Memos

Definitions:

Context -These are the areas that you want to be notified with this memo. You can select just on or multiple contexts for a specific memo. If you want to add a context after you have created a memo, you need to create a new memo record.

Content – This is your memos message, tailored to the contexts where the message is pertinent.

Acknowledge – Acknowledging the memo will stop the message from being displayed in all of the contexts.

Delete – Removes the memo, never to be seen or heard from again.
Chart Talk Memo Dock
The Chart Talk Memo Dock is on the right side of your screen.

Memo Mangement Screen

The memo management screen list each combination of memo content and context seperately. In the memo dock these messages will be grouped together and will all be acknowledged at the same time.

Creating a Memo

Contexts

    1. Clinic Schedule

– Visual indicator that memo exisits on appointment block. When scheduling an appointment for a patient, Memo dock will display memo content.

    1. Route Slip

– All active memos will be listed on patient route slip below header information.

    1. Auto Post Screen

– When posting payments for a patient, Memo dock will display memo content.

    1. Check Input Tool

– When entering payments for a patient, Memo dock will display memo content.

    1. SOAP

– – When launching or viewing the SOAP screen for a patient, Memo dock will display memo content.

    1. Billing Screen

– When entering payments for a patient, Memo dock will display memo content.

    1. Patient Payment Screen

– Visual indicator that memo is active for this context on appointment block. When scheduling an appointment for a patient, Memo dock will display memo content.

    1. Clinic Dashboard

– Visual indicator that memo exisits on appointment row.

Content

Up to 2000 Characters in length. If the memo content needs to exceed 2000 characters, consider using File Cabinet and templates for the message and memo as a reminder.

LINKS:

How to enable Memos
How to use Memos

Payer Information (Patient)

Navigate to Patient

Information

Payer Information


  1. Chose Insured or Non Insured
  2. Payer Name
  3. Pick applicable preference
  4. Click box to make active
  5. Click Add

  6. Member( clinic Reference)
  7. Insurance ID (REQUIRED FIELD)
  8. Type (Clinic Reference)
  9. Group Number
  10. Co-Pay($) (will populate an alert with ($) amount when checking in from clinic Dashboard)
  11. Co-Insurance(%)
  12. Relation (depending on who is selected information is pulled from General Information)
  13. Fields 12 – 21 only active in Relation is not SELF
  14. First Name (depending on who is selected information is pulled from General Information)
  15. Middle Name (depending on who is selected information is pulled from General Information)
  16. Last Name (depending on who is selected information is pulled from General Information)
  17.  DOB (depending on who is selected information is pulled from General Information)
  18.  Sex (depending on who is selected information is pulled from General Information)
  19. Street Address (depending on who is selected information is pulled from General Information)
  20.  City (depending on who is selected information is pulled from General Information)
  21.  State (depending on who is selected information is pulled from General Information)
  22.  Zip (depending on who is selected information is pulled from General Information)
  23. Phone (depending on who is selected information is pulled from General Information)
  24. NPI Number( not used. Treating provider NPI pulls from user set up)

Authoriztions

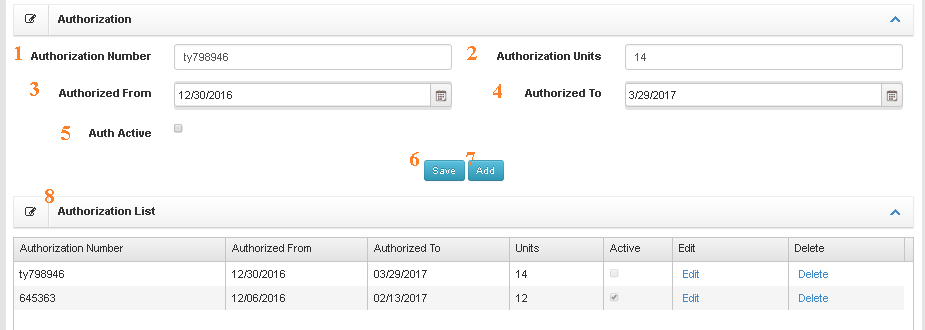
Insurance Authorizations

  1. Authorization Number – Reference number
  2. Authorization Units – Allowed visits
  3. Authorized from – Beginning date
  4. Authorized to – End date
  5. Auth Active – Only one authorization range can be active at a time
  6. Save
  7. Add – Clears fields to enter a new authorization if in edit mode.
  8. Authorization List – History of insurance authorizations for patient.
  9. Send Auth. in Edi- Will include Authorization number in Electronic Claim (only send if insurance requires, over rides other references)

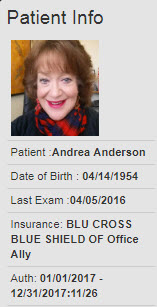
Patient Info

Patient info is a small glimpse of information for the selected patient.

Patient Info displays a photo of the patient. Add Patient Photo
Patient Name
Date of Birth
Insurance- Primary payer will be listed. If there is insurance the company will be listed or non-insured payer name.
Last Exam- Calculated from the checkbox on a visit.
Auth- If there is an authorized amount of visits in a time period entered in patient payer info.

Referring Provider (Patient Menu)

  1. Select Provider – List is populated by master referring provider table
  2. Assign provider – Adds selected provider to list and brings up detail entry tool.
  3. Add referring provider – Add a referring provider to the master referring provider table from this screen
  4. Main – Only one entry can be main. When marked main the referring provider inforamtion will be included in box 17 of the CMS 1500
  5. Referring Provider
  6. Qualifier – Included in box 17 of CMS 1500
  7. Referral Date
  8. Referring Reason
  9. Edit Record
  10. Delete Record

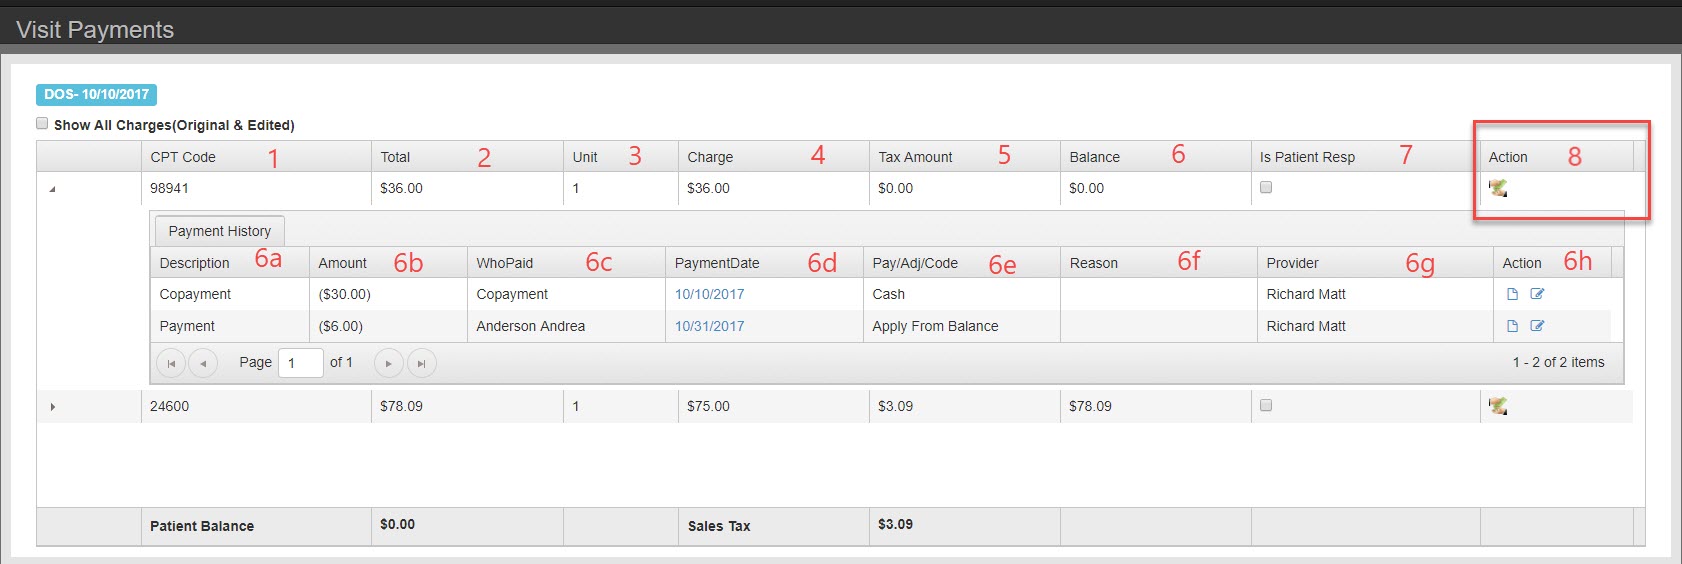
Manage Payments – More Info

  1. The first column is procedures: CPT, Gcodes, or other office codes.  Each individual procedure is presented in a single row.  Payments and adjustments can be applied on a charge by charge basis.
  2. Total – charge x units
  3. Unit – number of units billed for the specific procedure
  4. Charge – cost per unit of service
  5. Tax amount – if the charge is taxable, the amount of tax calculated into the balance.
  6. Balance – Sum of Charge and Tax minus all payments listed in Payment History
    1. Description – Payment, Copay, or adjustment
    2. Amount – Amount applied
    3. WhoPaid – Payer or Guarantor. If co-payment tool was used it will say Co-payment
    4. Payment Date – date the payment was applied to the charge (not always the date payment was taken)
    5. Payment Adjustment Code – Further classification of payment or adjustment. Each selection available is based on the description.  For payment guarantor you have options for check, chash, visa, master card, etc. For payment from payer you have options Ins Check, direct deposit, etc.
    6. Reason – Select reason for an adjustment for practice analysis reporting
    7. Provider – Provider the charge is associated with.
    8. Action: print a receipt or edit the payment record.
  7. Is Patient Responsible – check here if patient for the remainder of charges
  8. Add payment- Apply payment per line item. You can add a new payment or apply from credit balance.
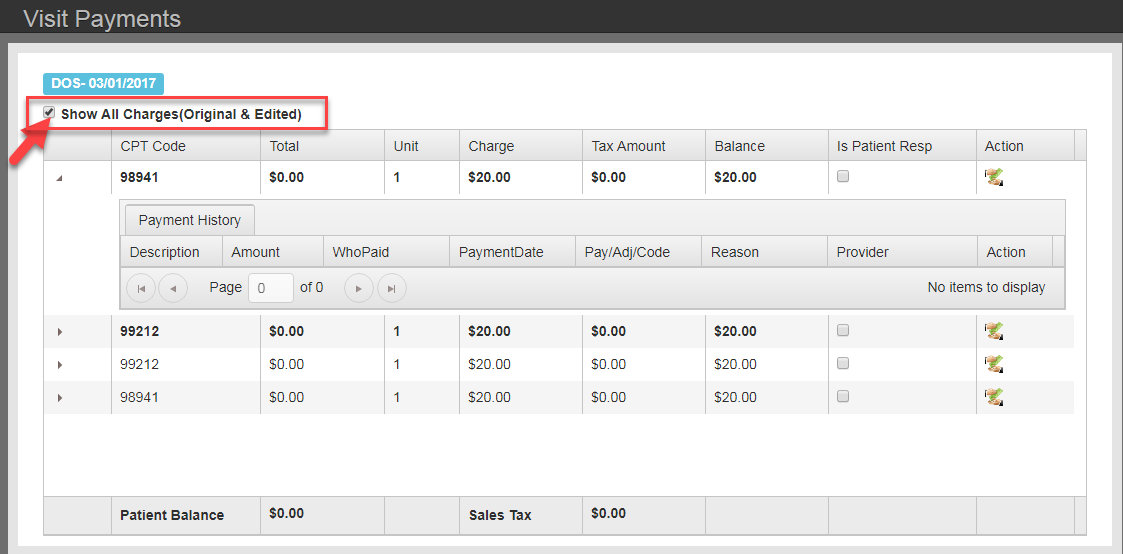
In this screen you can switch between looking at original charges or just edited charges.
The edited charges are codes that were changed in billing when creating a corrected claim.
Anything that is bold is an edited charge.