Billing

The Billing Screen holds all charges that should be sent to insurance
A - Filter Values
Enter the filter values and click the ‘Filter’ button to apply. Clear the filter by using the ‘Reset’ button.
TEXT FIELDS
Claim Id – Search for a specific claim
Last Name – Filter list by patient last name, First Name- filter list to include first name
From Date – Filter list by date of service beginning of range date
To Date – Filter list by date of service end of range date
CHECKBOXES
New – Filter all claims with status NEW
Submitted – Filter all claims with status Submitted
Acknowledged – Filter all claims with status Acknowledged
Needs Review- Filter all claims with status Needs Review
Processed – Filter all claims with status Processed
Finished – Filter all claims with status Finished
BUTTONS
Filter – Apply filter values
Reset – Clear all filter values
Submit – Batch send selected new claims to the primary insurer, generate printed 1500 for payers with default paper setting.
DROP DOWN MENU
Provider- filter by provider

Claim Status Key

Status Submitted, Acknowledged, Needs Review, and Processed can only be set via automated electronic billing processes within Chart Talk and your clearing house.

White On Hold. Only new claims can be put on hold. Claims on hold can only be returned to a status of New.Claims in hold status will not be include in batch submissions
Grey Printed. Claims that have been printed can be manually changed to printed status.
Rose Submitted. New claims that have been electronically submitted will be changed to submitted status until other EDI communication is received from the clearing house.
Olive Green Acknowledged. Claims that have been received by the clearing house CAN be acknowledged via electronic communication (EDI 999). Your specific clearinghouse determines how these files are sent back.
Orange Needs Review. Communication from Payer or clearinghouse has been relayed through the clearing house. Claim not accepted needs further review.
Bright Green Processed. Electronic remit has been received and can be viewed or processed.
Black Finished. Hide the claim from the list and set all remaining balances to patient responsibility.

  1. Expand claim details
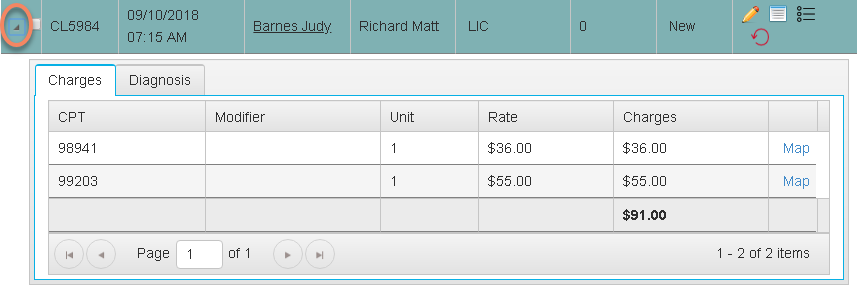
    Chart Talk Medical Billing for Chiropractic Expanded Charge
    An expanded charge in Chart Talk. Use the action tools to edit charge details. Use the mapping tool to manage the mapping details from charge to diagnosis.
  2. Select new claim (box at top of column selects all new claims) – used for batch claim submission
  3. ID # – Claim ID Number
  4. Visit Time – DOS
  5. Patient Name – – can click it will bring you to patient dashboard
  6. Provider Name – From Seen By field on Visit screen
  7. HCFA Count  – The Number of times a 1500 has been generated for selected claim
  8. Status – Drop down list allows users to change claim status to On Hold, Printed, and Finished. Other status are reserved for messaging submitted by your clearing house.
  9. Action –
    Pencil/Edit-modify rate of charge before submission.
    Click to view detail- to print paper claims. Shows previous dates a claim was sent. ** NOTE: all details pertaining 277/999 Received from clearinghouse for acknowledged or Needs Review Claims can be viewed here.
    Loops- send to secondary payer and correct a claim.
    Reset Claim- resets back to the visit for edits before a claim is submitted

Inbox

Selected messages will display in the lower details section.

inbox

Filters

  1. Date Range
  2. Active if Date Range = Custom
  3. Active if Date Range = Custom
  4. Select Provider – Filter by clinic staff that sent message
  5. Messages

  6. Delete – Tic box and click Delete button [13] to delete a message
  7. From – User/patient/representative that composed the message
  8. Subject/Read Status – if Dot is Green, message has not been viewed and will not count towards being read. When the Dot is Grey, message has been viewed previously. Unread messages cannot be deleted.
  9. Recieved Date
  10. Patient – Patient message is regarding
  11. Sent By – User/patient/representative that composed the message
  12. Delete Selected – will delete selected messages
  13. Reply
  14. Forward

Details

Displays content of selected message

Compose Message

Message_Compose

    Send to

  1. Staff
  2. Patient
  3. Patient Representative
  4. Selection Tool

  5. Selection List – based on above filters
  6. Add >> – Move highlighted name to recipient list
  7. << Remove - Remove highlighted name from recipient list
  8. Patient – Select the patient the message is regarding
  9. Reference – Additional qualifier
  10. Subject
  11. Message

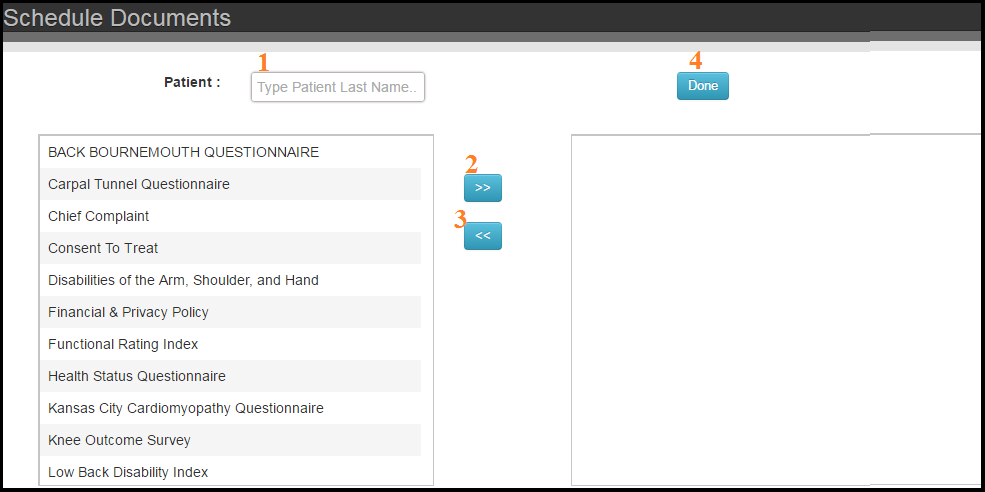
Assign New

Documents_AssignNew

  1. Patient – Select Patient
  2. Add Assigned Document
  3. Remove Assigned Document
  4. Done

Delete an assigned document:

  • Locate Patient: Last Name, First Name
  • Click the document on the right side table you wish to delete
  • Click the back arrow to move to left table
  • Click Done
  • Charges

      Filters- use to search for specific visit(s) in the ‘Charges Screen’

    1. Insured/Non Insured – Display list for patients with insured type primary payers/Display list for patients with non-insured type primary payers
    2. Charge ID
    3. Last Name, First Name
    4. Actions

    5. Filter – Apply filters
    6. Reset – Clear all filters
    7. Process for billing – Process selected claim(s) for billing
    8. Data Columns

    9. Expand details
    10. Charge ID
    11. Visit Time
    12. Duration
    13. Patient Name- click it will bring you to the patients dashboard
    14. Staff Name/ Seen by
    15. Payer Name
    16. Trash Bin – Delete charge and reset appointment status or process single charge to billing.