Clinic

PM_Clinic

  1. Clinic Name : This is the title that will appear along the header of your reports.
  2. Business Name : This is uneditable. Thifield holds the subdomain of your Chart Talk URL.
  3. City: *Field is Redundant/Scheduled to be removed*
  4. Tax Rate: Tax rate applied to codes marked ‘isTaxable’

Charges

    Filters- use to search for specific visit(s) in the ‘Charges Screen’

  1. Insured/Non Insured – Display list for patients with insured type primary payers/Display list for patients with non-insured type primary payers
  2. Charge ID
  3. Last Name, First Name
  4. Actions

  5. Filter – Apply filters
  6. Reset – Clear all filters
  7. Process for billing – Process selected claim(s) for billing
  8. Data Columns

  9. Expand details
  10. Charge ID
  11. Visit Time
  12. Duration
  13. Patient Name- click it will bring you to the patients dashboard
  14. Staff Name/ Seen by
  15. Payer Name
  16. Trash Bin – Delete charge and reset appointment status or process single charge to billing.

Medication Library

The medication library is a comprehensive list of all medication available to be selected for the individual patient medication list.

Chart Talk Medication Library
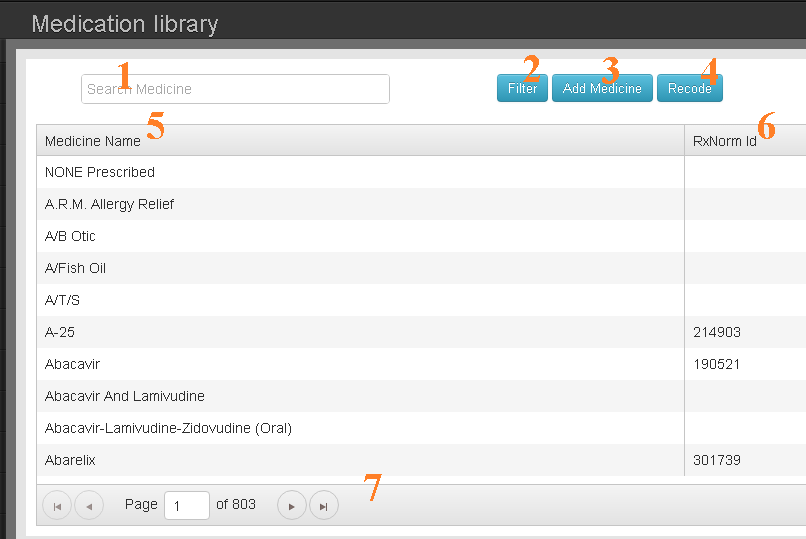
The Chart Talk Medication Library allows you to search, filter, and add medication and RxNorm codes
  1. Search Box- Type part or all of a medication name *NOTE – does not dynamically filter list
  2. Filter Button- Limits the list results to values containing text from the Search Box
  3. Add Medicine Button- If filter returns no results, this button will add the medication to the library and search for RxNorm values matching the medication name
  4. Recode Button –
    • When Medication is selected – Select a medication from the list by clicking on the row. Press recode while a medication is selected will search for a match in the NLM and return the RxNorm value.
    • When no medication is selected – Chart Talk will attempt to recode the entire medication library. *This can be data intensive and we advise you to only do this after business hours to keep other Chart Talk functionality responsive for all users.
  5. Medicine Name Column – Text value of medication
  6. RxNorm ID Column – coded value of medication
  7. List Navigation Controls – Page forward, backward, jump to page.

SUBMENU: Medical

NAVIGATION:

  1. Access the patient page
  2. Expand the Medical Menu from the Patient Navigation Menu<
  3. Select the Submenu item

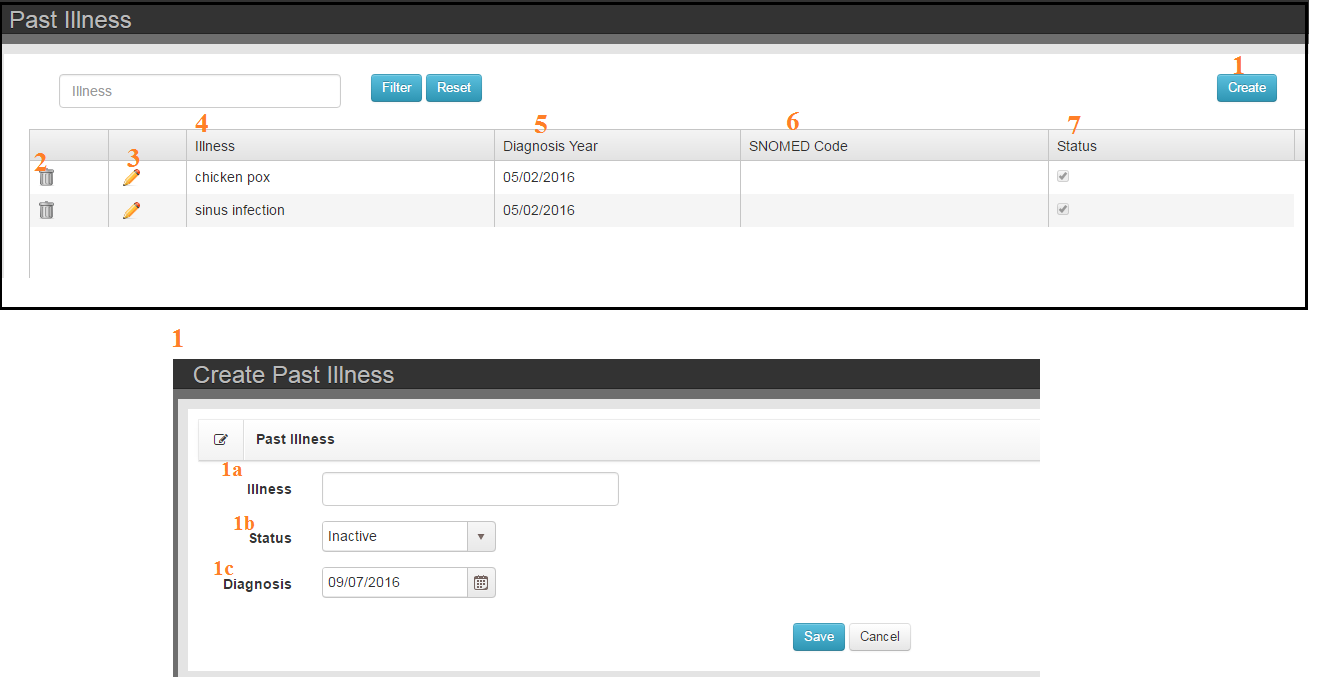
The Medical tab is in the Patient Navigation Menu for each Patient. By clicking on the arrow at the right side of the tab, a drop down list will display. This list includes: Problem List, Vitals, Family History, Social History, Past Illness, Hospitalization, Injuries and Medications and Allergies. Click on each tab to be able to create, review or update records.

An overview of the Medical Tab can be seen from the Dashboard Tab also. Any tab on the Dashboard that has a plus sign can have data entered through the Dashboard and will store with in the selected Medical Sub-menu.

File Cabinet

NAVIGATION:

  1. Access the patient page
  2. Select File Cabinet from the navigation menu.
Chart Talk File Cabinet Main Screen
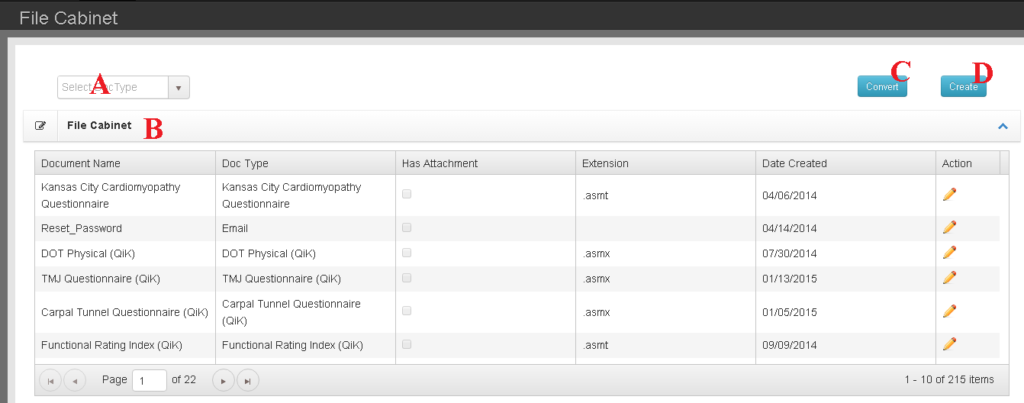
List of all documents in the patient file cabinet.

A. Drop down filter allows you to limit which documents are visible in the File Cabinet list (B).
B. The File Cabinet list shows document details as well as provides a link (pencil icon) to open the document for review, modification and printing.
C. The Convert button moves attached files from the outdated Chart Talk Desktop document structure into the supported Chart Talk Cloud architecture.
D. The create button opens a new record.

CREATE:

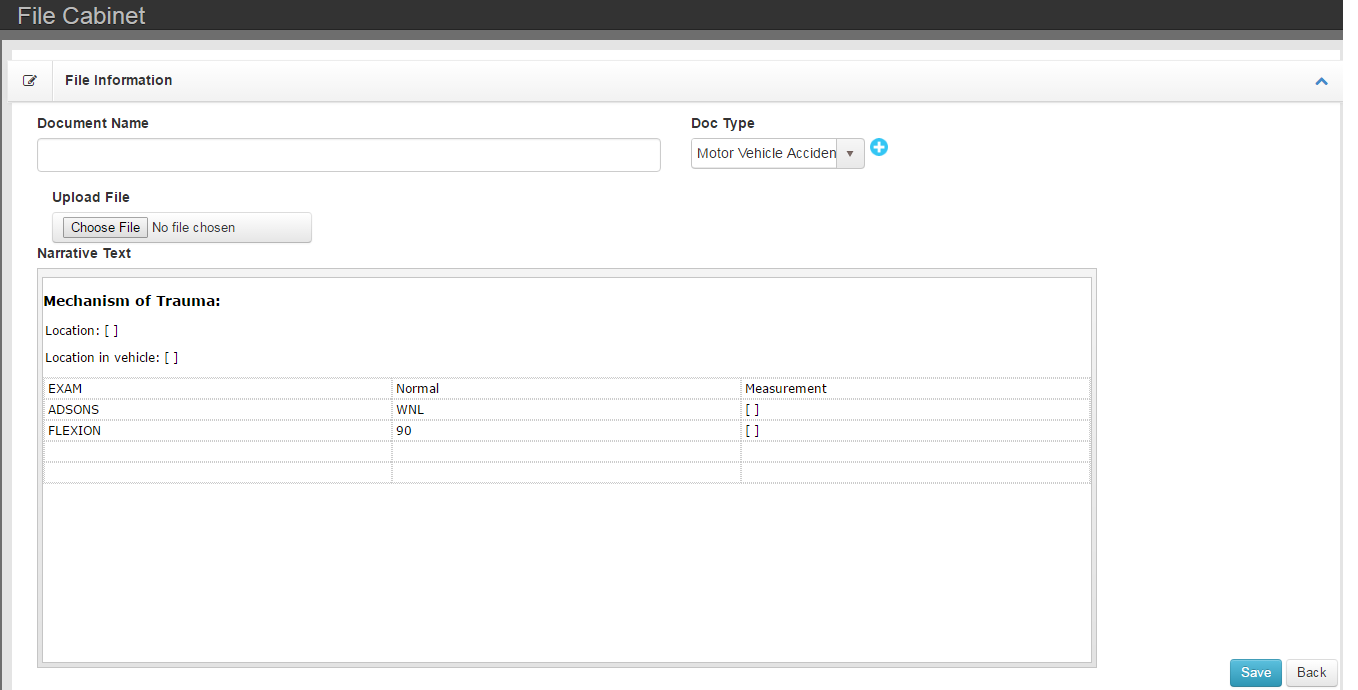
new file cab doc


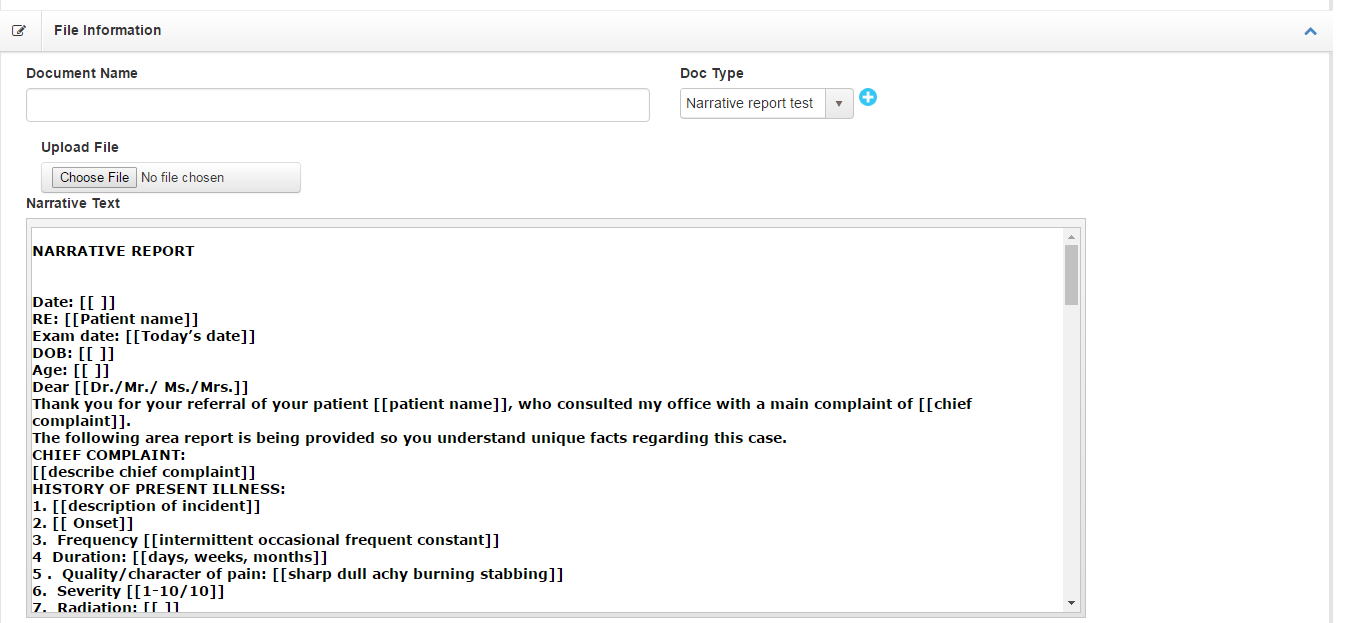
A. Document Name- allows you to create and customize the name of your document.
B. Document Type- list shows various pre-loaded document types or classifications. When selecting a document that is already loaded into the interface, the template previously saved will populate and allow user to customize report for the patient visit and save into their file cabinet.(see sample of narrative report and MVA report in Narrative Templates below).
C. The Upload File button allows user to upload a previously saved document from their desktop or external files.
D. Narrative text- allows the user to draft a new document from scratch.

filecab narrative report

filecab MVA report

Vitals

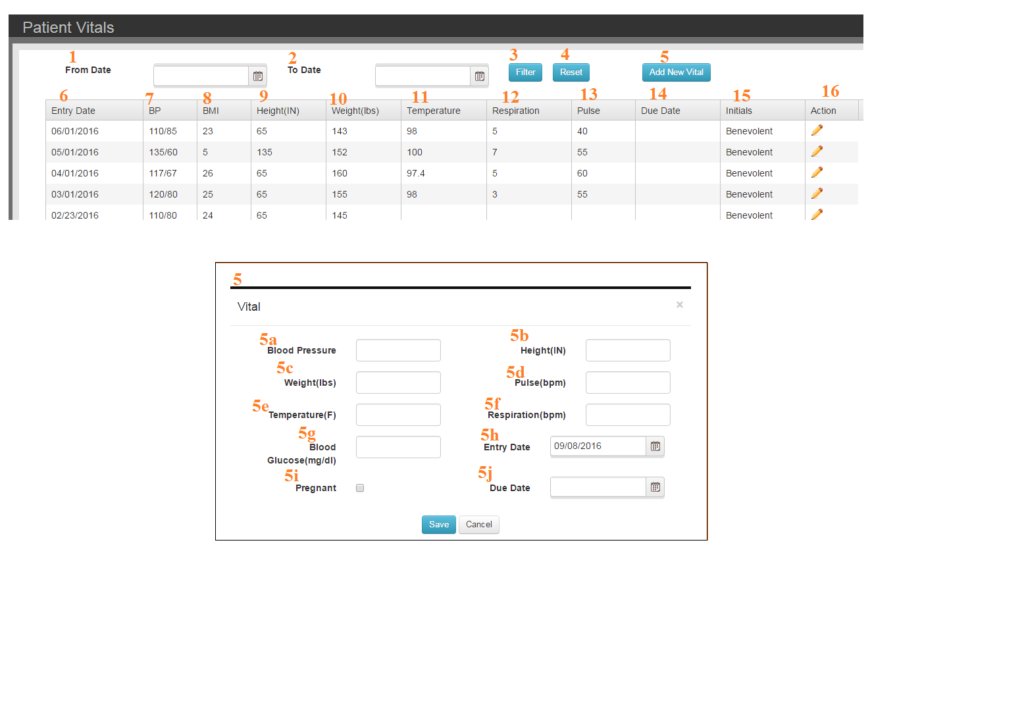
Vitals Record List

  1. Access the patient page
  2. Expand the Medical Menu
  3. Select Vitals
    Patient_Vital

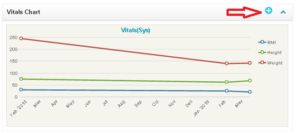
Add Vitals from Vitals Widget

  1. Access the patient dashboard
  2. Click the ‘+’ sign on the bar above the graph.Medical Menu
Plot of patient height, weight & BMI are available on the Vitals Widget
The vitals widget is available on the Patient Dashboard

ENTERING DATA:

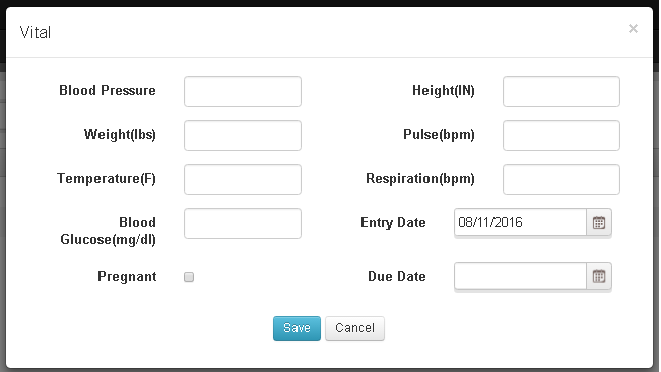
From the Vitals Record List, select the pencil icon to edit a record or the Add New Vital button to open the Vitals Entry Tool.

Vital entry tool tracks blood pressure, height, wieght, temperature, heart rate, pregnancy status, and calculates BMI automatically.
Enter and edit patient vital records using the Vitals Entry Tool

Medications

Medications

  1. Medication
  2. Strength
  3. Dosage
  4. Frequency
  5. Start Date
  6. End Date
  7. Active
  8. Entry Date
  9. NDCID
  10. Edit
  11. Delete
  12. Create (see below)

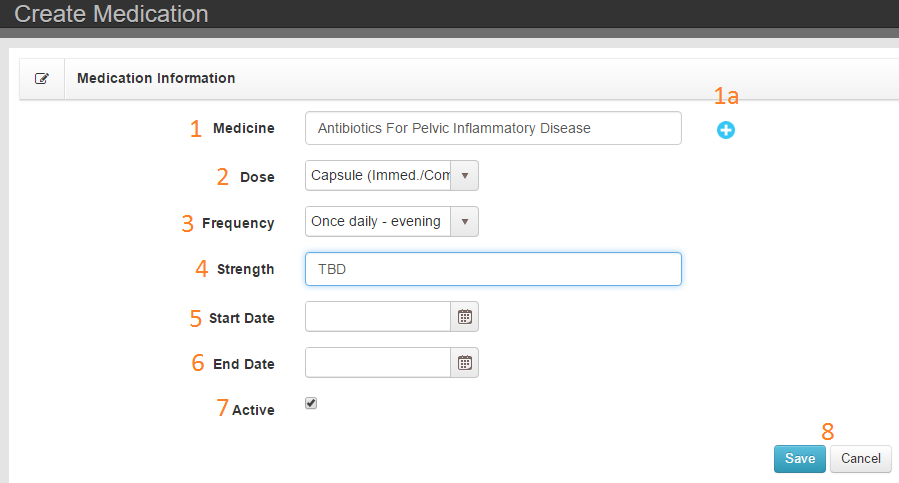
Adding a Medication

tools-medicine-create

  1. Medicine
    1. Launch Select  Medicine/Medication Tool
  2. Dose – Select Dose from drop down list
  3. Frequency – Select frequency from drop down list
  4. Strength  – Enter strength
  5. Start Date – Date patient stater taking medication
  6. End Date –  Date patient stopped taking medication
  7. Active – Patient is currently taking medication
  8. Save Button and Navigate back to Medication List