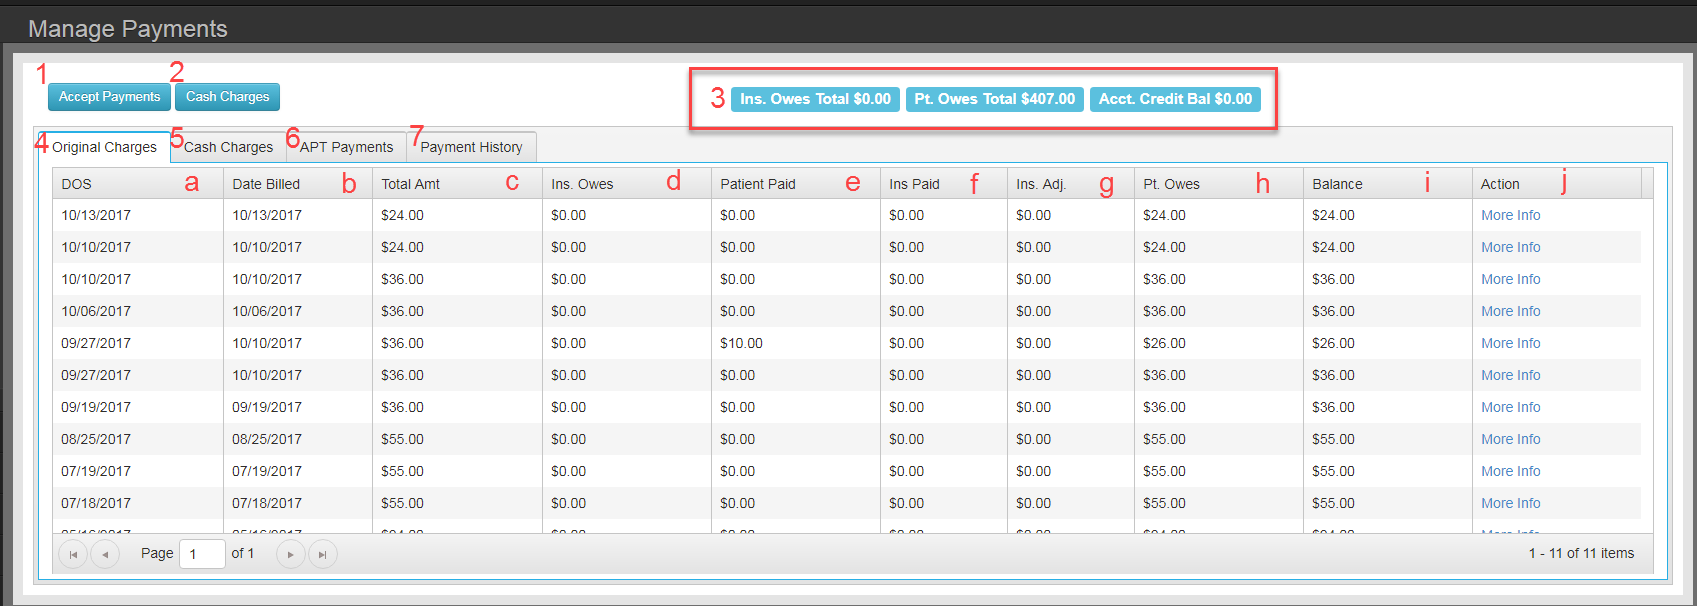
- Launch Accept Payment Tool
- Issue a charge for product or service without creating a DOS record
- Shows current account summary
- Original Charges Tab
- DOS – date of service/appointment
- Date billed – date the claim was generated for the DOS
- Total Amt – The sum total of the services and procedures for claim
- Ins owes – the sum amount of all charges not marked as patient responsibility
- Patient Paid – the sum amount of copayments and payments and adjustments from the patient or a patient guantor
- Insurance Paid – Amount auto posted or entered that has been marked a Payer as the payment source.
- Ins Adj – Amount attriubeted to Payers that is either marked adjustment or write off
- Pt Owes – Sum amount of claims totals marked as patient responsibility.
- Balance
- More Info – View/edit details of the specific transaction
- Cash Charges Tab (see below)
- APT Payments Tab (see below)
- Payment History (see below)
5. Cash Charges Tab
The Cash Charges Tab lists all sales made using the Cash Charges Tool.
-
- Date of Sale
- Total Amt
- Ins Owes – OBSOLETE
- Patient Paid –
- Ins Paid
- Ins Adj
- Pt Owes
- Balance
- Action – More Info – View/edit details of the specific transaction
6. APT Payments
View edit payments accepted and applied using the Accept Payment Tool (APT)

Column b – j show the payment details including total a,mount accepted and total amount applied from the payment. Expanding this row shows the itemized breakdown (columns k – o) of how the payment was applied.
-
- Filters
- Hide/Unhide Details
- DOP – Date of Payment. Date the payment was accepted
- Payment Type
- Amount – Total amount of payment
- Paid Amount – total of the funds from the payment that have been applied to patient charges
- Payer
- Guarantor
- Edit payment
- Print payment receipt
- Delete payment – A payment cannot be deleted if any of the transaction has been used to pay patient charges.
- DOS – Date of service payment was applied to
- Date of payment
- CPT Code – code payment was applied to
- Amount – money that payment was applied to
- Delete payment – Deleting a payment here will return Amount to the patient account credit balance.
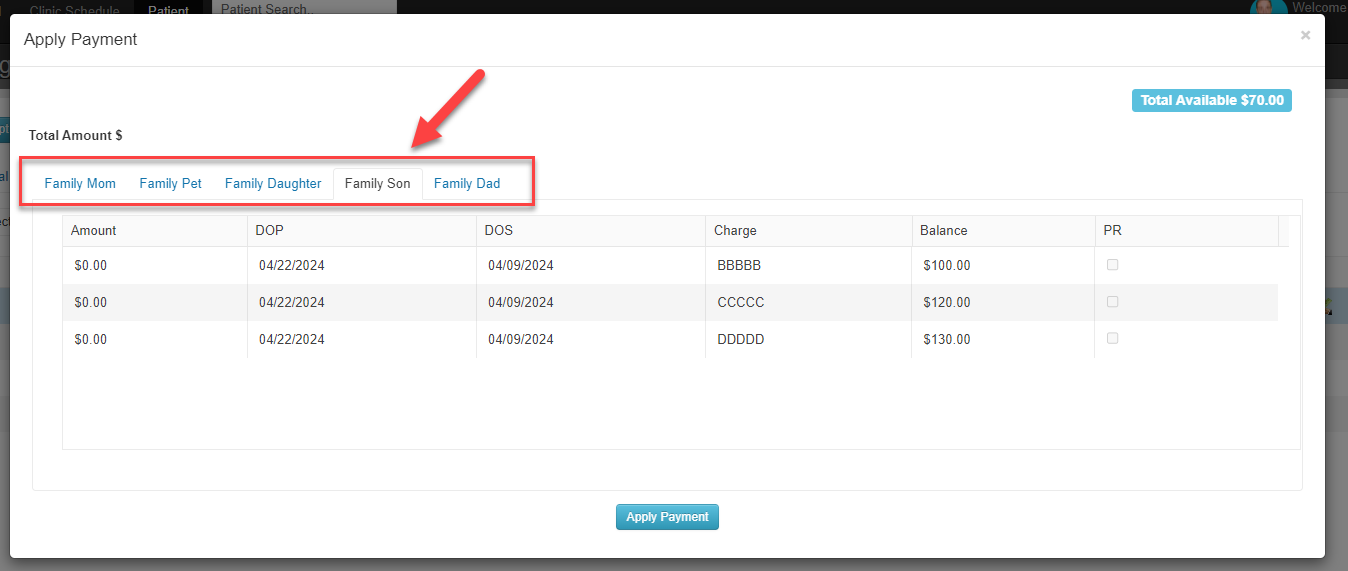
To apply payments from an entry with a blanace, click the Dollar Bill icon. You are presented with a selection of non-zero dollar charges for the selected patient and anyone they are the guarantor for.
7. Payment History
Payment applied using the more info tool, insurance check entry tool, or Auto Posted are listed on this tab

-
- Date of Service
- Date of Payment
- CPT
- Amount
- Payment Type
- Payer (if Insurance payment)
- Guarantor (If patient/guarantor payment)
- Notes
- View/edit details
- Delete payment
8. Guarantor Payments
Lists all payments that were applied to patient account using funds from a transaction made by someone other than the patient. Deleting the payment on this tab will return the funds to the guarantors credit balance.
9. Cards on File
-
- Cards on file – Only one can be active at a time.
- Add – Add a new card on file record
- Actions – Edit or delete a card on file.
- Guarantors – Any guarantors linked to other patient accounts show up here. If the Guarantor information is entered without linking to a patient, the information is not conveyed in this table.
1. Accept Payments Tool
Take a single payment from a patient and apply it to multiple outstanding charges. Payments made with the APT that are not applied to a charge are added to the Patient Account Credit balance.
*The APT applies payments using the oldest funds available first.

- Who Paid – Lists all payers and guarantors.
- Description – Will always be Payment
- Pay/Adj/Code – Cash, Check, or credit card
- Open Balances – the sum of all selected charges from the box below
- Charge selection – all charges with non-zero balance set to ‘Patient Responsibility’. Chacking the box will apply payments to the charges from oldest to most recent
- Patient Account Balance – Available funds from prepay/credits on the patient account
- Check # Auth – A field to enter CC transaction info or check number
- Amount – Total of transaction
- Notes – Open text field
- Save button – Apply the payments from 1 – 10 to the selected charges
- Apply From Balance – If applying from a balance then only charges need to be selected. Boxes 1-4 & 6 – 10 not necessary.
- If you accept payment greater than the sum from field 4, the balance is applied to Patient Account Balance
- If you accept a payment without selecting any charges, funds will be allocated to Patient Account Balance
- After you save or Apply From Balance, you will be asked if you want to print a reciept.
- All the details from boxes 1 – 10 will be listed when you examine individual claims using the More Info Tool.
- If the Patient or selected guarantor has an active card on file, ‘Use Card on File’ will be an option to charge the detialed payment.
2. Cash Charge Tool

-
- CPT/Billing Codes – Enter the code for the product or service
- Enter the number of units
- Enter a dollar value discount if applicable
- Save will add the record the the transaction box below. There is no limit of items that can be saved into the transaction box.
- The code you entered above appears here.
- If there is a fee already associated with the CPT code it will appear here. You can also double click on the fee and change it by typing in an amount or by clicking the arrows up or down.
- Units can be entered in when entering in the CPT code before you save or can be changed by double clicking. It can be changed by typing in a new unit quantity or by using the arrows up or down.
- Total automatically adds up to subtotal before any tax if applicable. Charge x Units= Total
- Any discount (in dollar amount) will be deducted from the subtotal if put in here.
- Tax will automatically be calculated if it was configured to have tax but if you need to add tax manually double click on the box and enter in value.
- Remove line item from transaction box
- Finish- will save it to your “Cash Charges” tab in Manage Payments.
- Finish and pay- will save it to “Cash Charges” tab in Manage payments and will bring up the Accept Payment Tool to apply payment to the cash charge.
Related Page: Apply Payments