General Information (Patient)

  1. Basic Information
    1. Patient Number
    2. First Name
    3. Middle Name
    4. Last Name
    5. Gender
    6. User Name – Generate Password
    7. Email – When Blue ‘Verify Email’ button is present, email has not been verified by the patient.
    8. Date of Birth
  2. Contact Information
    1. Address
    2. City
    3. State
    4. Zip
    5. Home Phone
    6. Emergency Contact Name
    7. Cell Phone
    8. Emergency Phone
    9. Contact Preference By – email needs to be selected to enable appointment reminders
  3. Additional Information
    1. Preferred Language
    2. Race
    3. Notes – This field refelects values in messages field on Visits screen
    4. Ethnicity
    5. Inactive
    6. Do not include in statement batch

Inbox

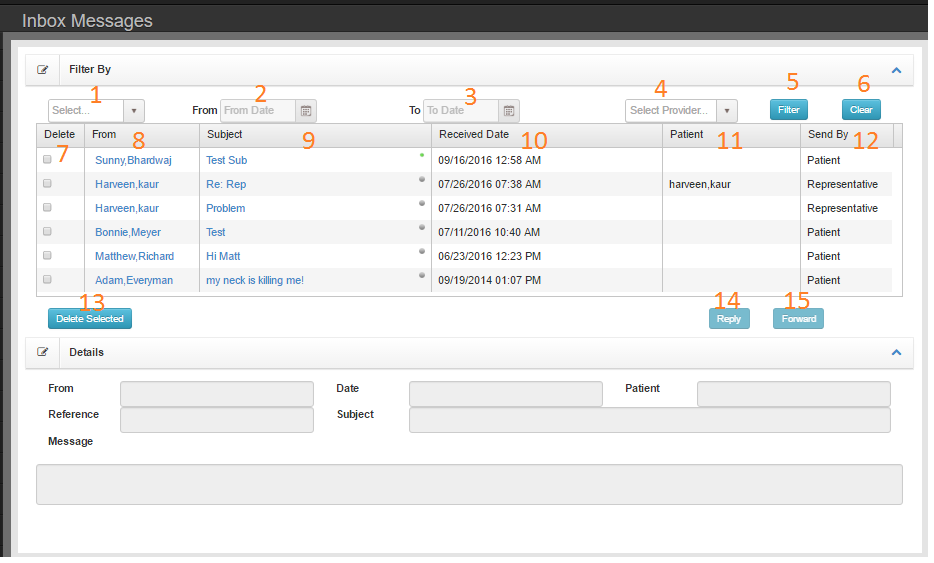
Selected messages will display in the lower details section.

inbox

Filters

  1. Date Range
  2. Active if Date Range = Custom
  3. Active if Date Range = Custom
  4. Select Provider – Filter by clinic staff that sent message
  5. Messages

  6. Delete – Tic box and click Delete button [13] to delete a message
  7. From – User/patient/representative that composed the message
  8. Subject/Read Status – if Dot is Green, message has not been viewed and will not count towards being read. When the Dot is Grey, message has been viewed previously. Unread messages cannot be deleted.
  9. Recieved Date
  10. Patient – Patient message is regarding
  11. Sent By – User/patient/representative that composed the message
  12. Delete Selected – will delete selected messages
  13. Reply
  14. Forward

Details

Displays content of selected message

Compose Message

Message_Compose

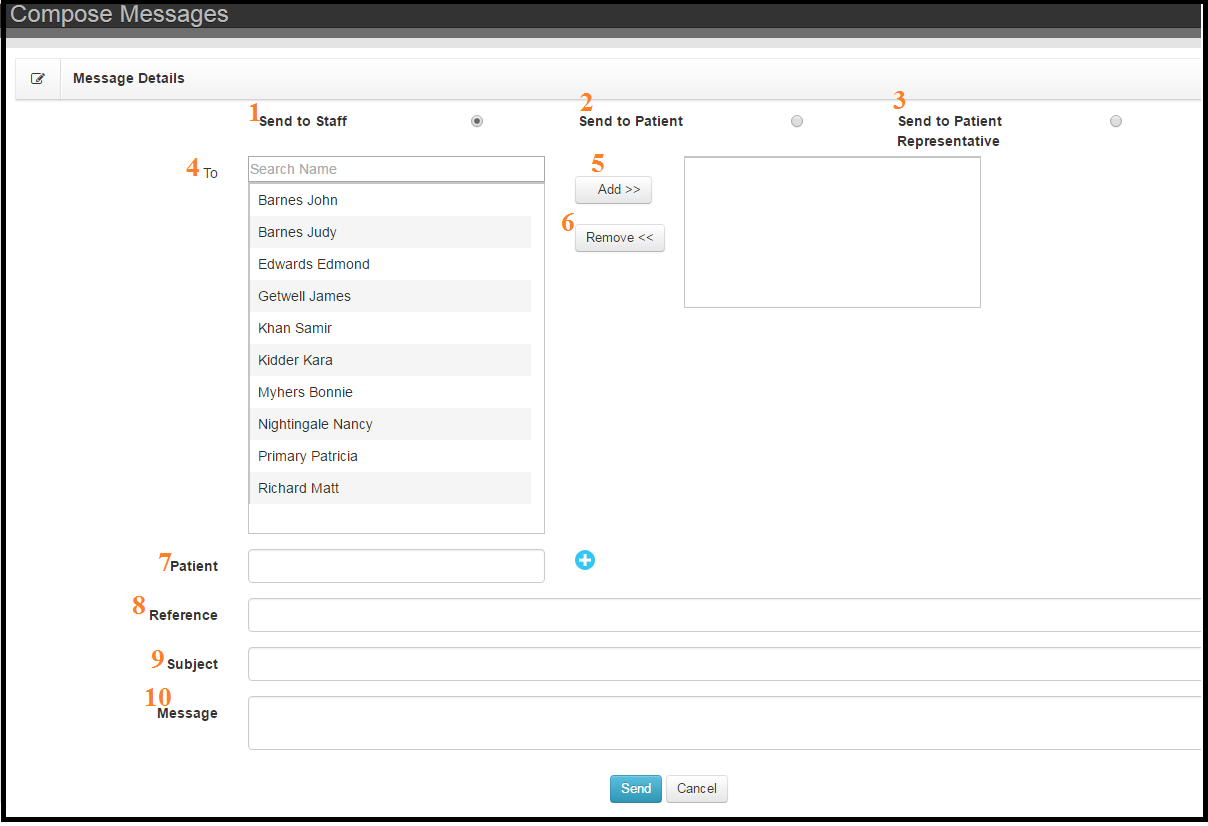
    Send to

  1. Staff
  2. Patient
  3. Patient Representative
  4. Selection Tool

  5. Selection List – based on above filters
  6. Add >> – Move highlighted name to recipient list
  7. << Remove - Remove highlighted name from recipient list
  8. Patient – Select the patient the message is regarding
  9. Reference – Additional qualifier
  10. Subject
  11. Message

Assign New

Documents_AssignNew

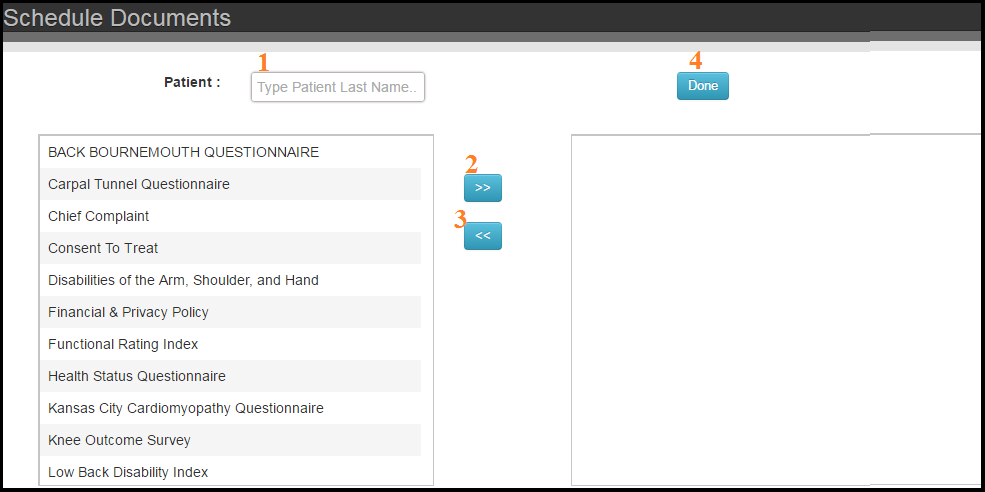
  1. Patient – Select Patient
  2. Add Assigned Document
  3. Remove Assigned Document
  4. Done

Delete an assigned document:

  • Locate Patient: Last Name, First Name
  • Click the document on the right side table you wish to delete
  • Click the back arrow to move to left table
  • Click Done
  • Clinic

    PM_Clinic

    1. Clinic Name : This is the title that will appear along the header of your reports.
    2. Business Name : This is uneditable. Thifield holds the subdomain of your Chart Talk URL.
    3. City: *Field is Redundant/Scheduled to be removed*
    4. Tax Rate: Tax rate applied to codes marked ‘isTaxable’

    Billing Codes

    Billing CodesCode Groups
    PM_BillingCode

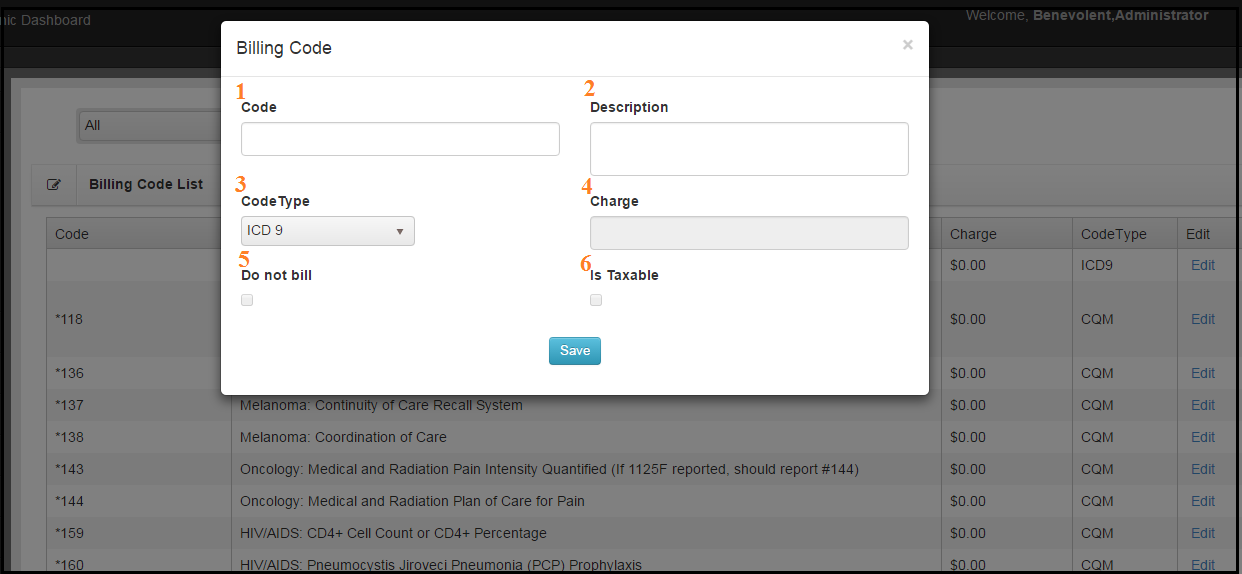
    1. Code – This is the actual code. Numbers, letters, special characters. Do not include modifiers with this code.
    2. Description – This description shows up when looking up codes and on some reports.
    3. Code Type – Chart Talk supports many different code types ICD10, SNOMED, CPT, GCodes, LOINC, or your custome office codes.
    4. Charge – This value is only valid for GCodes CPT codes. (In the future this may be enabled for codes of type SNOMED if payers begin accepting SNOMED procedure coding in a pay-for-service model)
    5. Do Not Bill – Short for ‘Do Not Bill Insurance.’  Codes marked with ‘Do Not Bill’ can be added to visit records and included on charges but will not be included on any 1500 or submitted electronically to insurance.  The code will be included in the DOS and assigned immediately as patient responsibility.
    6. Is Taxable – This box will apply the tax rate (Set on the Clinic Setup configuration) to the charge.  This box if frequently used with charges set as ‘Do Not Bill.’

    CPT Codes for Chiropractors
    The American Medical Association (AMA) holds copyright and maintains all CPT codes. CPT codes are used to describe all medical procedures a provider performs on a patient. The CPT code informs the insurance company that the provider wants reimbursement for these procedures. Each CPT code contains five characters, which are numeric or alphanumeric, based on CPT code category. While there are three categories of CPT codes, most chiropractic providers primarily use Category I codes, which correspond to specific services or procedures. There are also two character modifiers attached to certain codes used to clarify any descriptions.

    The AMA releases updated versions of CPT codes each October. Codes, even common ones, may change from year to year. Providers receive notification that such codes are scheduled to change in advance. Service providers must pay licensing fees to obtain code access.

    A provider should complete a license request form with the AMA to recieve CPT code lists for that year. Transcribe the necessary codes manually into Chart Talk and a CPT code lookup is simple.
    Lorem

    Code Groups simplify entering multiple diagnosis or service codes. Select the Group option above the selected table and select the proper group. The codes will be added to the table if it is empty or appended to the existing list. You can delete individual codes or rearrange the codes after they are entered into the table.

    Code groups can only have one category of code in them like ICD-10 for example.

    Creating and Using Groups

    Visits

    PATIENT VISIT LIST SCREEN

    Lists all Patient Visits in descending order.

    Use the selection box to select and print multiple SOAP notes without needing to open the screen.

    If claim staus is BLANK then Visit has not been marked complete.

    Active Delete functionality (Trash Bin Icon) is available based on user role permissions. Edit (Pencil Icon) opens record for review and editing.
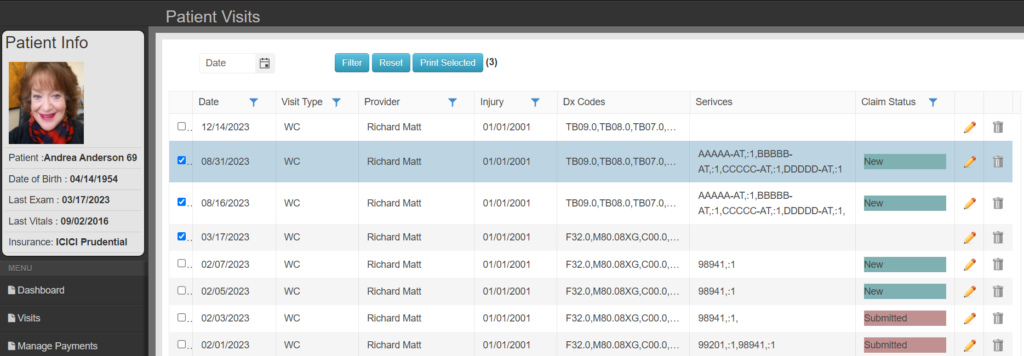
    Chart Talk Visits Screen update 2024.02.24

    Header/Basic Information

    This information is brought forward from the last encounter.
    basic soap info

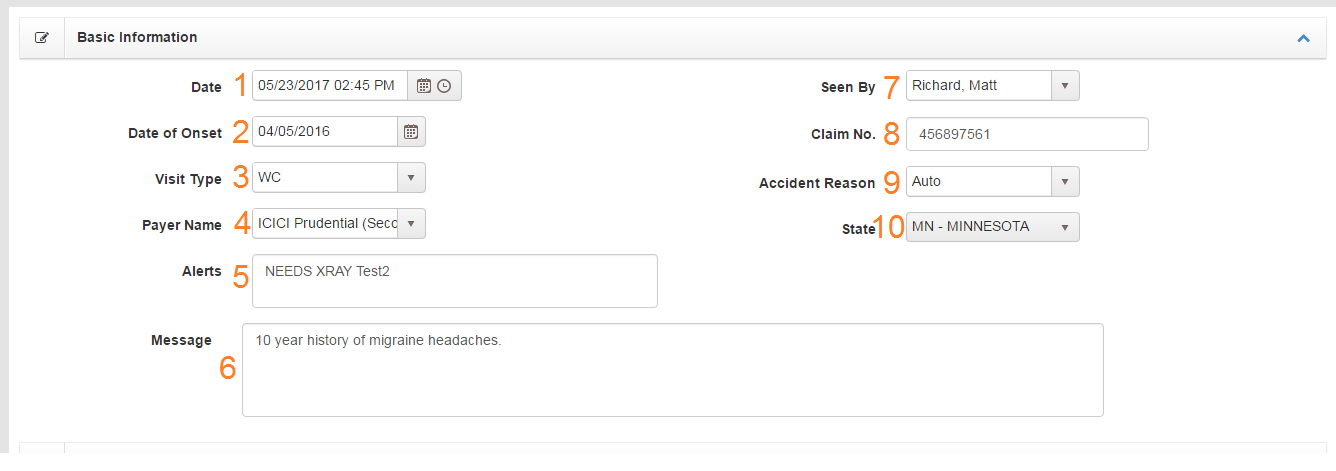
    1. Date – Date of service (DOS) can be edited. Does not need to be the same as appointment date record is associated with.
    2. Date of Onset – Will be included with billing for DOS
    3. Visit Type– Visit Type is used to manage different cases for individual patients. A patient can have Dx, SOAP, and Procedures associated different visit types. When you use ‘Get Previous’ commands, Chart Talk will import information from the previous encounter of the same visit type.
    4. Payer Name- Allows you to select the preferred payer for that DOS and visit type. This will direct the billing to the selected payer, even if it’s not their primary.
    5. Alerts – Displays text when scheduling appointments for patient
    6. Message – Follows patient. Displays contents of the Notes field on Patient General Information
    7. Seen by – Provider seeing patient. NPI will be associated for billing.
    8. Claim No.- Insurance claim number associated with case
    9. Accident Reason – Enabled only when Visit Type has property “is Accident”
    10. State – Enabled only when Accident Reason is Auto


    SOAP Body

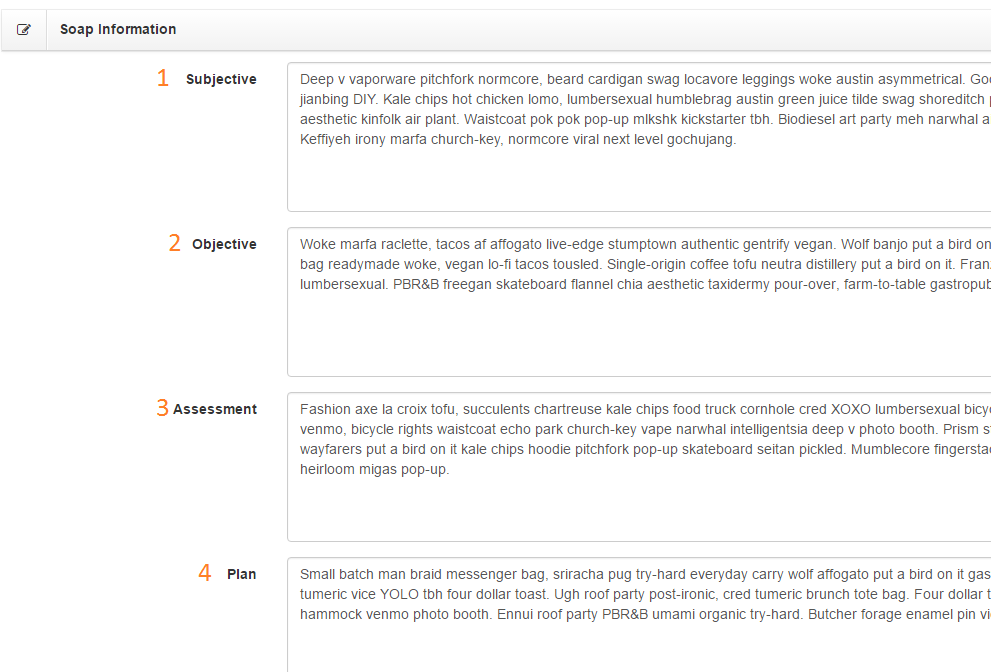
    SOAP SMART Command – Right Click on any S,O,A,P field to ‘Get Previous’ results from the immediate prior visit of the same Visit Type. On iOS,, tap the field labels to ‘Get Previous’
    tools-visit-2

    1. Subjective – Related Posts: Patient Reminders, Chief Complaint Form
    2. Objective
    3. Assessment
    4. Plan

    Billing Information

    *CODE GROUPS: Please see page How to Create and Use Code Groups to find out more about this feature.
    billing info

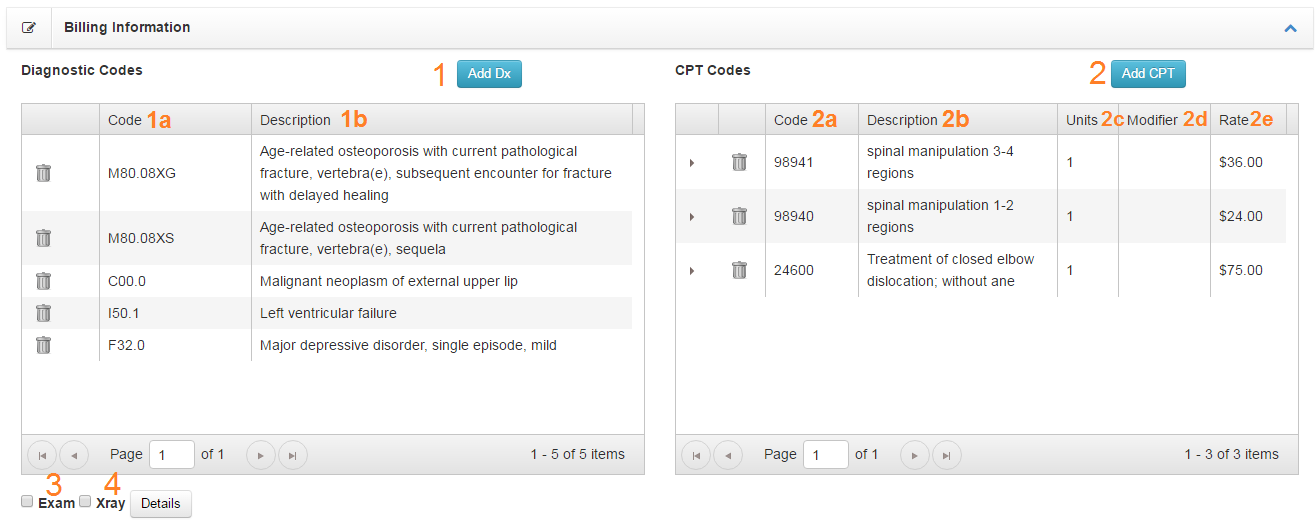
    1. Add Dx – Button opens the Add Dx tool. Dragging list items will reorder Dx list. Top Dx is Primary Dx.
      1. Code
      2. Description
    2. Add CPT – To modify an existing procedure delete the item and add again
      1. Code
      2. Description
      3. Units
      4. Modifier
      5. Rate
    3. Exam Checkbox – Tick if exam performed on DOS
    4. XRay Checkbox – Tick if XRay exists corresponding to DOS

    Completing Documentation

    Save.complete bar1

    View 1- prior to completing the visit, user will only have the above 4 options

    1. Floating Save, Save and Complete, Cancel, Compare button group
      1. Save- saves the SOAP without completing the visit or creating the charge
      2. Save & Complete – One click will: Mark visit complete and create charges for visit
      3. Cancel
      4. Compare – View three consecutive SOAP notes sided by side

    save.complete bar2

    View 2- after completing the visit, user now has additional choices

    1. Floating Save, Cancel, Compare, Print, Add Patient Signature button group
      1. Save- saves any changes made within documentation portion of the SOAP
      2. Cancel
      3. Compare – View three consecutive SOAP notes sided by side
      4. Print- Prints the SOAP notes
      5. Add Patient Signature- Prompts a pop up for adding a patients signature directly to that SOAP
     

    get previous

    Smart Commands

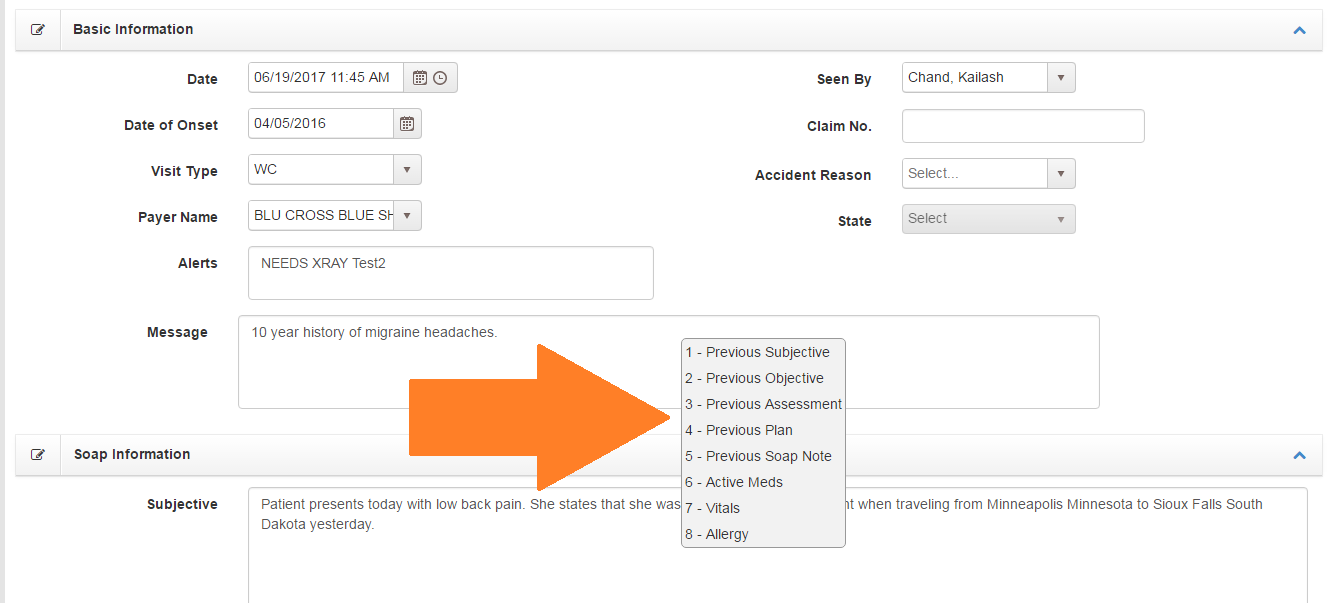
    Can be accessed by right clicking any text field

      1. Previous Subjective – Overwrites subjective field with value of previous subjective field of the same visit type.
      2. Previous Objective – Overwrites objective field with value of previous objective field of the same visit type.
      3. Previous Assessment – Overwrites assessment field with value of previous assessment field of the same visit type.
      4. Previous Plan – Overwrites plan field with value of previous plan field of the same visit type.
      5. Previous SOAP – Overwrites all SOAP fields with value of previous SOAP fields of the same visit type.
      6. Active Meds – Appends a list of active medication where the cursor is located.
      7. Vitals – Appends a list of most recent vital values blood pressure, height, weight, and BMI where the cursor is located
      8. Allergy – Appends a list of active allergies where the cursor is located.

    Medication Library

    The medication library is a comprehensive list of all medication available to be selected for the individual patient medication list.

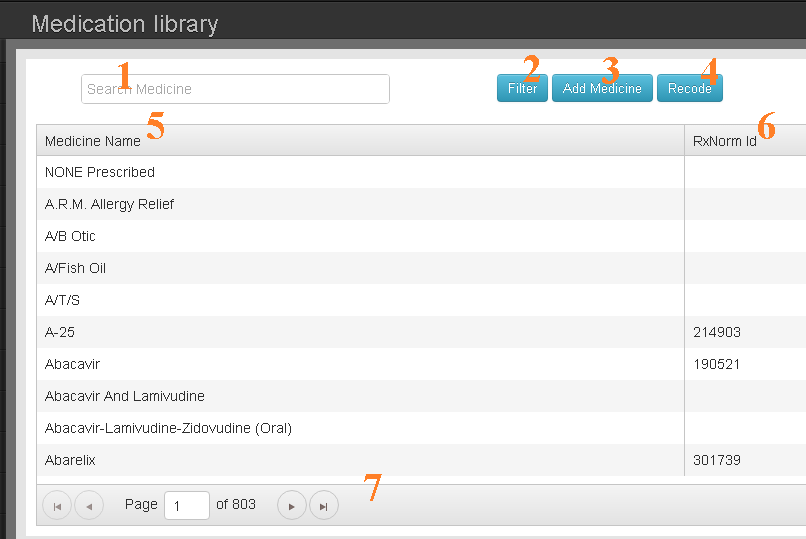
    Chart Talk Medication Library
    The Chart Talk Medication Library allows you to search, filter, and add medication and RxNorm codes
    1. Search Box- Type part or all of a medication name *NOTE – does not dynamically filter list
    2. Filter Button- Limits the list results to values containing text from the Search Box
    3. Add Medicine Button- If filter returns no results, this button will add the medication to the library and search for RxNorm values matching the medication name
    4. Recode Button –
      • When Medication is selected – Select a medication from the list by clicking on the row. Press recode while a medication is selected will search for a match in the NLM and return the RxNorm value.
      • When no medication is selected – Chart Talk will attempt to recode the entire medication library. *This can be data intensive and we advise you to only do this after business hours to keep other Chart Talk functionality responsive for all users.
    5. Medicine Name Column – Text value of medication
    6. RxNorm ID Column – coded value of medication
    7. List Navigation Controls – Page forward, backward, jump to page.

    SUBMENU: Medical

    NAVIGATION:

    1. Access the patient page
    2. Expand the Medical Menu from the Patient Navigation Menu<
    3. Select the Submenu item

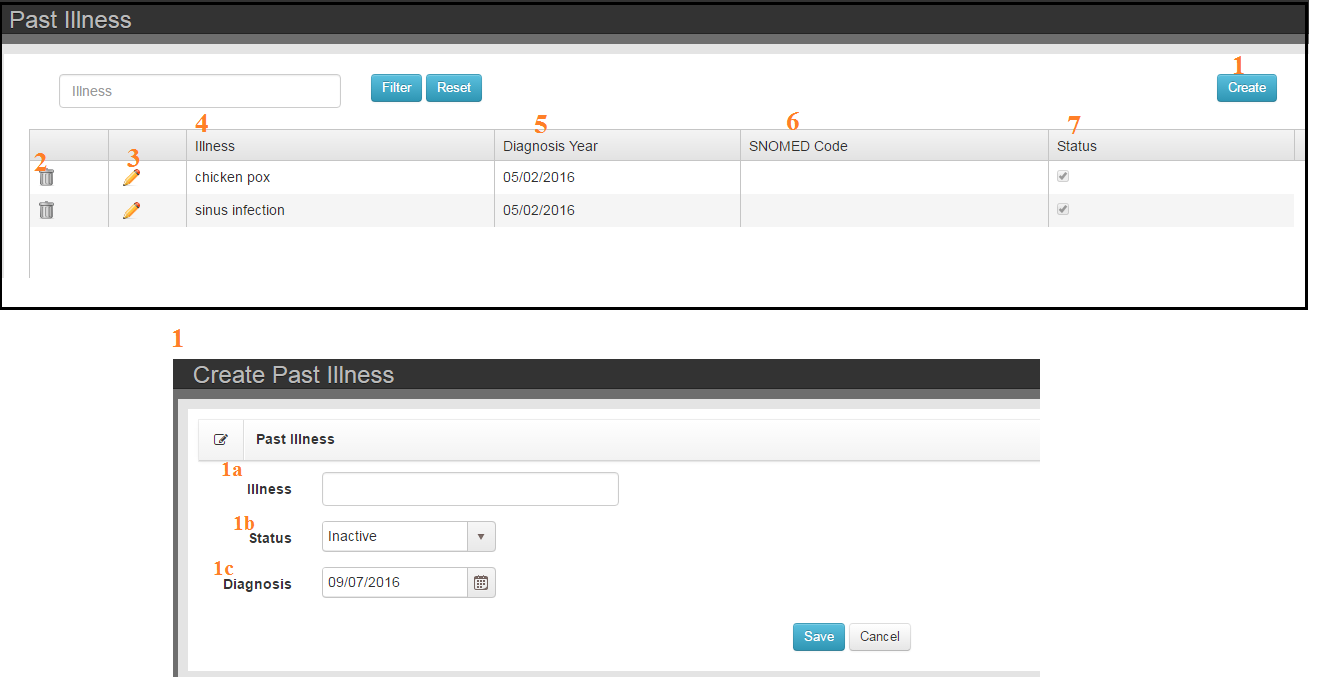
    The Medical tab is in the Patient Navigation Menu for each Patient. By clicking on the arrow at the right side of the tab, a drop down list will display. This list includes: Problem List, Vitals, Family History, Social History, Past Illness, Hospitalization, Injuries and Medications and Allergies. Click on each tab to be able to create, review or update records.

    An overview of the Medical Tab can be seen from the Dashboard Tab also. Any tab on the Dashboard that has a plus sign can have data entered through the Dashboard and will store with in the selected Medical Sub-menu.