Todays Appointments

Navigation
Click the More option on the Todays Appointment Widget
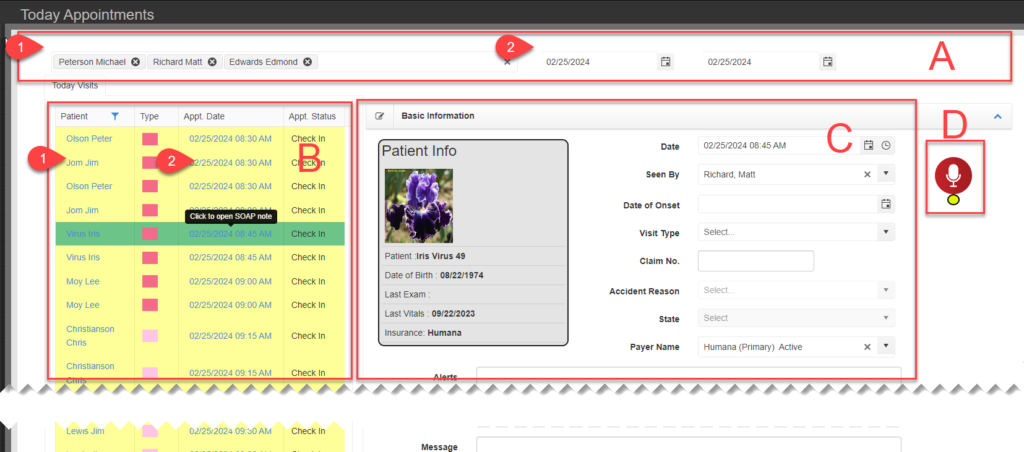
Todays Appointement Screen is based off the origianl Chart Talk documentation workflow,

  1. Filters
    1. Provider list – The list will defualt to show only the provider that is logged in. If the logged in user is not a provider, the list will default to all active providers.
    2. Date range – Start and end will defualt to the current day. The date range can be expanded to show all appointmnets for any valid date range.
  2. Patient Appointments
    1. Patient Name – Clicking this will display the patient general information in the Patient Detail area.
    2. Appointment Time – – Clicking this will display the visit record in the Patient Detail area.
  3. Patient Details – Displays information similar to the General Information and Patient Visit screen.
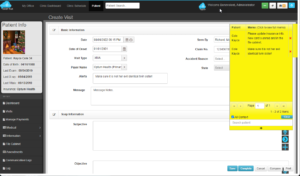
  4. SMART Talk icon – Can be dragged around the screen using the yellow handle. When red mic is not listeneing. Toggle Microphone on/off by clicking or using key combination Alt + Q. Microphone turns blue when in command mode. Press Alt + W to toggle command recognition on/off.

Memos

Definitions:

Context -These are the areas that you want to be notified with this memo. You can select just on or multiple contexts for a specific memo. If you want to add a context after you have created a memo, you need to create a new memo record.

Content – This is your memos message, tailored to the contexts where the message is pertinent.

Acknowledge – Acknowledging the memo will stop the message from being displayed in all of the contexts.

Delete – Removes the memo, never to be seen or heard from again.

Chart Talk Memo Dock
The Chart Talk Memo Dock is on the right side of your screen.

Memo Mangement Screen

The memo management screen list each combination of memo content and context seperately. In the memo dock these messages will be grouped together and will all be acknowledged at the same time.

Creating a Memo

Contexts

    1. Clinic Schedule

– Visual indicator that memo exisits on appointment block. When scheduling an appointment for a patient, Memo dock will display memo content.

    1. Route Slip

– All active memos will be listed on patient route slip below header information.

    1. Auto Post Screen

– When posting payments for a patient, Memo dock will display memo content.

    1. Check Input Tool

– When entering payments for a patient, Memo dock will display memo content.

    1. SOAP

– – When launching or viewing the SOAP screen for a patient, Memo dock will display memo content.

    1. Billing Screen

– When entering payments for a patient, Memo dock will display memo content.

    1. Patient Payment Screen

– Visual indicator that memo is active for this context on appointment block. When scheduling an appointment for a patient, Memo dock will display memo content.

    1. Clinic Dashboard

– Visual indicator that memo exisits on appointment row.

Content

Up to 2000 Characters in length. If the memo content needs to exceed 2000 characters, consider using File Cabinet and templates for the message and memo as a reminder.

LINKS:

How to enable Memos
How to use Memos

Appointment Type

Appointment types control scheduling functions on Clinic Schedule and My Schedule

  1. Type Name – Name of appointment type
  2. Color (background color)
  3. Patient Name Font Color
  4. Appointment Status Font Color
  5. Duration
  6. Soap Type – Choose yes if SOAP documentation should be generated for this appointment type

To edit an Appointment Type (Do not delete an appointment type that is in use):

  1. Expand the Schedule Menu and Select Appintment Types
  2. Click the Pencil Icon next to the appointment type you want to edit
  3. Click the Drop Down Icon for the color selection, use the color wheel to select your color and click Apply
  4. Click Save

Referring Provider (Patient Menu)

  1. Select Provider – List is populated by master referring provider table
  2. Assign provider – Adds selected provider to list and brings up detail entry tool.
  3. Add referring provider – Add a referring provider to the master referring provider table from this screen
  4. Main – Only one entry can be main. When marked main the referring provider inforamtion will be included in box 17 of the CMS 1500
  5. Referring Provider
  6. Qualifier – Included in box 17 of CMS 1500
  7. Referral Date
  8. Referring Reason
  9. Edit Record
  10. Delete Record

Narrative Templates

Narrative templates will populate the text field in the patient File Cabinet when selected.

  1. Document – Title will appear when selecting template from drop down menus
  2. Description
  3. Template Content
  4. https://manual.mycharttalk.com/wp-admin/post.php?post=2466&action=edit

Dynamic Variable List
Name Variable
Today Date @Today
Patient Name @Patient
Clinic  @Clinic
First Name  @FirstName
LastName  @LastName
Middle Initial  @Middleinitial
Address  @Address
City  @City
State  @State
Zip  @Zip
Email  @Email
Home Phone  @HomePhone
Cell Phone  @CellPhone
Date of Birth  @DOB
Age  @Age
Height  @Height
Weight  @Weight
Vitals @Vitals
Blood Pressure  @BloodPressure
BMI  @BMI
Patient Medication  @MedicationList
Patient Problem  @ProblemList
Patient Allergy  @AllergyList
Sex  @Sex
Race  @Race,
ClinicAddress  @ClinicAddress
FamilyHistory  @FamilyHistory
PrimaryInsurance  @PrimaryInsurance
SecondaryInsurance  @SecondaryInsurance
Family History  @FamilyHistory
Past Illness  @PastIllness
Social Historye  @SocialHistory
Hospitalizations  @Hospitalizations
Injuries  @Injuries
Last Chief Complaint  @lastChief

Print Settings

Print settings control printed output from Chart Talk

  1. Font Setting – Changes font and font size for reports
    1. Font – Choose any font (except comic sans!)
    2. Font Size
  2. HCFA Print Setting
    1. Use Preprinted Paper – select this if you will be printing on CMS 1500 blanks, otherwise Chart Talk prints the 1500 form for you.
    2. Use Location Alias Instead of Clinic Name – will override the value in Box 32 with the Location Alias set ‘isservice
    3. Use Location Alias Instead of Rendering Provider in box 33 – will override the value in Box 33 with the Location Alias set ‘isBilling’
    4. X Offset – Value in pixels to shift the CMS 1500 horizontally when Use Preprinted Paper is true
    5. Y Offset – Value in pixels to shift the CMS 1500 vertically when Use Preprinted Paper is true
  3. Statement Setting
    1. Include Charge Comments- will display charge comments on patient statements. Both clinic user initiated and posted 835s from the auto post.
    2. Clinic Message- Text box to type clinic message that is included on ALL patient statements that are generated.
  4. Letterhead Setting
    1. Use Custom Letterhead – When true, the letterhead of SOAP reports will replace the standard clinic information heading with the image uploaded here. Suggested dimentsions are 1700 px X 220 px at 150 ppi, or to your preference.

835 Print Settings

You can add your own explanations to the messages recieved from payers and applied using auto post. Below is an example of the setting on the 1. Print settting screen, 2. Line items from Autopost screen, 3. How it shows up on the patient statement.

1.

835 Electronic Remits

2.

835 Values Received from Payer

3.

Print settings appear on patient statement