Appointment Reminder Settings

Chart Talk Appointment Reminder Settings
Automated message settings in Chart Talk

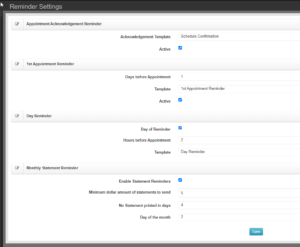
Each function uses the template selected. Pictured are the default values. If you want to edit the template, go to Email Templates and edit both the SMS and Email values.

    1. Appointment Acknowledgement Reminder

– This message is sent immediately when an appointment request is approved or an appointment is scheduled manually.

    1. 1st Appointment Reminder

– Will happen X number days (24 hours before appt by default)

    1. Day Reminder

– Will happen X number hours (2 hours before appt by default)

    1. Monthly Statement Reminder

– Notifies the Patient OR Guarantor by communication preference that they can download statement through the patient portal.

Service Type

Service Type
Online Service Types are mapped to Chart Talk Appointment Types.
  1. Service – This is the displayed name the patient will select from your online portal. Multiple service types can be mapped to the same appointment type in Chart Talk.
  2. Appointment Type – The appointment type is listed in Chart Talk and is created under Schedule Configuration > Appointment Types
  3. Is New Patient – If you expect this appointment type to selected by patients not in your Chart Talk database, the online appointment tool will ask for additional patient information.
  4. Status – detemines if the service type is active.
  5. Create – Launch the New Service Type Tool.
  6. Edit – Edit the properties of a specific service type.


Online Provider Availability

For Every Open Availability Block in the Online Appointment Request Page, there needs to be one row in the online availability table.

Online Appointment Request
This is what the online appointment request page looks like. Without any values in the provider or service type filter, the page displays all appointements available on the selected day.


Onlione prover list availability
Online Provider Availability List –
  1. Service
  2. Provider
  3. Day
  4. Block Start
  5. Block End – Descrepency between this value and the duration of the associated appointment type will default to the appointment type duration on the displayed schedule.
  6. Launch the Availability Tool
  7. Copy – Opens the Availability tool with the rows values (except Provider name) already completed.
  8. Edit – Change values of the existing row
  9. Delete – Delete the existing row

Booking Settings

About: Chart Talk Bookings is a service that allows clinics to include their own branding for integrated on-line booking, on-line payment portal*, and appointment reminders. This booking seetings page allows your clinic to configure the clinic branded page.


Pictured above is the preview of an example clinic template

  1. Area 1 Color: The color of the outer border of the page.
  2. Area 2 Color: The color of the the inner page content.
    1. Font Size in Area 2
    2. Font Color in Area 2
    3. Return Landing Page : When patient completes functions, their browesr will be returned to your web site.
  3. Clinic name presented as H1 header tag in patient portal
  4. Clinic phone number
  5. Clinic contact email address
  6. Clinic logo: for best results use .PNG filetype approx. 250 x 250 px @ 75 dpi. Logo atomatically links to Return Landing Page.
  7. Footer Message: Appears on the footer of all generated pages for clinic.

Payer Information (Patient)

Navigate to Patient

Information

Payer Information


  1. Chose Insured or Non Insured
  2. Payer Name
  3. Pick applicable preference
  4. Click box to make active
  5. Click Add

  6. Member( clinic Reference)
  7. Insurance ID (REQUIRED FIELD)
  8. Type (Clinic Reference)
  9. Group Number
  10. Co-Pay($) (will populate an alert with ($) amount when checking in from clinic Dashboard)
  11. Co-Insurance(%)
  12. Relation (depending on who is selected information is pulled from General Information)
  13. Fields 12 – 21 only active in Relation is not SELF
  14. First Name (depending on who is selected information is pulled from General Information)
  15. Middle Name (depending on who is selected information is pulled from General Information)
  16. Last Name (depending on who is selected information is pulled from General Information)
  17.  DOB (depending on who is selected information is pulled from General Information)
  18.  Sex (depending on who is selected information is pulled from General Information)
  19. Street Address (depending on who is selected information is pulled from General Information)
  20.  City (depending on who is selected information is pulled from General Information)
  21.  State (depending on who is selected information is pulled from General Information)
  22.  Zip (depending on who is selected information is pulled from General Information)
  23. Phone (depending on who is selected information is pulled from General Information)
  24. NPI Number( not used. Treating provider NPI pulls from user set up)

Authoriztions

Insurance Authorizations

  1. Authorization Number – Reference number
  2. Authorization Units – Allowed visits
  3. Authorized from – Beginning date
  4. Authorized to – End date
  5. Auth Active – Only one authorization range can be active at a time
  6. Save
  7. Add – Clears fields to enter a new authorization if in edit mode.
  8. Authorization List – History of insurance authorizations for patient.
  9. Send Auth. in Edi- Will include Authorization number in Electronic Claim (only send if insurance requires, over rides other references)

Appointment Type

Appointment types control scheduling functions on Clinic Schedule and My Schedule

  1. Type Name – Name of appointment type
  2. Color (background color)
  3. Patient Name Font Color
  4. Appointment Status Font Color
  5. Duration
  6. Soap Type – Choose yes if SOAP documentation should be generated for this appointment type

To edit an Appointment Type (Do not delete an appointment type that is in use):

  1. Expand the Schedule Menu and Select Appintment Types
  2. Click the Pencil Icon next to the appointment type you want to edit
  3. Click the Drop Down Icon for the color selection, use the color wheel to select your color and click Apply
  4. Click Save

Route Slip Configuration

  1. Left Column
  2. Center Column
  3. Right Column
  4. Save

Each box has text edit options for Bold, Italic, and Underline. Text edit options are located on the upper left corner. These fields correspond to the columns located on the bottom two-thirds of the printed route slip. The default values are just an example of how you can lay out your route slips.

*The header information that appears on the route slip is generated based on appointment data.

Related Link:
How to use the Route Slip

Referring Provider (Patient Menu)

  1. Select Provider – List is populated by master referring provider table
  2. Assign provider – Adds selected provider to list and brings up detail entry tool.
  3. Add referring provider – Add a referring provider to the master referring provider table from this screen
  4. Main – Only one entry can be main. When marked main the referring provider inforamtion will be included in box 17 of the CMS 1500
  5. Referring Provider
  6. Qualifier – Included in box 17 of CMS 1500
  7. Referral Date
  8. Referring Reason
  9. Edit Record
  10. Delete Record

Narrative Templates

Narrative templates will populate the text field in the patient File Cabinet when selected.

  1. Document – Title will appear when selecting template from drop down menus
  2. Description
  3. Template Content
  4. https://manual.mycharttalk.com/wp-admin/post.php?post=2466&action=edit

Dynamic Variable List
Name Variable
Today Date @Today
Patient Name @Patient
Clinic  @Clinic
First Name  @FirstName
LastName  @LastName
Middle Initial  @Middleinitial
Address  @Address
City  @City
State  @State
Zip  @Zip
Email  @Email
Home Phone  @HomePhone
Cell Phone  @CellPhone
Date of Birth  @DOB
Age  @Age
Height  @Height
Weight  @Weight
Vitals @Vitals
Blood Pressure  @BloodPressure
BMI  @BMI
Patient Medication  @MedicationList
Patient Problem  @ProblemList
Patient Allergy  @AllergyList
Sex  @Sex
Race  @Race,
ClinicAddress  @ClinicAddress
FamilyHistory  @FamilyHistory
PrimaryInsurance  @PrimaryInsurance
SecondaryInsurance  @SecondaryInsurance
Family History  @FamilyHistory
Past Illness  @PastIllness
Social Historye  @SocialHistory
Hospitalizations  @Hospitalizations
Injuries  @Injuries
Last Chief Complaint  @lastChief