TOOL PATIENT: Problem (Dx) Code

AVAILABLE ON: Visit Screen

Purpose: Add one or multiple Dx codes to patient

Good to know: Adding a new problem will associate the problem with the selected Visit Type

Troubleshooting tip: If list does not show ICD10 codes, the Primary Payer is set to take ICD9 Codes. Edit the Primary Payer and return to Visit Record to add proper Dx.
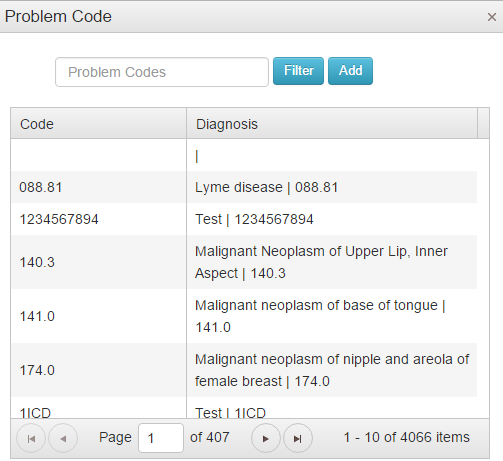
tools-problem-code

  • Filter the list by typing code into the filter box.
  • Select code by double clicking selected code in list.
  • Add multiple codes to the visit record without closing the tool.  Double click your selected code and then filter for the next code.
  • When finished, close the tool by clicking X in the upper right of the tool.

Payment Detail Tool

manage-payment-detail-tool

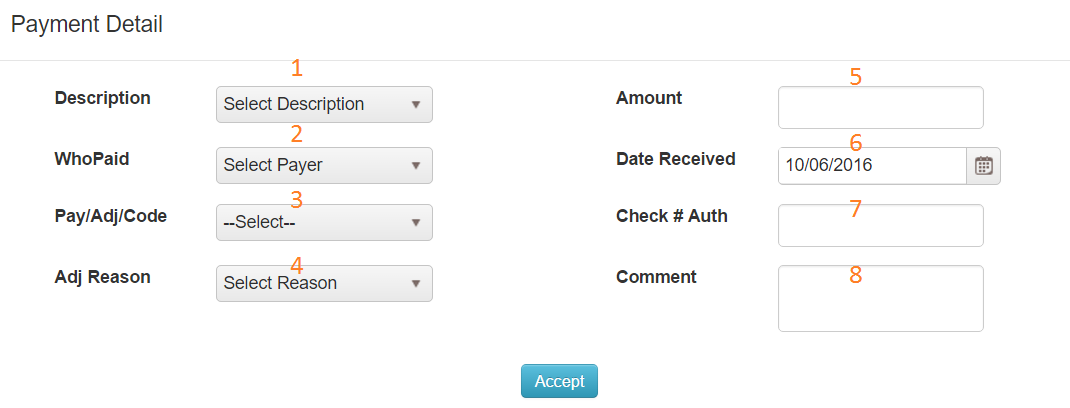
  1. Description: Payment, copayment, Adjustment are the three most common selection.  Detailed description of each option are available in our online manual at manual.mycharttalk.com
  2. Who Paid – this is a list of all payers and guarantors.  This is why it is important to at least set the patient up as their own guarantor, so you can apply payments from them.
  3. Pay/Adj/Code – options in this field will change based on the Description and WhoPaid – for payers options like Ins Check or direct deposit are available, where as a patient or guarantor will have visa, MC, cash and check as options.
  4. Adj Reason – optional field to help classify adjustment reasons .  Primarily used when evaluating payments, payers, and services quarterly or annually.
  5. Amount – The actual payment or adjustment amount.
  6. Date received – will default to the date the payment detail tool was opened .This can be backdated if needed.
  7. Check # – this field is used for the insurance check detail report and will group all payments applied to the same check number.
  8. Comment – open text for any notes on any payment or adjustment.

Manage Payments – More Info

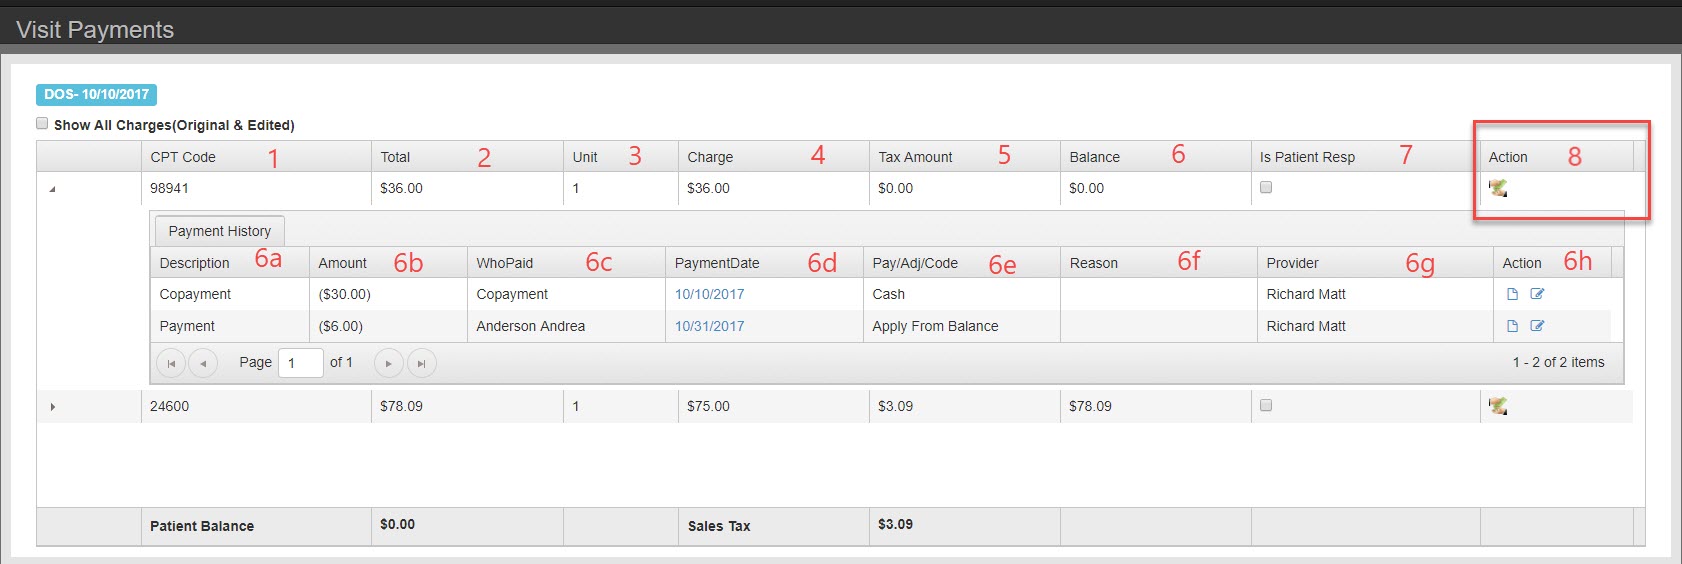
  1. The first column is procedures: CPT, Gcodes, or other office codes.  Each individual procedure is presented in a single row.  Payments and adjustments can be applied on a charge by charge basis.
  2. Total – charge x units
  3. Unit – number of units billed for the specific procedure
  4. Charge – cost per unit of service
  5. Tax amount – if the charge is taxable, the amount of tax calculated into the balance.
  6. Balance – Sum of Charge and Tax minus all payments listed in Payment History
    1. Description – Payment, Copay, or adjustment
    2. Amount – Amount applied
    3. WhoPaid – Payer or Guarantor. If co-payment tool was used it will say Co-payment
    4. Payment Date – date the payment was applied to the charge (not always the date payment was taken)
    5. Payment Adjustment Code – Further classification of payment or adjustment. Each selection available is based on the description.  For payment guarantor you have options for check, chash, visa, master card, etc. For payment from payer you have options Ins Check, direct deposit, etc.
    6. Reason – Select reason for an adjustment for practice analysis reporting
    7. Provider – Provider the charge is associated with.
    8. Action: print a receipt or edit the payment record.
  7. Is Patient Responsible – check here if patient for the remainder of charges
  8. Add payment- Apply payment per line item. You can add a new payment or apply from credit balance.
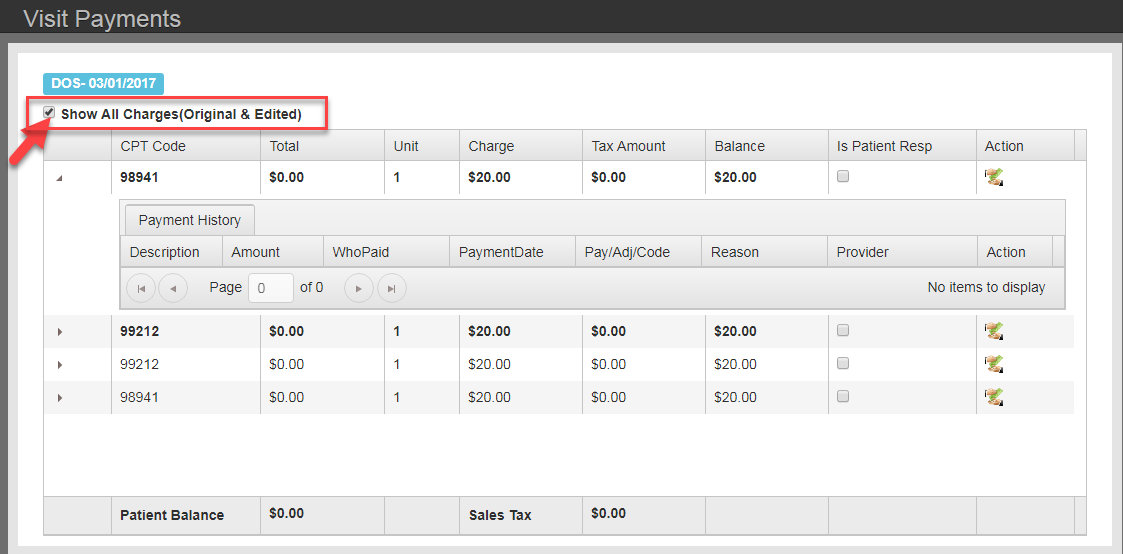
In this screen you can switch between looking at original charges or just edited charges.
The edited charges are codes that were changed in billing when creating a corrected claim.
Anything that is bold is an edited charge.

Problem List

BEST PRACTICE: Add Dx from the Visit screen. Use the Problem List for reference to see Dx history and cases sise-by-side.

problem-list

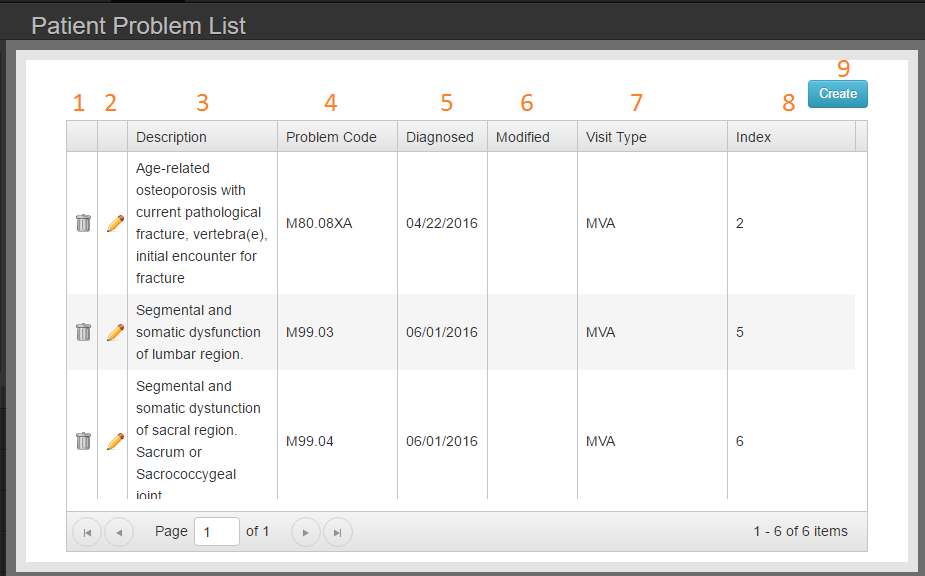
  1. Delete – Remove all record of Dx
  2. Edit – Change a property of the selected record
  3. Description – As defined for Billing Code library
  4. Problem Code – As defined for Billing Code library
  5. Diagnosed – Date first entered/diagnosed
  6. Modified – Most recent date the record was altered/modified/edited
  7. Visit Type – Associated visit type for case management
  8. Index – Not editable. Reflects order of Dx from Visit Screen

Adding a Diagnosis

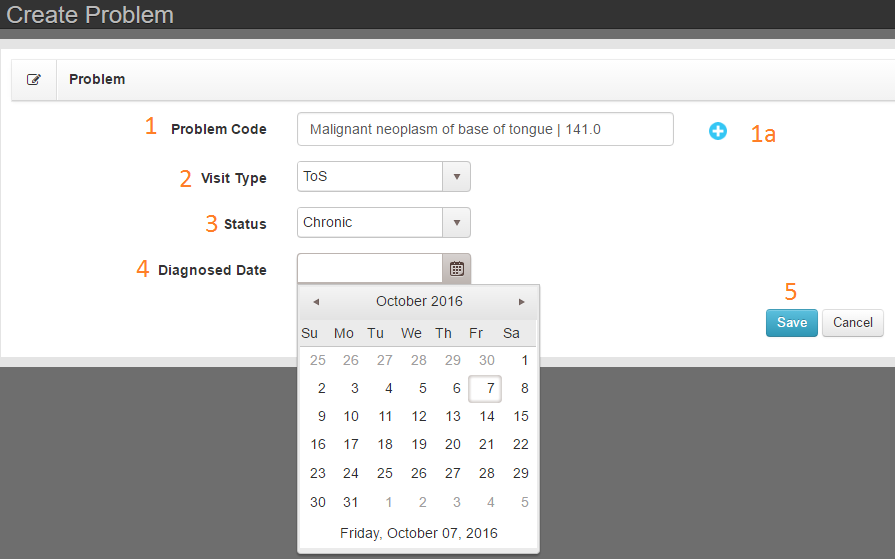
tools-problem-create

  1. Problem Code – Description and Code listed in Billing Code library
    1. Add Problem Code
  2. Visit Type – Associated visit type for case managemnt
  3. Status – Active, resolved, or chronic
  4. Diagnosed Date – Use calendar tool to select or type in date
  5. Save and Return to Problem List

General Information (Patient)

  1. Basic Information
    1. Patient Number
    2. First Name
    3. Middle Name
    4. Last Name
    5. Gender
    6. User Name – Generate Password
    7. Email – When Blue ‘Verify Email’ button is present, email has not been verified by the patient.
    8. Date of Birth
  2. Contact Information
    1. Address
    2. City
    3. State
    4. Zip
    5. Home Phone
    6. Emergency Contact Name
    7. Cell Phone
    8. Emergency Phone
    9. Contact Preference By – email needs to be selected to enable appointment reminders
  3. Additional Information
    1. Preferred Language
    2. Race
    3. Notes – This field refelects values in messages field on Visits screen
    4. Ethnicity
    5. Inactive
    6. Do not include in statement batch

Billing

The Billing Screen holds all charges that should be sent to insurance
A - Filter Values
Enter the filter values and click the ‘Filter’ button to apply. Clear the filter by using the ‘Reset’ button.
TEXT FIELDS
Claim Id – Search for a specific claim
Last Name – Filter list by patient last name, First Name- filter list to include first name
From Date – Filter list by date of service beginning of range date
To Date – Filter list by date of service end of range date
CHECKBOXES
New – Filter all claims with status NEW
Submitted – Filter all claims with status Submitted
Acknowledged – Filter all claims with status Acknowledged
Needs Review- Filter all claims with status Needs Review
Processed – Filter all claims with status Processed
Finished – Filter all claims with status Finished
BUTTONS
Filter – Apply filter values
Reset – Clear all filter values
Submit – Batch send selected new claims to the primary insurer, generate printed 1500 for payers with default paper setting.
DROP DOWN MENU
Provider- filter by provider

Claim Status Key

Status Submitted, Acknowledged, Needs Review, and Processed can only be set via automated electronic billing processes within Chart Talk and your clearing house.

White On Hold. Only new claims can be put on hold. Claims on hold can only be returned to a status of New.Claims in hold status will not be include in batch submissions
Grey Printed. Claims that have been printed can be manually changed to printed status.
Rose Submitted. New claims that have been electronically submitted will be changed to submitted status until other EDI communication is received from the clearing house.
Olive Green Acknowledged. Claims that have been received by the clearing house CAN be acknowledged via electronic communication (EDI 999). Your specific clearinghouse determines how these files are sent back.
Orange Needs Review. Communication from Payer or clearinghouse has been relayed through the clearing house. Claim not accepted needs further review.
Bright Green Processed. Electronic remit has been received and can be viewed or processed.
Black Finished. Hide the claim from the list and set all remaining balances to patient responsibility.

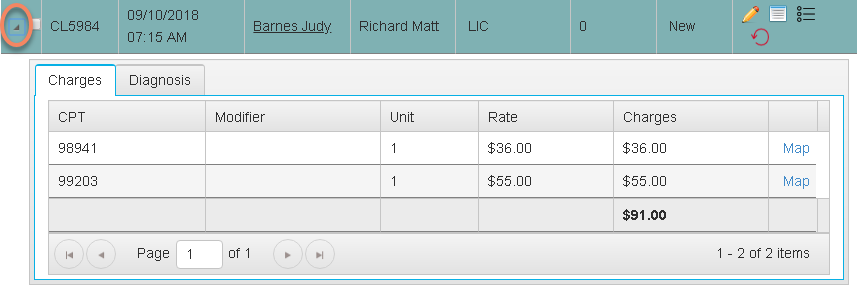
  1. Expand claim details
    Chart Talk Medical Billing for Chiropractic Expanded Charge
    An expanded charge in Chart Talk. Use the action tools to edit charge details. Use the mapping tool to manage the mapping details from charge to diagnosis.
  2. Select new claim (box at top of column selects all new claims) – used for batch claim submission
  3. ID # – Claim ID Number
  4. Visit Time – DOS
  5. Patient Name – – can click it will bring you to patient dashboard
  6. Provider Name – From Seen By field on Visit screen
  7. HCFA Count  – The Number of times a 1500 has been generated for selected claim
  8. Status – Drop down list allows users to change claim status to On Hold, Printed, and Finished. Other status are reserved for messaging submitted by your clearing house.
  9. Action –
    Pencil/Edit-modify rate of charge before submission.
    Click to view detail- to print paper claims. Shows previous dates a claim was sent. ** NOTE: all details pertaining 277/999 Received from clearinghouse for acknowledged or Needs Review Claims can be viewed here.
    Loops- send to secondary payer and correct a claim.
    Reset Claim- resets back to the visit for edits before a claim is submitted

REPORT: All Patients Balance

Purpose
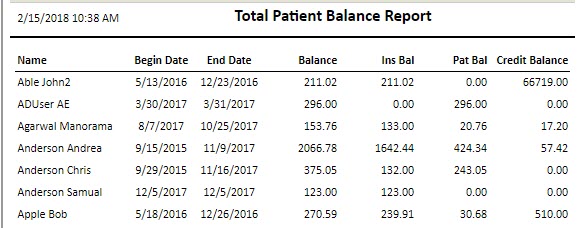
The ‘All Patients Balance’ Report is a comprehensive list of non-zero balances for all active patients in the database.

Filter: NA

Header: Date/Time Generated, Total Patient Balance Report

Column Data: Name, Begin Date, End Date, Balance, Insurance Balance, Patient Balance, Credit Balance

  • Name – Patient Name
  • Begin Date – Oldest DOS with an open balance
  • End Date – Most recent DOS with an open balance
  • Balance – Total balance owed across all DOS. Insurance balance + Patient balance
  • Insurance Balance – Sum of services/procedures assigned as insurance responsibility
  • Patient Balance – Sum of services/procedures assigned as patient responsibility

Footer: Total


Clinic

PM_Clinic

  1. Clinic Name : This is the title that will appear along the header of your reports.
  2. Business Name : This is uneditable. Thifield holds the subdomain of your Chart Talk URL.
  3. City: *Field is Redundant/Scheduled to be removed*
  4. Tax Rate: Tax rate applied to codes marked ‘isTaxable’