PROCESS Batch Claim Submission

Once the charge has been reviewed, it is ready to be sent to the clearing house. This process can be done on an individual basis, however the preference is to send a “Batch” of claims. This process can be completed as often as your clinic would like, ie: daily, weekly etc. The Batch Claim Submission screen has been color coded to ensure a distinct difference between claims that have been “Sent” and those that have NOT. The color code system is noted at the top of the screen.

To SUBMIT the claims, simply click on the SUBMIT button on the top right side of the screen.

PROCESS Electronic Claim Submission

Process to get claim created and submitted
Schedule Appointment
Add Dx and Procedure codes
Mark Visit Complete on Clinic Dashboard
Review Charge
If incorrect, delete charge – revise SOAP details – mark visit complete on Clinic Dashboard
Submit Charge for Billing
Review Bill
Edit charges or add procedure code

Guarantor

Patient_Gurantorinformation

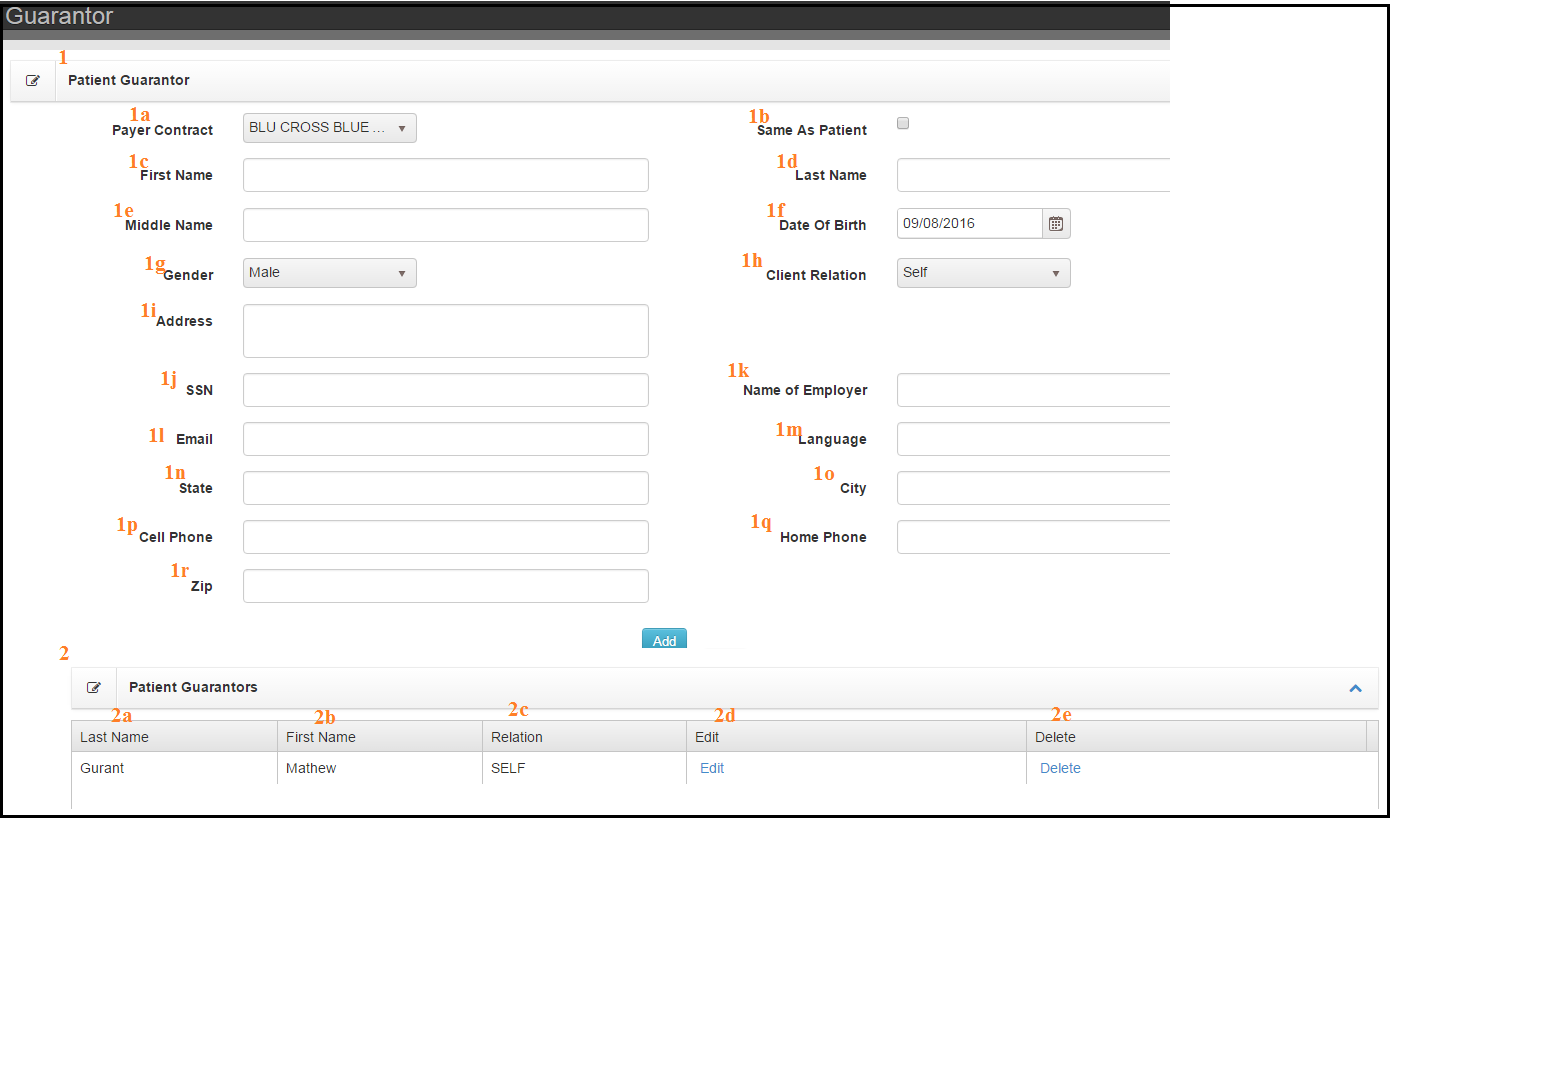
Add Guarantor Form

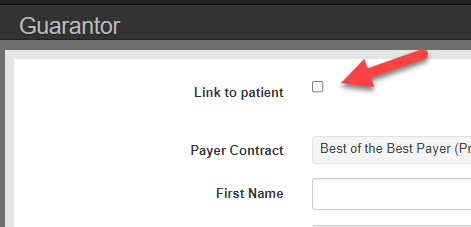
BEST PRACTICE:

Click ‘Link to Patient’ box and choose patient.
Best Practice link patient guarantor to another patient account

Otherwise …

  1. Patient Guarantor
    1. Payer Contract – Select primary payer
    2. Same as patient – Tic box to save time completing form
    3. First Name
    4. Last Name
    5. Middle Name
    6. Date of Birth
    7. Gender
    8. Client Relation
    9. Address
    10. SSN
    11. Name of Employer
    12. Email
    13. Language
    14. State
    15. City
    16. Cell Phone
    17. Home Phone
    18. Zip

Add Button commits form.

Column Data

  1. Patient Guarantors
    1. Last Name
    2. First Name
    3. Relation
    4. Edit
    5. Delete

All Guarantors will show up as options to recieve payments.

NOTE: Any new patient created will automatically have guarantor added as self.

Locations

Many times your office or organization operates from multiple locations. The Locations table allows you to associate as many addresses with your organization as you need. Select Locations from the Practice Management Submenu.

PM_LocationAddress

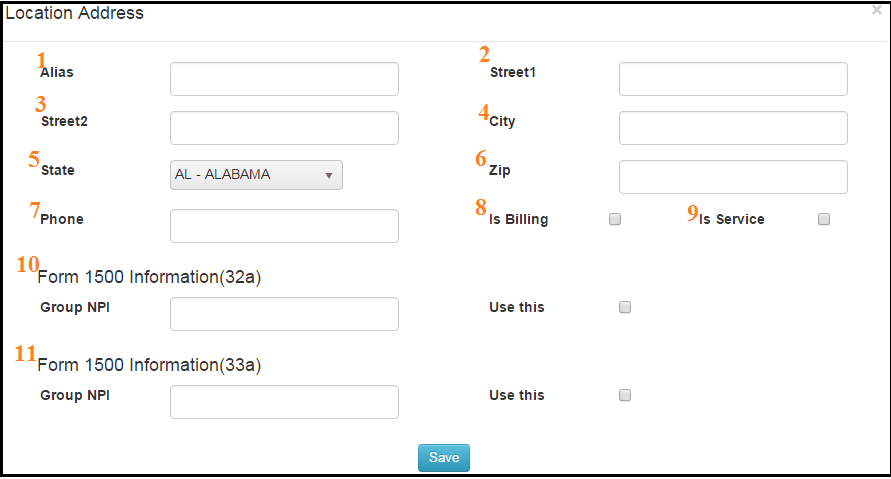
  1. Add a Location

Add a location by clicking the Create button.

  1. Alias Name you know the location by. e.g. Rose Street Office, Billing Office, etc.
  2. Street1  – Address of the location
  3. Street2 -Address of the location
  4. City -City of the location
  5. State -State of the location
  6. Zip -Zip of the location
  7. Phone -Phone number for the location
  8. IsBilling – This location info will show up in box 33
  9. IsService – This location will show up in box 32
  10. Group NPI & Use This – If you need to have individual NPI numbers on the 1500 claim but a group NPI in Box 32a , put group NPI in this box and select use this. This is called Box 32a Override. ++1500 will pull NPI from top location only++
  11. Form 1500 Information 33a(Group NPI) -++1500 will pull NPI from top location only++

2.  Edit a Location

Change any of the above information.

Payer

NAVIGATION:
  1. Open Payers from Practice Management on the Main Navigation Menu
  2. To create a new record, enter the name and Insurance Type ‘Insured’ if you will file insurance claims electronically or on 1500 form.
    Non-Insured if you would bill the patient.
When setting up payers, it is best practice to use the exact name your cleaning house uses. See your clearinghouse for a list of payers and their ID# as defined by your Clearing House.
    Type in a new Payer name and click add. After clicking Add, the Payer edit screen will open. To edit an existing Payer record, click the pencil icon next.

  1. Payer Name – Use the name listed in the Clearing House DB
  2. Payer Type – Insured if claims should be printed on 1500 form or sent electronically.
  3. Insurance Type – This will determine which box at the top (BOX 1) of the 1500 form is checked on printed claims.
  4. Email ID – *Not Required* This is for office reference does not populate on printed 1500 form
  5. Address – Street address.Where printed/mailed claims would be sent to. (Box 7)
  6. City-  Populates in  (Box 7)
  7. State- Populates in  (Box 7)
  8. Zip Code– Populates in (Box 7)
  9. Telephone- Populates in (Box 7)
  10. FAX– *Not Required* This is for office reference does not populate on printed 1500 form
  11. Payer ID – Found through the clearinghouse Payer Search or list.
  12. Clearinghouse – Which clearinghouse these electronic claims should be sent to.
  13. DX Code Type – Which diagnosis codes this payer accepts (Will limit which codes provider can add to SOAP note) NOTE: After October 1, 2015 choose ICD-10 Codes.
  14. Additional Claim Info– see standard text below
  • Default Paper Claim – When checked, indicates this payer takes claims on printed CMS 1500 rather than electronically.
  • a: Taxonomy code- are administrative codes set for identifying the provider type and area of specialization for health care providers. Each taxonomy code is a unique ten character alphanumeric code that enables providers to identify their specialty at the claim level. If a taxonomy code is required by a payer it would show in (Box 33).
    *most chiropractic payers do not require this code
  • b: Include DTP 454 in EDI- When submitting to payer that requires loop 2300 DPT454. *Most Medicare payers require this when submitting electronically.
  • c: Include Standard Text- This will populate text into (box 19) for this specific payer. Type what would like in the “additional claim info” box
  • d:Use Rendering Provider in 33a: This option will override group and location settings for box 33a/loop
  • e: Include Accident Date in EDI – include the onset date from DOS when Visit Type ‘isAccident’ is true for payers when this option is selected- (BOX 14)
  • f: Include x-ray Date- When checked this will include x-ray date in (box 15)
  • g:Append 0000 to 5 digit zip code– ONLY Mark as true if a payer requires 9 digit zip code when only 5 numbers are entered will add 0000. Leave unchecked to use what you enter in as default for payer, patient and clinic.
  • h:Accept Assignment-When checked will mark yes in box 27 on 1500 forms and on the EDI

PROCESS Practice Management Tab

**SEE PM DATABASE CONFIGURATION SECTION FOR A DETAILED DESCRIPTION OF EACH FEATURE.

Setting up your practice and insurers is where you begin with electronic remittance through Chart Talk.

Payers –

Payers are set up to submit to a Clearinghouse. Each payer can submit to only one clearinghouse.

Locations –
Locations is any physical or mailing address for your clinic. Options under location can configure how the 1500 form is printed and (*FUTURE FEATURE*) how multiple site schedules are displayed.

Practice Group –
*Reserve for initial configuration*

Clearinghouses –
*Reserve for initial configuration*

Billing Codes –
Edit/Add codes and primary fee schedule. When setting up a Billing Code there is the option to add tax if the code is taxable and also to select the option DO NOT BILL for codes that are Patient responsibility only. All information in this tab(except for Is Taxable) Must be filled in. Give the billing code a zero dollar value under the Charge box. If you do not fill in a value, the information will not appear correctly when you are searching for the code in the Charges area of the SOAP.

Providers –

If a provider is part of a Group, the group ID will be used when submitting claims. A provider can only be part of one group. If no Group is specifies for the provider, the individual NPI will be used when submitting the claim.

Group –
*Reserve for initial configuration*

PROCESS Patient Check In – Clinic Dashboard

The clinic dashboard is a place where the information and common functions used at the front desk of a clinic are easily accessible. When a scheduled patient comes in changing the Status (using the drop down menu) to In Clinic will check the patient in and notify the Front desk if a Co-Pay is due. The copay can then be collected and entered by clicking yes or on the Action column and following the dropdowns for entry, including printing a receipt. It will also reveal if the patient has any outstanding Documents which have not been completed. At this time, the staff will direct the patient in options for completing the documents either asking them to complete using the patients own smart device (phone),or on a device supplied by the clinic which will allow the patient to securely access their own patient portal.

PROCESS PM Database Configuration

Within Chart Talk are many databases that are pre-populated with industry standard information. There are also databases that are configured specifically for each individual clinic. To access the Database Directory, click on the Practice Management tab from the Menu.

PM Data Configuration 1

Below is an overview of each Database and it functions:

Payer Database

PM Data Configuration 2

Enter each individual Insurance company into this database. Enter the Payer/Insurance company name, fill in the drop down of Insurance and check the box next to Active then click Add.

The name will appear on the screen and you are able to then Edit the information for this specific insurance company.

PM Data Configuration 3

If you choose to set up an individual fee schedule for this payer, fill in the bottom of the screen with each CPT code from the schedule respectively. NOTE: It is the responsibility of the clinic to update this fee schedule with any changes in allowed fees from the Payer.

Location Database

PM Data Configuration 4

This database is set up with the Clinic Demographic information. If the clinic has more than one location, each location will be identified in this database. The Chart Talk support team can help in setting this up.

Manage Groups Database

PM Data Configuration 5

This database is set up with specific provider information regarding NPI numbers and interface information for the Clearing House. The Chart Talk support team can help in setting this up.

Clearing House Database

PM Data Configuration 6

This database is set up with specific information based on the Clearing House you choose for the Billing Interface. The Chart Talk support team will help in setting this up.

Billing Codes Database

PM Data Configuration 7

This database has several Coding Databases within including: ICD9, ICD10, CPT, G- CODES, CQMM, and LOINC. Use the drop down tab on the top left that states all to see each database and click on the one you want to access. Then use the Code search box to look for a code to verify if it already exists in the Database or if you need to add it in. To add the code, click on the Create Button and fill out the information then Save.

PM Data Configuration 8

Clinic Database

PM Data Configuration 9

The Clinic Database will be populated with information by the Chart Talk support team except for
the local tax rate. Add your local state Sales Tax rate in the box on the bottom right side of this screen.
*Note: For Sales tax to automatically be calculated for a CPT code, in the set- up screen for that code, the IS Taxable box must be checked.

Modifier Database

PM Data Configuration 10

The Modifier Database is pre-populated with the most common modifier codes. To add additional codes click on the Add New box and fill in the screen then press Save.