Email Templates

email-template
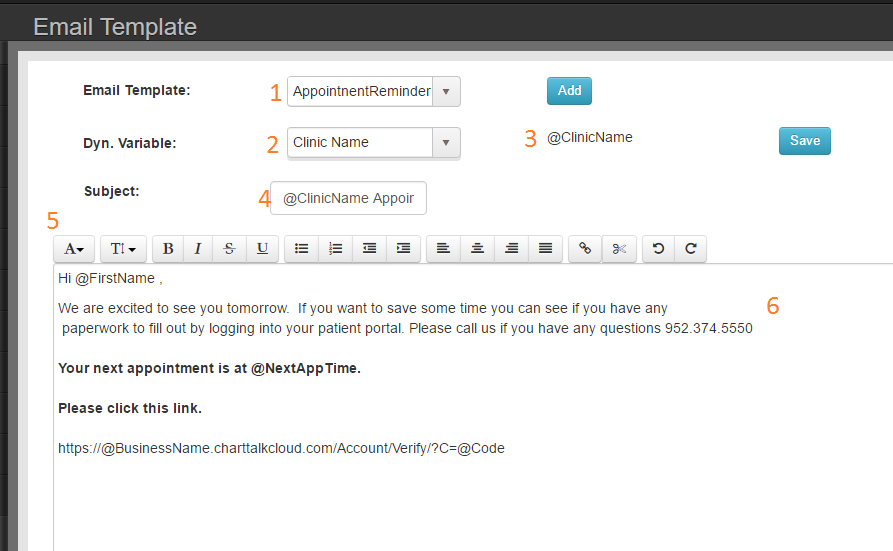
Your patient will receive an email asking them to Verify information to activate their participation in the Automatic Appointment Reminder/Email program.

  1. Email template selection
  2. Dynamic variable available – Select the value you would like to include in the body of your email
  3. Dynamic variable value – Paste this value into the body of the email. Will print out with patient values.
  4. Subject of email
  5. Body of email – Inclues dynamic variable values and mark up using the available tools.

Document List

document-list

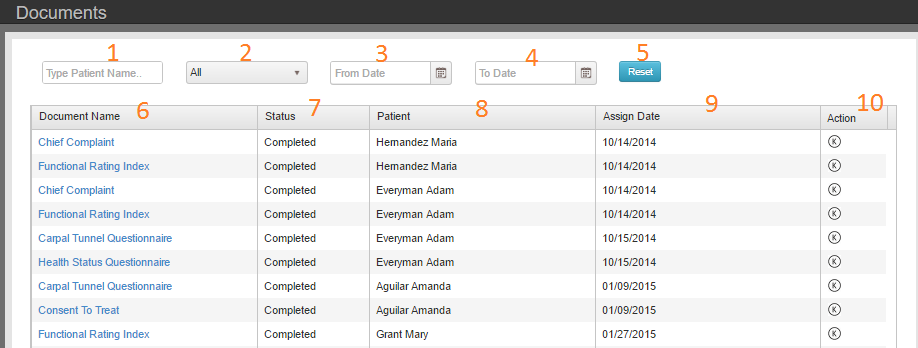
When the document name is clicked, the document will open in Clinic Staff mode. The staff can assist the patient filling out the form and will remain logged into the EHR after the form is complete. To launch the document in a mode that is secure to hand a tablet to the patient, use the Kiosk Mode button (Circle K) in the right hand column.

    Filters

  1. Patient
  2. Document status
    1. To Do – Docuemnt has been assigned but not filled out and signed by the patient.
    2. In Progress – Patient has completed and signed the document. The document gas not been reviewed by the assigner or provider.
    3. Complete – Document has been signed by the assigner and patient.
  3. From date
  4. To date
  5. Clear filters
  6. Column Data

  7. Document Type
  8. Document status
  9. Patient Name
  10. Document assigned to patient date
  11. Launch document in Kiosk mode

Patient Portal

The Patient Portal is a secure way for your patients to access information which has been assigned to them for completion by the clinic. They will also be able to communicate back to the clinic and review specific information available in their individual Portal.

For a New Patient: Patient will automatically receive an email asking them to verify their valid email address and instructions to set up their secure Login and Password. Patient must have contact preference Email selected.

For an existing Patient, Once you enter their email or update their email address on their General Information screen, press the Verify button to the right and the instructional email will send to the patient. Patient must have contact preference Email selected.

**NOTE: Check the box for email as the patient’s contact preference on the General Information screen.

When the patient accesses their Patient Portal this screen will open and let them know
If and how many documents are pending completion by them.

By clicking OK the screen will enable and allow them to choose the outstanding documents (s)
and complete. Once completed the documents will automatically store in the correct screens
within Chart Talk. ie: Chief Complaint form will appear in the Subjective portion of their upcoming
visit SOAP.

To complete, click on the document hi-lited in Blue and the document will open for completion.

The Portal Tabs:

The General Information Tab: Allows the patient to view their demographic information but does not allow for any changes or additions.

Synopsis Tab: Gives an overview of the Patient Dashboard but does not allow for any changes or additions.

Download Summary Tab: Gives an overview of the patient care and can be printed by the patient.

Amendments: The patient can create an amendment that they feel the provider should be aware of and could be added to their health information on file. When this is completed, the Amendment will show on the My Office Overview, under Pending Amendments. The provider will access it and approve it and save to the patient record or discuss it and deny it from entering into the patient record.

What the Patient creates in their Amendments Tab in their portal:

What the Clinic sees on the My Office Dashboard:

What the Provider will review once he/she clicks on the patient name in Blue, and can then
Choose to Approve and Save it into the patient record or Deny and discard.

The Patient Representative Tab: Allows the Representative to access the information on
Behalf of the Patient securely.

Message: Allows for communication with your patient in a secure environment

Log: Is the Audit Log of who, what, and when information was accessed within the patient portal for this specific patient.
Clearing Houses

pm_clearinghouse

    Connection Details

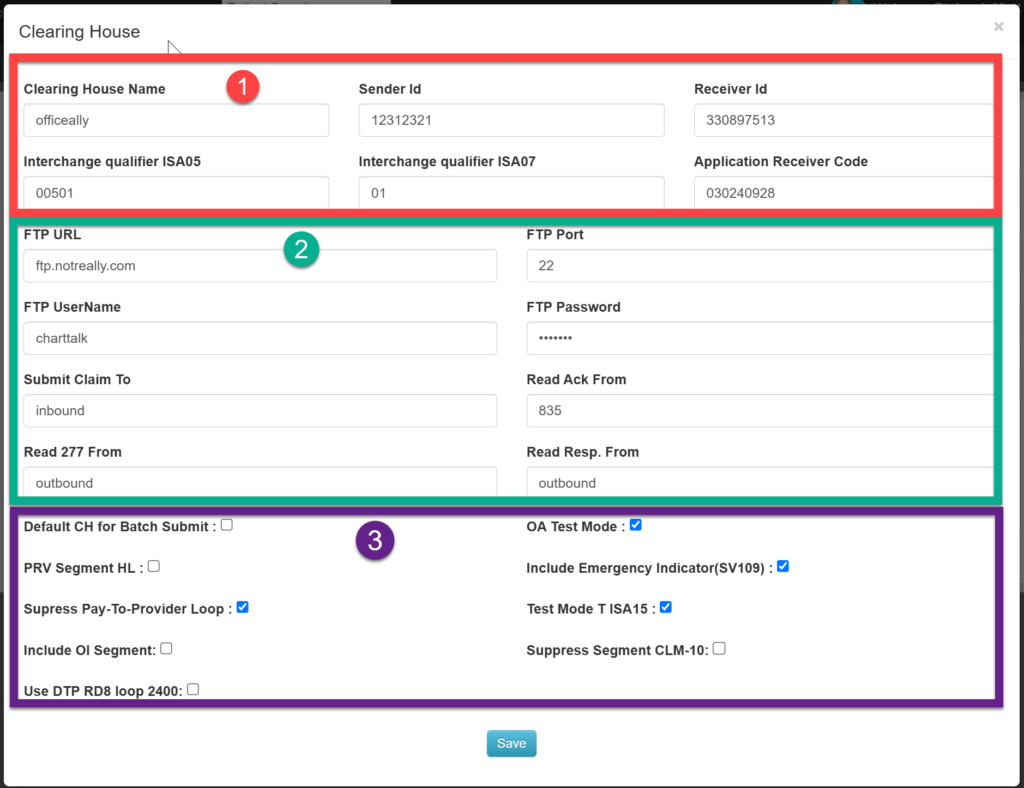
  1. Clearing House Name
  2. Sender Id- Clearinghouse specific
  3. Receiver Id- Clearinghouse specific
  4. Interchange qualifier- Clearinghouse specific
  5. FTP URL- Set up by clearinghouse
  6. FTP Port- Set up by clearinghouse
  7. FTP UserName- Set up by clearinghouse
  8. FTP Password- Set up by clearinghouse
  9. FTP Folder Setup

  10. Submit Claim To- Folder for 837
  11. Read Ack From- Folder for 999
  12. Read Resp. From- Folder for 835
  13. Other

  14. Default for Batch Submit-
  15. Set Test Account- Works for Office Ally to test claims

Manage Payments

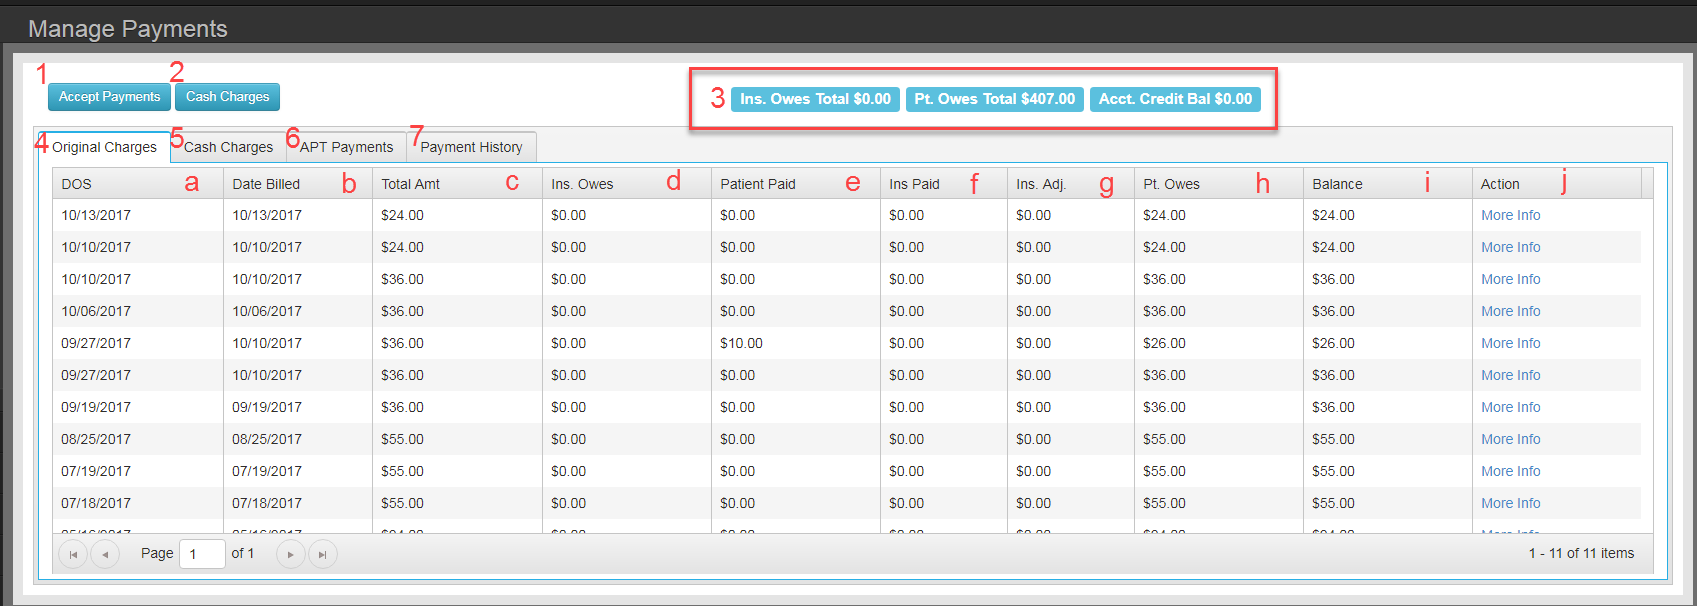
*Tabs for Cards on file and Guarantor Payments not pictured
  1. Launch Accept Payment Tool
  2. Issue a charge for product or service without creating a DOS record
  3. Shows current account summary
  4. Original Charges Tab
    1. DOS – date of service/appointment
    2. Date billed – date the claim was generated for the DOS
    3. Total Amt – The sum total of the services and procedures for claim
    4. Ins owes – the sum amount of all charges not marked as patient responsibility
    5. Patient Paid – the sum amount of copayments and payments and adjustments  from the patient or a patient guantor
    6. Insurance Paid –  Amount auto posted or entered that has been marked a Payer as the payment source.
    7. Ins Adj – Amount attriubeted to Payers that is either marked adjustment or write off
    8. Pt Owes – Sum amount of claims totals marked as patient responsibility.
    9. Balance
    10. More Info – View/edit details of the specific transaction
  5. Cash Charges Tab (see below)
  6. APT Payments Tab (see below)
  7. Payment History (see below)

5. Cash Charges Tab

The Cash Charges Tab lists all sales made using the Cash Charges Tool.

    1. Date of Sale
    2. Total Amt
    3. Ins Owes – OBSOLETE
    4. Patient Paid –
    5. Ins Paid
    6. Ins Adj
    7. Pt Owes
    8. Balance
    9. Action – More Info – View/edit details of the specific transaction

6. APT Payments

View edit payments accepted and applied using the Accept Payment Tool (APT)

Column b – j show the payment details including total a,mount accepted and total amount applied from the payment. Expanding this row shows the itemized breakdown (columns k – o) of how the payment was applied.

    1. Filters
    2. Hide/Unhide Details
    3. DOP – Date of Payment. Date the payment was accepted
    4. Payment Type
    5. Amount – Total amount of payment
    6. Paid Amount – total of the funds from the payment that have been applied to patient charges
    7. Payer
    8. Guarantor
    9. Edit payment
    10. Print payment receipt
    11. Delete payment – A payment cannot be deleted if any of the transaction has been used to pay patient charges.
    12. DOS – Date of service payment was applied to
    13. Date of payment
    14. CPT Code – code payment was applied to
    15. Amount – money that payment was applied to
    16. Delete payment – Deleting a payment here will return Amount to the patient account credit balance.

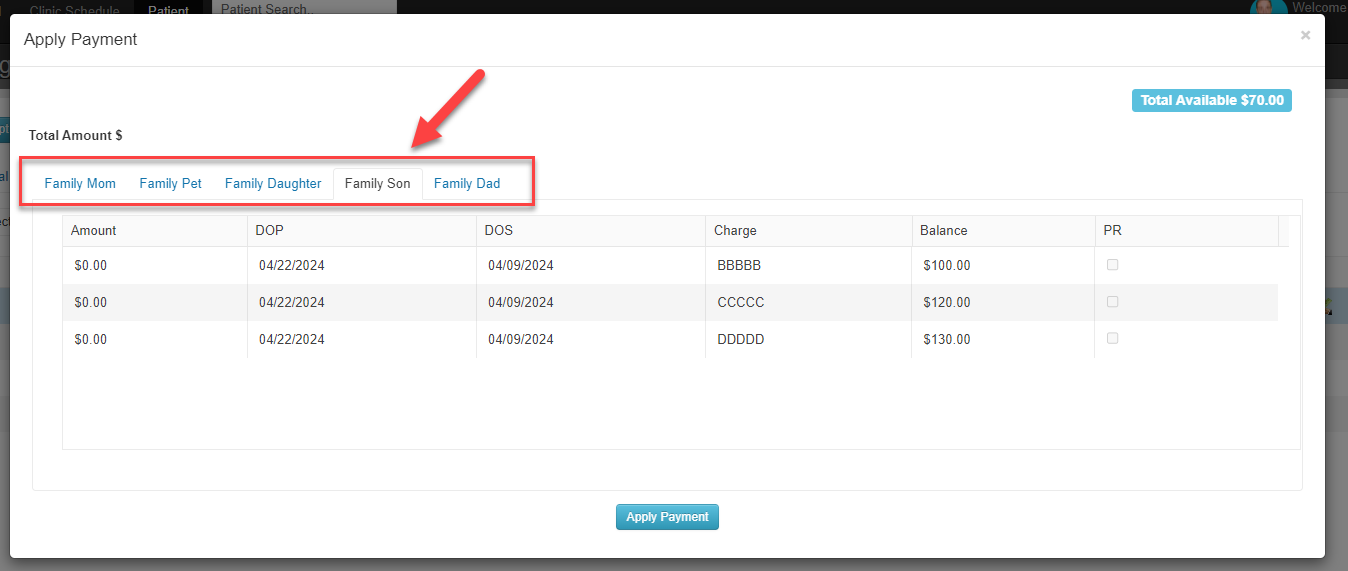
To apply payments from an entry with a blanace, click the Dollar Bill icon. You are presented with a selection of non-zero dollar charges for the selected patient and anyone they are the guarantor for.

APT Payments can be applied to the patient and anyone the are linked to as being the guarantor for.

7. Payment History

Payment applied using the more info tool, insurance check entry tool, or Auto Posted are listed on this tab

    1. Date of Service
    2. Date of Payment
    3. CPT
    4. Amount
    5. Payment Type
    6. Payer (if Insurance payment)
    7. Guarantor (If patient/guarantor payment)
    8. Notes
    9. View/edit details
    10. Delete payment

8. Guarantor Payments

Lists all payments that were applied to patient account using funds from a transaction made by someone other than the patient. Deleting the payment on this tab will return the funds to the guarantors credit balance.

9. Cards on File

    1. Cards on file – Only one can be active at a time.
    2. Add – Add a new card on file record
    3. Actions – Edit or delete a card on file.
    4. Guarantors – Any guarantors linked to other patient accounts show up here. If the Guarantor information is entered without linking to a patient, the information is not conveyed in this table.

1. Accept Payments Tool

Take a single payment from a patient and apply it to multiple outstanding charges. Payments made with the APT that are not applied to a charge are added to the Patient Account Credit balance.
*The APT applies payments using the oldest funds available first.

  1. Who Paid – Lists all payers and guarantors.
  2. Description – Will always be Payment
  3. Pay/Adj/Code – Cash, Check, or credit card
  4. Open Balances – the sum of all selected charges from the box below
  5. Charge selection – all charges with non-zero balance set to ‘Patient Responsibility’. Chacking the box will apply payments to the charges from oldest to most recent
  6. Patient Account Balance – Available funds from prepay/credits on the patient account
  7. Check # Auth – A field to enter CC transaction info or check number
  8. Amount – Total of transaction
  9. Notes – Open text field
  10. Save button – Apply the payments from 1 – 10 to the selected charges
  11. Apply From Balance – If applying from a balance then only charges need to be selected. Boxes 1-4 & 6 – 10 not necessary.
More on the Accept Payment Tool
  • If you accept payment greater than the sum from field 4, the balance is applied to Patient Account Balance
  • If you accept a payment without selecting any charges, funds will be allocated to Patient Account Balance
  • After you save or Apply From Balance, you will be asked if you want to print a reciept.
  • All the details from boxes 1 – 10 will be listed when you examine individual claims using the More Info Tool.
  • If the Patient or selected guarantor has an active card on file, ‘Use Card on File’ will be an option to charge the detialed payment.

2. Cash Charge Tool

    1. CPT/Billing Codes – Enter the code for the product or service
    2. Enter the number of units
    3. Enter a dollar value discount if applicable
    4. Save will add the record the the transaction box below. There is no limit of items that can be saved into the transaction box.
    5. The code you entered above appears here.
    6. If there is a fee already associated with the CPT code it will appear here. You can also double click on the fee and change it by typing in an amount or by clicking the arrows up or down.
    7. Units can be entered in when entering in the CPT code before you save or can be changed by double clicking. It can be changed by typing in a new unit quantity or by using the arrows up or down.
    8. Total automatically adds up to subtotal before any tax if applicable. Charge x Units= Total
    9. Any discount (in dollar amount) will be deducted from the subtotal if put in here.
    10. Tax will automatically be calculated if it was configured to have tax but if you need to add tax manually double click on the box and enter in value.
    11. Remove line item from transaction box
    12. Finish- will save it to your “Cash Charges” tab in Manage Payments.
    13. Finish and pay- will save it to “Cash Charges” tab in Manage payments and will bring up the Accept Payment Tool to apply payment to the cash charge.

    Related Page: Apply Payments

Auto Post

How to: Use Autopost

Chart Talk Autopost 835 Claim Remittance
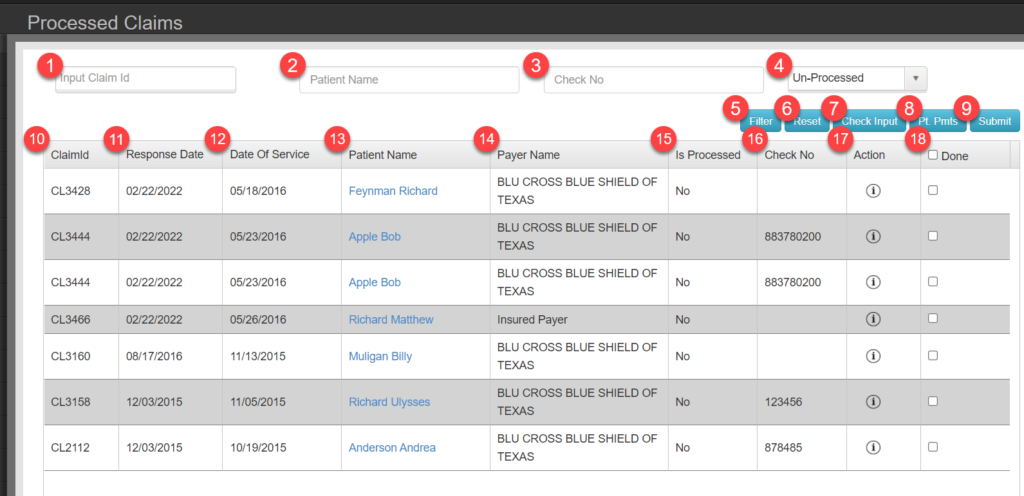
Post insurance checks recived electronically or use the check entry tool. Multiple patietn payments can be added from here without needing to navigate to every patient.

    Filters

  1. Claim ID
  2. Patient Name
  3. Check No
  4. Check Status
  5. Action Buttons

  6. Filter – Apply filters
  7. Reset – Clear filter list
  8. Check Input- Opens Check Input Tool
  9. Pt Pmts – Opens the patient payment tool. This allows you to enter a payment for the patient without needing to go to the patient page and upen manage payments.
  10. Submit – Processes any items marked Done.
  11. Column Data

  12. Claim ID
  13. Response Date Date 835 received
  14. Date of Service
  15. Patient Name
  16. Payer Name
  17. Is Processed
  18. Check No
  19. Action: Info – Display contents of the 835 electronic EOB
  20. Done – Done will make the item disappear from the default view of this screen.

Check Input Tool

Check Input Tab

Chart Talk Check Input Tool 2.0

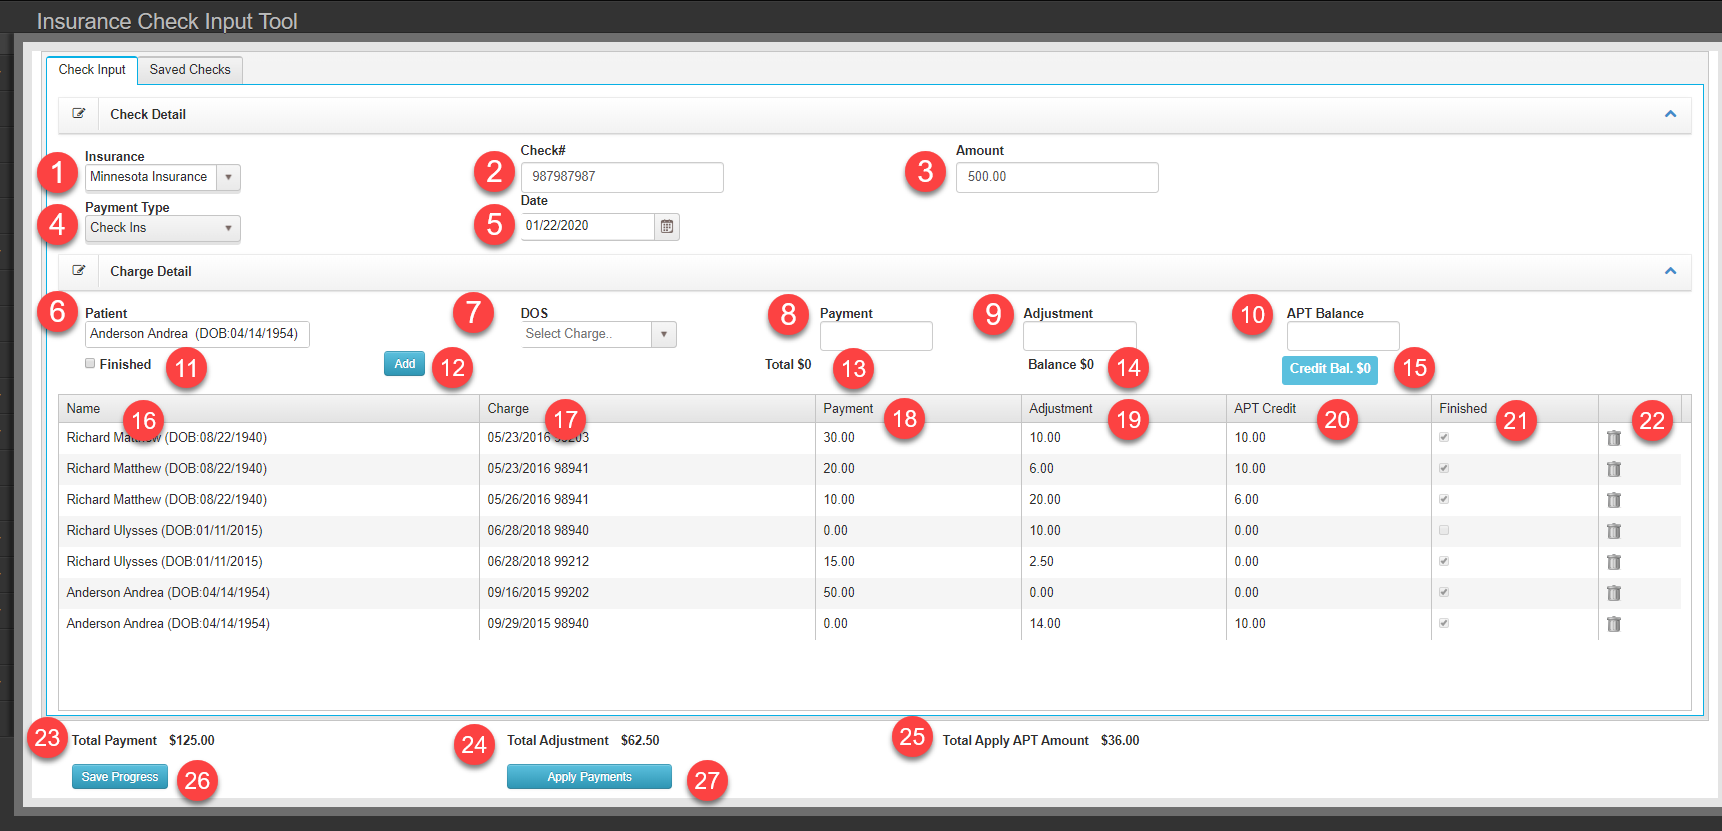
Check/Charge Detail

    Filters

  1. Insurance selection drop down menu
  2. Check Number
  3. Total payment amount – This amount will be used as a final check when applying payments. If total does not reconcile with individual payments, the function cannot be completed
  4. Payment Type- Insurance Check, Direct Deposit, Insurance CC
  5. Date: Date on Check
  6. Data Input Fields

  7. Patient – Select patient name
  8. DOS – All charges not set to patient responsibility are available from oldest to newest
  9. Payment – Total payment for charge
  10. Adjustment – Adjustment for charge
  11. APT Balance- Amount of patient credit to apply to charge.
  12. Finished – Will assign the remainder of balance as patient responsibility
  13. Add – Adds record to box below
  14. Total- Total payment amount made to selected charge
  15. Balance due remaining on the selected charge
  16. Credit Bal- Any amount of credit the patient is carrying when patient account was loaded.
  17. Cloumn Details

  18. Patient Name
  19. DOS/Charge
  20. Payment amount
  21. Adjustment
  22. APT Credit
  23. Finished- ‘finished’ box checked will assign the remainder of balance as patient responsibility
  24. Delete charge – use this if you need to edit a line item and re-apply it
  25. Total Payment – Sum of all payments in the payment list
  26. Total Adjustment – Sum of all adjustments in the payment list
  27. Total Apply APT Amount – Sum of all patient credit payments applied in the patient list
  28. Save Progress- Save the details of the check to the ‘Saved Checks’ tab to be completed later.
  29. Apply Payments – Once the Total Payment(15) is equal to the check amount (3) payments will be applied to all accounts when clicking this button.

Saved Checks Tab

Check Input Tool
Check Input Tool – Saved Checks Tab
    Filters

  1. Check No – Filter list by check number
  2. Payer – Filter list by Payer
  3. Check Staus – By default, filter is set to Not Applied
  4. Buttons

  5. Filter – Apply filter value to list
  6. Reset – Clear filter values
  7. Columns – Values from saved check data

  8. Check Date
  9. Check No.
  10. Amount
  11. Payment Type
  12. Total Patients
  13. Applied
  14. Pencil – Loads check details to Check Input tab to continue editing

PROCESS Collecting Co-Pay at Check In

Indicate a patient has a co-pay when setting up Primary Payer from Patient Insurance list
Change Appointment status from ‘Check In’ to ‘In Clinic’
Co-Pay Alert* Accept or Cancel
Accept – Enter amount and click ‘Save’ or ‘Save & Print’

Note: If a patient prefers to pay their copay after the visit, when they are checking out, the payment MUST be taken prior to Completing the appointment. Once an appointment has been completed the payment will need to be applied through the Manage Payment screen once a bill has been created.

PROCESS Payments

This section covers manually and automatically applying payments to claims:

AUTO POSTING A CLAIM: When claims have processed through the Clearing house, the clearing house will automatically send the electronic remittances back to the clinic. Accuracy of the payment aligning with the date of service of each claim is assured through the use of a unique Claim ID# which is assigned to each date of service as the claim is uploaded and it appears on the left side of each line item. By looking at the “Is Processed” column it will state if the claim has processed and payment is ready. To automatically download the payments to each claim that says “yes” in this column, click the APPLY PAYMENTS key. To review “how” the payment and adjustment was applied to each line item, click on the icon in the Action column and it will display the RESPONSE screen which will show the reason codes for this item.

To MAUALLY POST A PAYMENT:

To manually post a payment go into the individual patient and click on the Manage Payments tab. Select the date of service to apply the payment and or adjustment to and click on “More Info” which will bring up the Visit Payments screen. For each line item to apply the payment/adjustment to click on the ACTION icon on the right side of the screen. This will display the Payment Detail screen where each line item can be accessed and payments/adjustments applied. If there is a balance remaining that is the Patient Responsibility, check the box that appears to the right of the balance column and the amount will be transferred to the Patient responsibility column. If the Patient Responsibility box is NOT checked the patient responsibility WILL NOT appear in the proper column for billing the patient.

PROCESS Reviewing the Status of a Claim

On the Billing screen there is a Filter Button on the top which allows you to type in the patients last name, first name, and a date range, select the Filter Button, and any claims that have not been processed will appear. Once review of claims is complete for this patient, click the RESET button and the screen will return to the original list of claims.