Vitals

Vitals Record List

  1. Access the patient page
  2. Expand the Medical Menu
  3. Select Vitals
    Patient_Vital

Add Vitals from Vitals Widget

  1. Access the patient dashboard
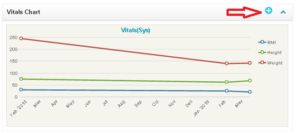
  2. Click the ‘+’ sign on the bar above the graph.Medical Menu
Plot of patient height, weight & BMI are available on the Vitals Widget
The vitals widget is available on the Patient Dashboard

ENTERING DATA:

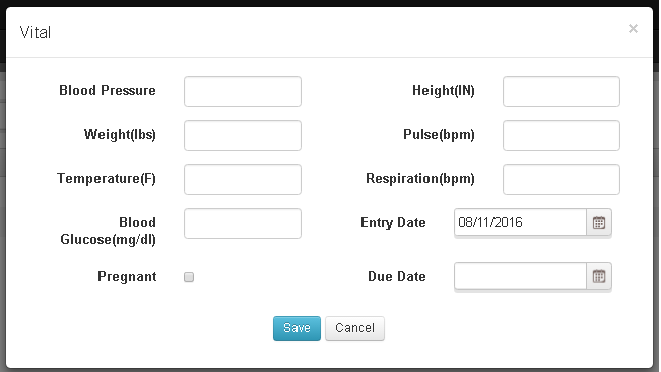
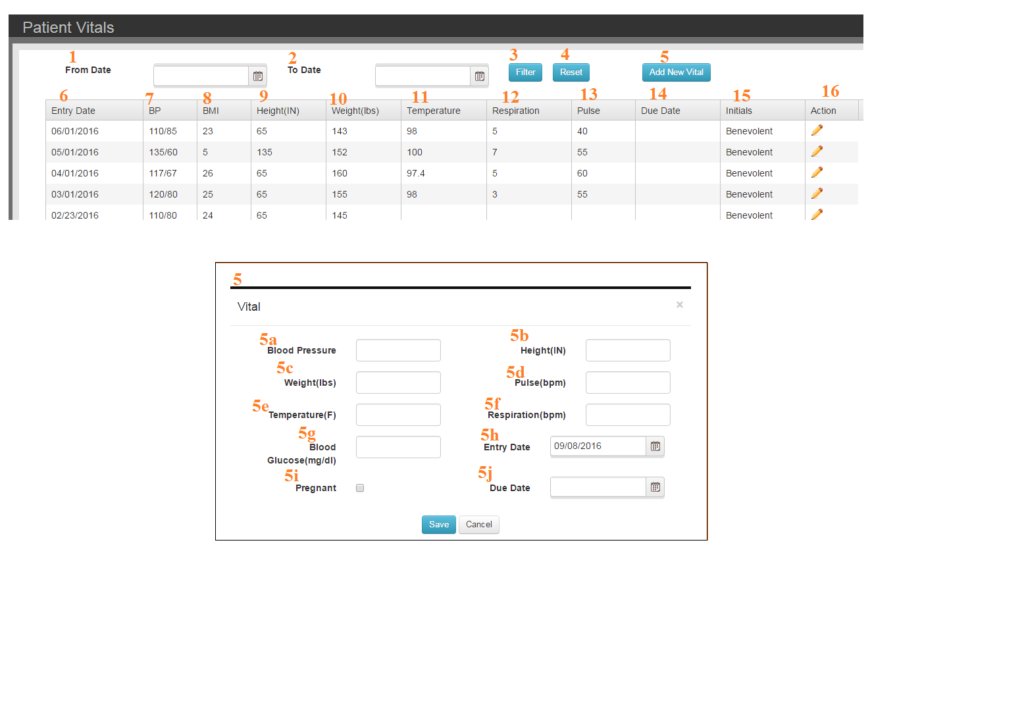
From the Vitals Record List, select the pencil icon to edit a record or the Add New Vital button to open the Vitals Entry Tool.

Vital entry tool tracks blood pressure, height, wieght, temperature, heart rate, pregnancy status, and calculates BMI automatically.
Enter and edit patient vital records using the Vitals Entry Tool

Medications

Medications

  1. Medication
  2. Strength
  3. Dosage
  4. Frequency
  5. Start Date
  6. End Date
  7. Active
  8. Entry Date
  9. NDCID
  10. Edit
  11. Delete
  12. Create (see below)

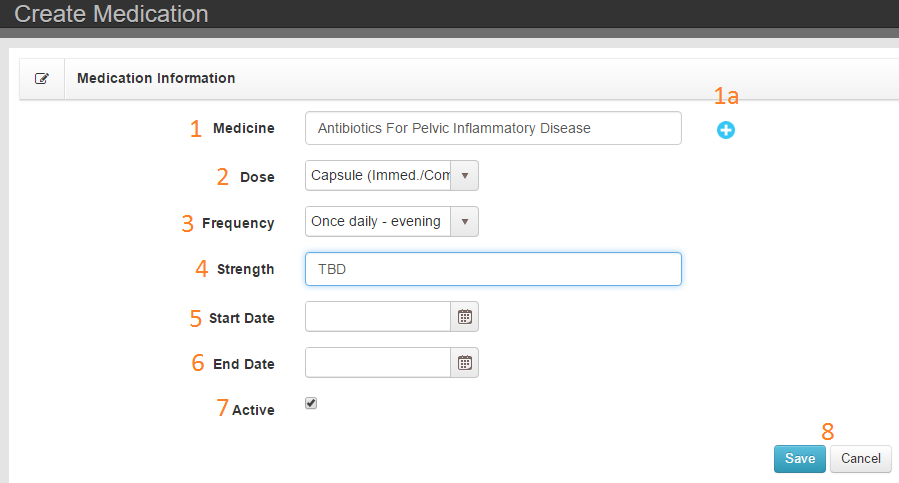
Adding a Medication

tools-medicine-create

  1. Medicine
    1. Launch Select  Medicine/Medication Tool
  2. Dose – Select Dose from drop down list
  3. Frequency – Select frequency from drop down list
  4. Strength  – Enter strength
  5. Start Date – Date patient stater taking medication
  6. End Date –  Date patient stopped taking medication
  7. Active – Patient is currently taking medication
  8. Save Button and Navigate back to Medication List

Amendments

An amendment is an official request made by the patient or patient representative. An amendment can be accepted or denied. If an amenedment is accepted it is the responsibility of the provider to update the patient record accordingly.

amendment

    Filter Values

  1. Subject
  2. Source
  3. Action Buttons

  4. Filter – Apply filters
  5. Reset – Clear filters
  6. Column Data

  7. Subject
  8. Status
  9. Source
  10. Date
  11. Time

Representative

A patient representative is a parent, guardian, caretaker or other responsible party for the patient. A patient representative can log into the patient portal to see information for the patient they care for. The patient representative can also recieve appintment reminders from Chart Talk bookings for a patient.

To enable the messagesing feATURE:

  1. Search for and open the patient record
  2. Expand Information and select Patient Representative
  3. Click Create or Edit an existing record.
  4. Tic the box for recieve reminders

*Only one representive can be selected to recieve reminders

A patient can allow other parties to access their chart as a Patient Representative

*Note – The patient needs to access the patient portal in order to give a Patient Representative access.

Creating a patient representative gives an interested party access to the same information and engagement functionality as your patients.

Setting Up a Patient Representative

It is the patient that allows access to their representative. From the Patient Dashboard select Patient Representative from the Navigation Menu

The patient can use the Create button to set up one or many representatives.
How To: Login Patient Portal as Representative

Clinic Dashboard

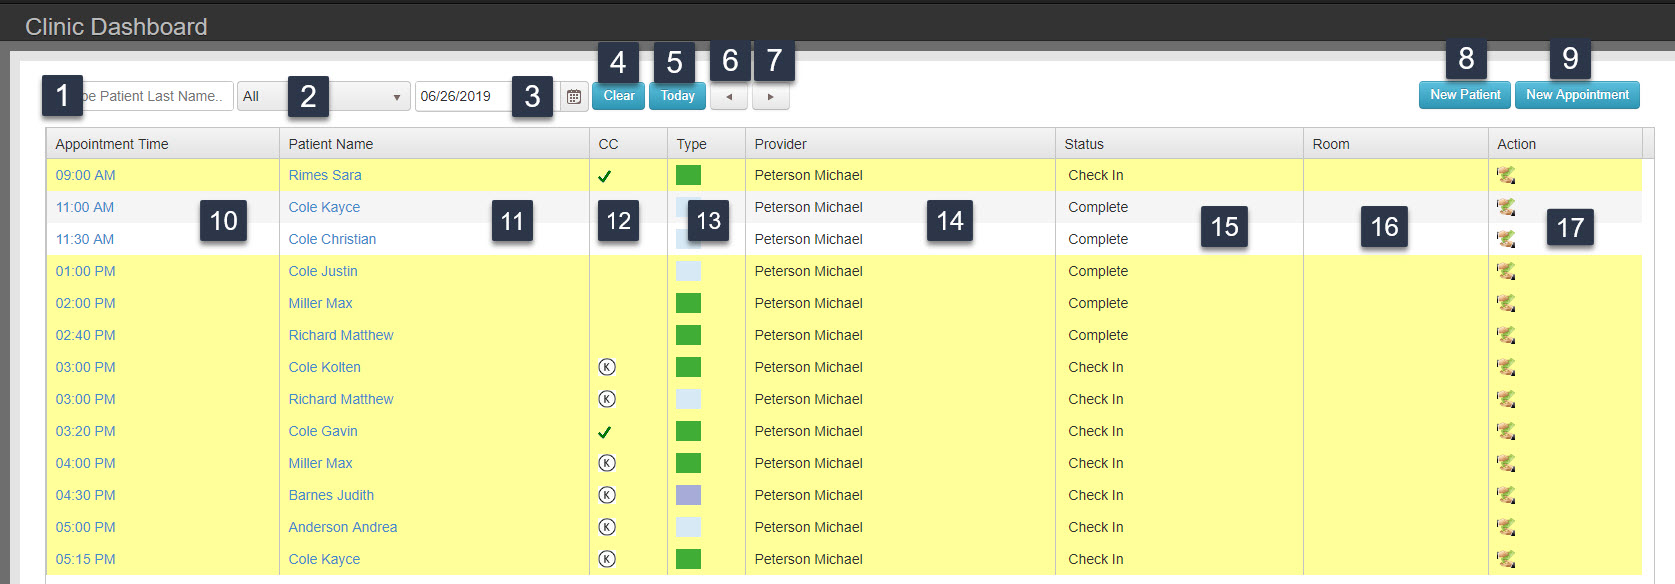
  1. Filter – By Patient Last Name, First Name
  2. Filter –  By Provider
  3. Filter – Date of Service
  4. Clear – Resets Search Values
  5. Today- Will bring you back to present day
  6. Left Arrow- Navigate to previous dates
  7. Right Arrow- Navigate to future dates
  8. New Patient (walk in or phone – quick access to add new patient to database)
  9. New Appointment
  10. Appointment Time – Clicking time takes you directly to SOAP note
  11. Patient Name- Clicking Patient name takes you directly to their general information page.
  12. CC- Chief Complaint- Click K to launch, once finished a green check mark will appear
  13. Type – Appointment Type
  14. Provider
  15. Status – Appointment Status
  16. Room – Designated area for appointment
  17. Action Button – Accept Copay (Can only be used when appointment status is ‘In Clinic’)

Column SortIf you click the header in any of the columns, the view will sort alphabetically/numerically. If you click again, the sort will be reversed. This is to allow users the freedom to navigate more easily to where they would like to be.

Patient Dashboard

NAVIGATION:

  • Main Dashboard – Click the Patients Name from the Todays Visit Widget
  • Patient Screens – Click Dashboard from the Top Selection of the Patient Navigation Menu


  1. Patient Reports – A select number of Patient Reports are available to run without having to go to the report section of Chart Talk.
  2. Vitals Chart – Clicking the Blue Plus (‘+’) icon launches a data entry tool. The Canvas Area plots height, weight & BMI over time for the patient. TROUBLESHOOTING NOTE: If height or weight was not entered then the data points will go to 0. Open Vitals from the Medical submenu and enter data, edit data point and/or re-save.*
  3. Visits – A list of all visit records. Click on the date to open a specific record. Clicking the Blue Plus (‘+’) icon launches a blank visit screen.
  4. Functional Assesment – The drop down menu list all types of functional outcome documents that the patient has filled out using the Chart Talk Patient portal. Selecting a specific document will graph the FA results in the canvas area. * A printout of this graph is available on the Patient Review Report
  5. Upcoming Appointments – All future appointments using the Chart Talk scheduler. Click the Printer and it will print out list of upcoming appointments
  6. Problems – List of all active and inactive diagnosis.
  7. Notifications –
  8. Medications – A list of active medications. Clicking the Blue Plus (‘+’) icon launches a data entry tool.
  9. File Cabinet – A list of documents in the patients File Cabinet. Drop down list filters for specific data types.

Clinic Reports

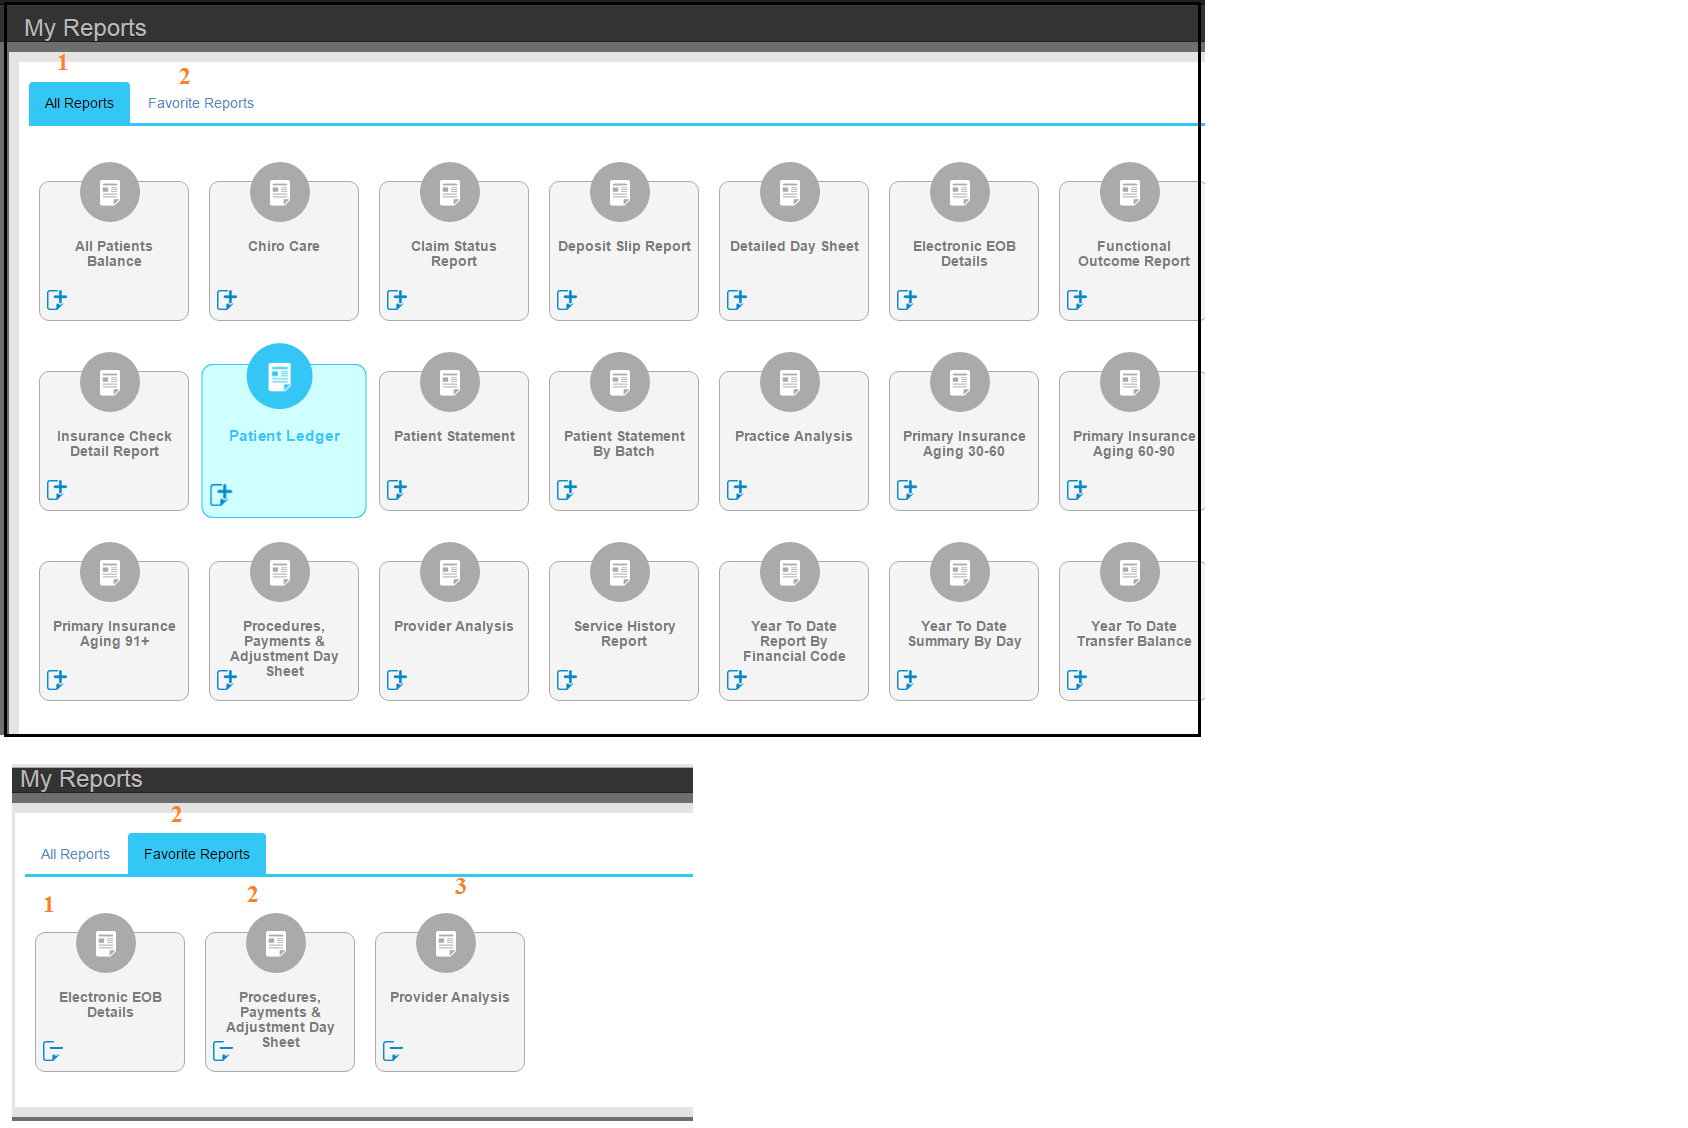
Clinic Reports can be enable or disabled for specific user roles.  Clinic reports serve functions that do not serve financial or quality reporting purposes.

Adding a report to favorites

To add a report to your favorites list, click the + on the selected report.
To remove a report from your favoties list, click the – on the selected report

Clinic Schedule

Chart Talk Chiropractic Clinic schedule for chiropractic practice management
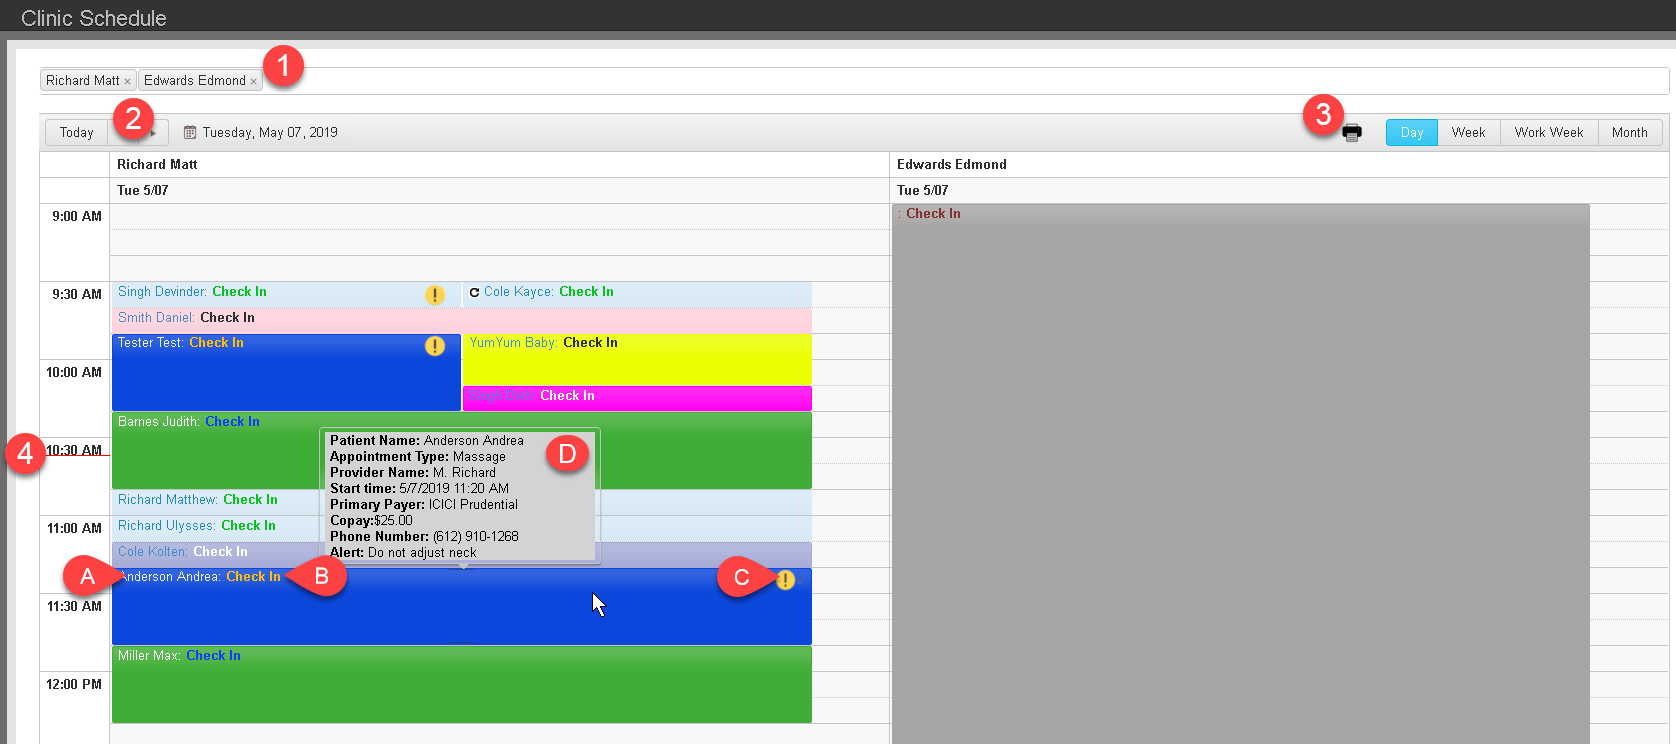
Customize the Chart Talk clinic schedule to easily see information about your workday and your patients for chiropractic, massage, physical therapy, and other appointment types.

Provider Schedule: Time breakdown can be edited using CS Config

  1. Provider List can be modified to show more/less providers by clicking the ‘x’ for less and adding more by clicking in the blank area of the bar.
  2. Date navigation: Next/Previous day using the arrows, jump to ‘Today’, or use the Claendar date selection tool./li>
  3. Schedule View: Print and change view.
  4. Red line indicates current time
    1. Appointments

    2. Patient Name
    3. Appointment Status
    4. Alert Indicator
    5. Hover Message: hold cursor over appointment to see this message

Return to Previous View

Clinic schedule will launch with the last view/date during that log in session.