TOOL PATIENT: Problem (Dx) Code

AVAILABLE ON: Visit Screen

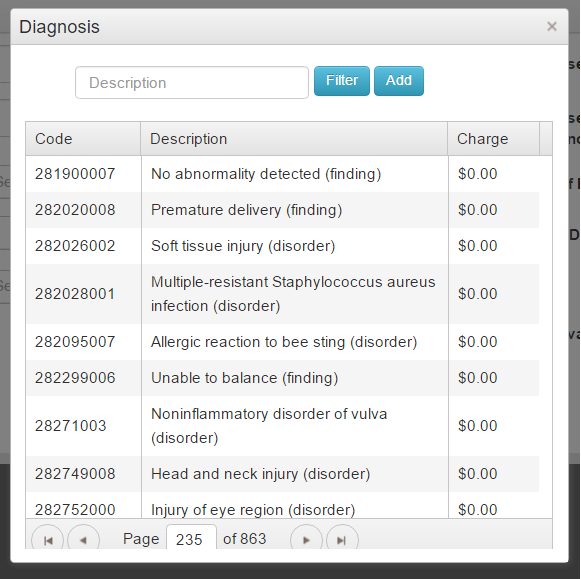
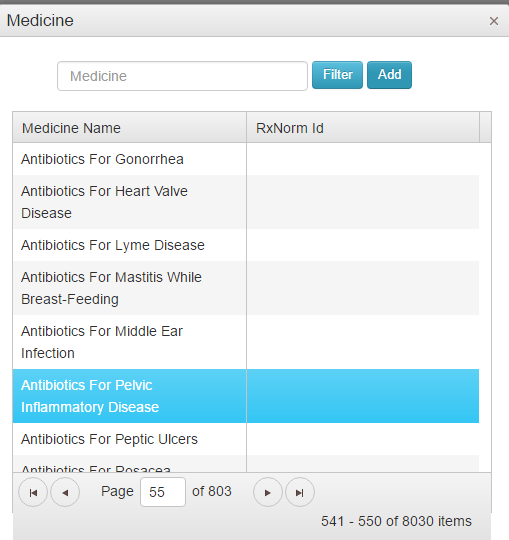
Purpose: Add one or multiple Dx codes to patient

Good to know: Adding a new problem will associate the problem with the selected Visit Type

Troubleshooting tip: If list does not show ICD10 codes, the Primary Payer is set to take ICD9 Codes. Edit the Primary Payer and return to Visit Record to add proper Dx.
tools-problem-code

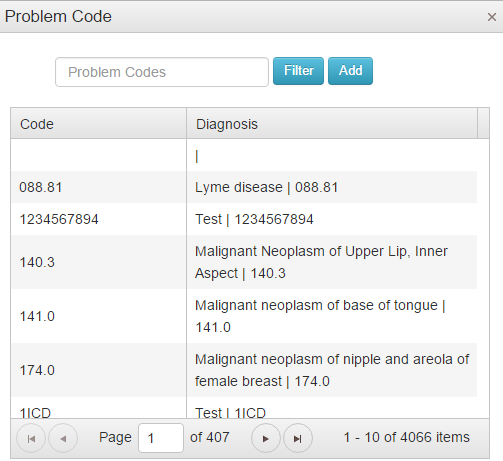
  • Filter the list by typing code into the filter box.
  • Select code by double clicking selected code in list.
  • Add multiple codes to the visit record without closing the tool.  Double click your selected code and then filter for the next code.
  • When finished, close the tool by clicking X in the upper right of the tool.

Payment Detail Tool

manage-payment-detail-tool

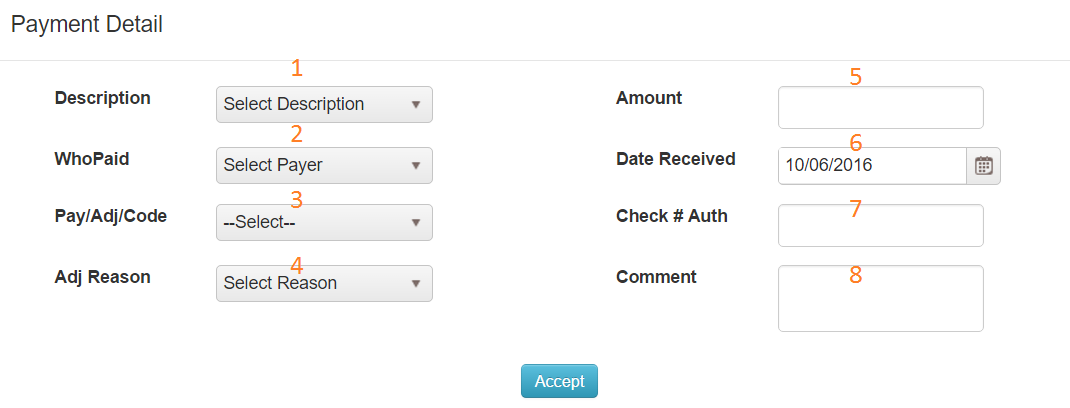
  1. Description: Payment, copayment, Adjustment are the three most common selection.  Detailed description of each option are available in our online manual at manual.mycharttalk.com
  2. Who Paid – this is a list of all payers and guarantors.  This is why it is important to at least set the patient up as their own guarantor, so you can apply payments from them.
  3. Pay/Adj/Code – options in this field will change based on the Description and WhoPaid – for payers options like Ins Check or direct deposit are available, where as a patient or guarantor will have visa, MC, cash and check as options.
  4. Adj Reason – optional field to help classify adjustment reasons .  Primarily used when evaluating payments, payers, and services quarterly or annually.
  5. Amount – The actual payment or adjustment amount.
  6. Date received – will default to the date the payment detail tool was opened .This can be backdated if needed.
  7. Check # – this field is used for the insurance check detail report and will group all payments applied to the same check number.
  8. Comment – open text for any notes on any payment or adjustment.

Manage Payments – More Info

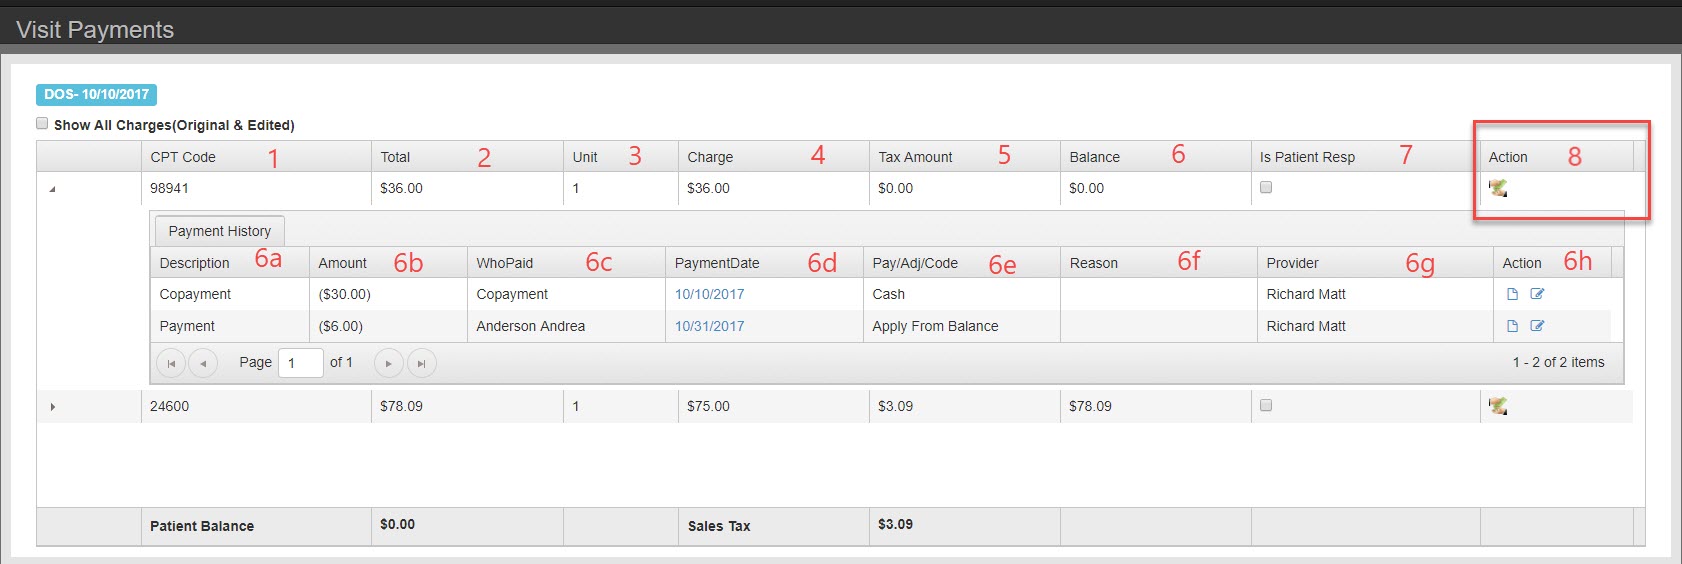
  1. The first column is procedures: CPT, Gcodes, or other office codes.  Each individual procedure is presented in a single row.  Payments and adjustments can be applied on a charge by charge basis.
  2. Total – charge x units
  3. Unit – number of units billed for the specific procedure
  4. Charge – cost per unit of service
  5. Tax amount – if the charge is taxable, the amount of tax calculated into the balance.
  6. Balance – Sum of Charge and Tax minus all payments listed in Payment History
    1. Description – Payment, Copay, or adjustment
    2. Amount – Amount applied
    3. WhoPaid – Payer or Guarantor. If co-payment tool was used it will say Co-payment
    4. Payment Date – date the payment was applied to the charge (not always the date payment was taken)
    5. Payment Adjustment Code – Further classification of payment or adjustment. Each selection available is based on the description.  For payment guarantor you have options for check, chash, visa, master card, etc. For payment from payer you have options Ins Check, direct deposit, etc.
    6. Reason – Select reason for an adjustment for practice analysis reporting
    7. Provider – Provider the charge is associated with.
    8. Action: print a receipt or edit the payment record.
  7. Is Patient Responsible – check here if patient for the remainder of charges
  8. Add payment- Apply payment per line item. You can add a new payment or apply from credit balance.
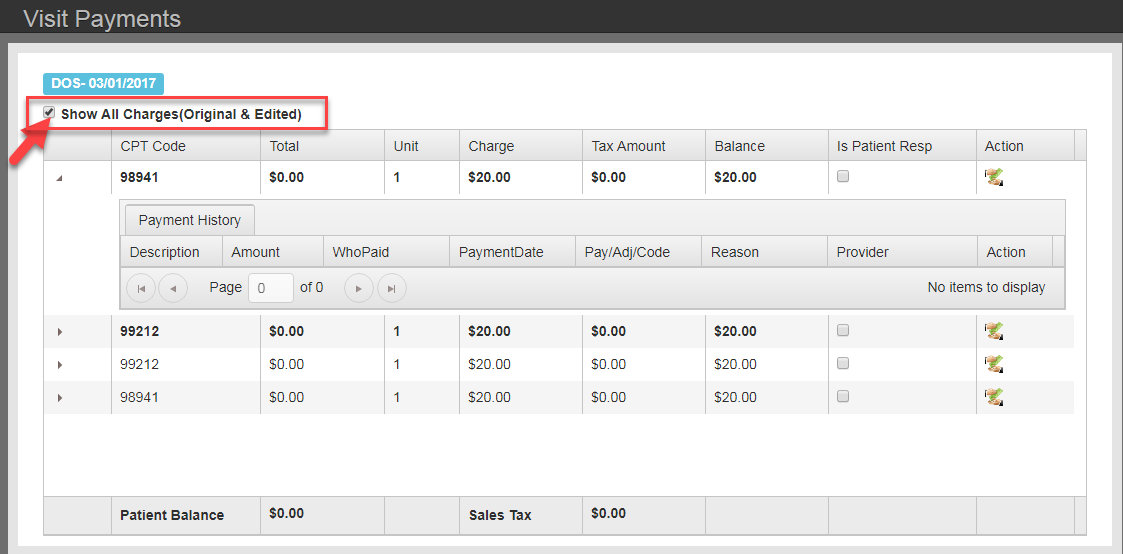
In this screen you can switch between looking at original charges or just edited charges.
The edited charges are codes that were changed in billing when creating a corrected claim.
Anything that is bold is an edited charge.

Charges

    Filters- use to search for specific visit(s) in the ‘Charges Screen’

  1. Insured/Non Insured – Display list for patients with insured type primary payers/Display list for patients with non-insured type primary payers
  2. Charge ID
  3. Last Name, First Name
  4. Actions

  5. Filter – Apply filters
  6. Reset – Clear all filters
  7. Process for billing – Process selected claim(s) for billing
  8. Data Columns

  9. Expand details
  10. Charge ID
  11. Visit Time
  12. Duration
  13. Patient Name- click it will bring you to the patients dashboard
  14. Staff Name/ Seen by
  15. Payer Name
  16. Trash Bin – Delete charge and reset appointment status or process single charge to billing.

SUBMENU: Medical

NAVIGATION:

  1. Access the patient page
  2. Expand the Medical Menu from the Patient Navigation Menu<
  3. Select the Submenu item

The Medical tab is in the Patient Navigation Menu for each Patient. By clicking on the arrow at the right side of the tab, a drop down list will display. This list includes: Problem List, Vitals, Family History, Social History, Past Illness, Hospitalization, Injuries and Medications and Allergies. Click on each tab to be able to create, review or update records.

An overview of the Medical Tab can be seen from the Dashboard Tab also. Any tab on the Dashboard that has a plus sign can have data entered through the Dashboard and will store with in the selected Medical Sub-menu.

File Cabinet

NAVIGATION:

  1. Access the patient page
  2. Select File Cabinet from the navigation menu.
Chart Talk File Cabinet Main Screen
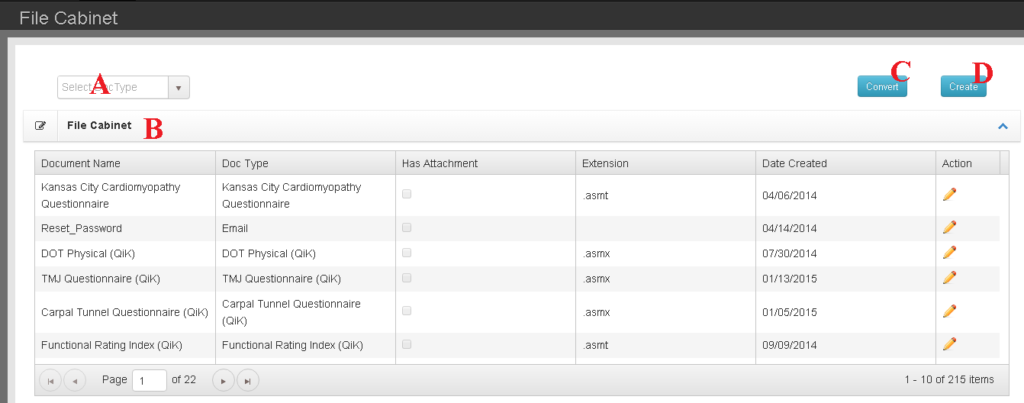
List of all documents in the patient file cabinet.

A. Drop down filter allows you to limit which documents are visible in the File Cabinet list (B).
B. The File Cabinet list shows document details as well as provides a link (pencil icon) to open the document for review, modification and printing.
C. The Convert button moves attached files from the outdated Chart Talk Desktop document structure into the supported Chart Talk Cloud architecture.
D. The create button opens a new record.

CREATE:

new file cab doc


A. Document Name- allows you to create and customize the name of your document.
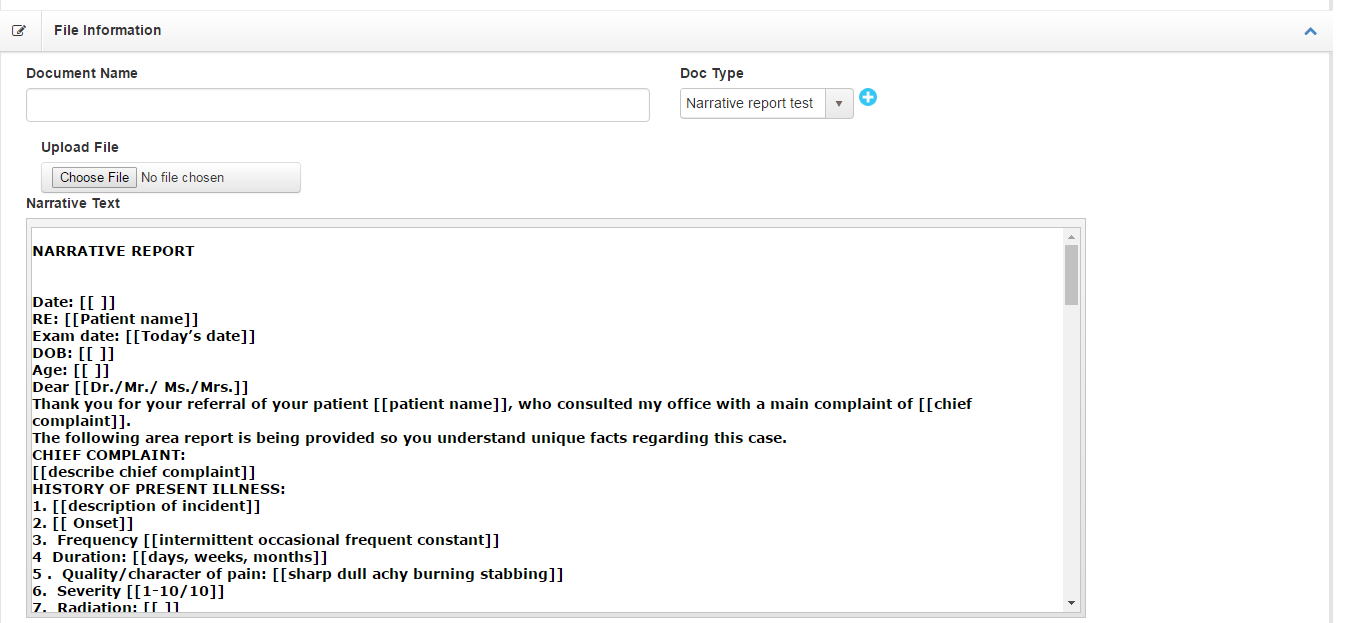
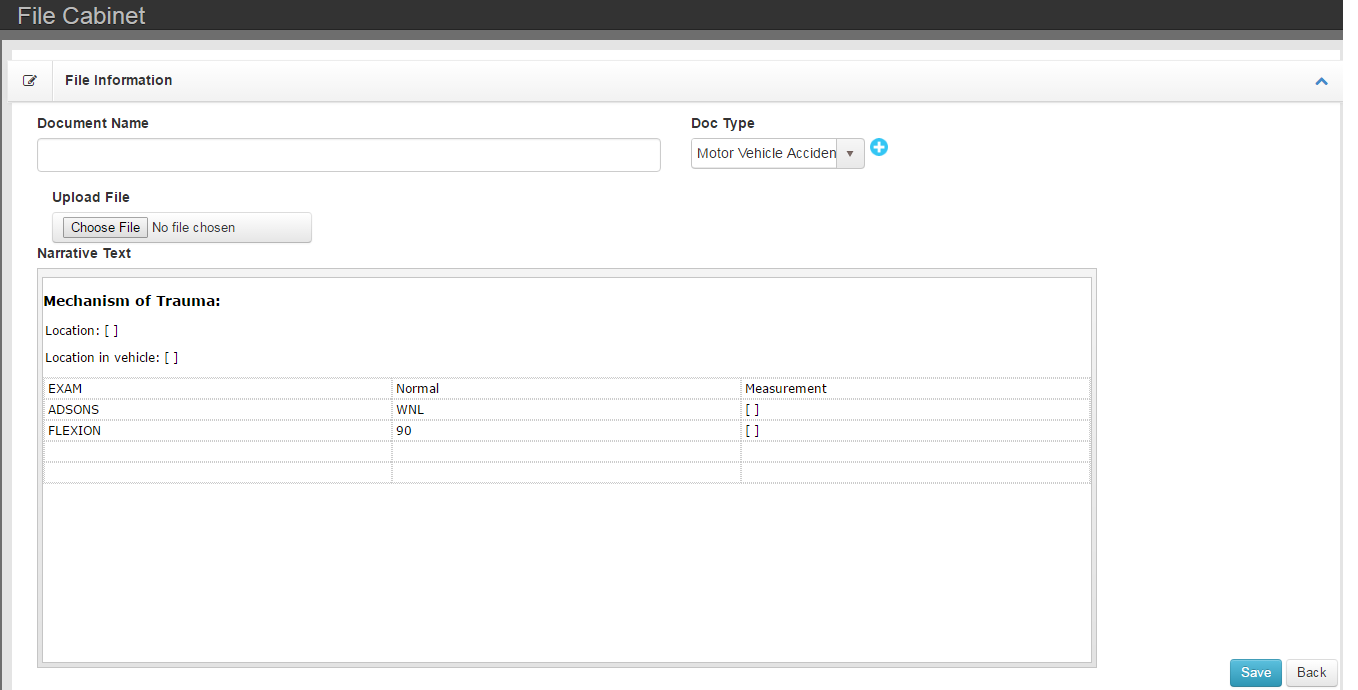
B. Document Type- list shows various pre-loaded document types or classifications. When selecting a document that is already loaded into the interface, the template previously saved will populate and allow user to customize report for the patient visit and save into their file cabinet.(see sample of narrative report and MVA report in Narrative Templates below).
C. The Upload File button allows user to upload a previously saved document from their desktop or external files.
D. Narrative text- allows the user to draft a new document from scratch.
filecab narrative report

filecab MVA report