Starting point: Get yourself familiar with navigating the Auto Post screen here: Navigation-Auto Post
While Chart Talk does a lot of the work for you, you will always have control over posting the payment. Once Chart Talk scans the ERA, you have the opportunity to review the information and choose to accept the payments and adjustments provided.
- Click Chart Talk Logo- to bring you to the main navigation menu
- Locate and click on ‘Auto Post’
The ‘Processed Claims’ screen will open. This screen will show all the claims that have received an electronic response from insurance payers (835).

RECOMMEND: for bulk checks or checks with multiple patients we recommend filtering by check after filtering will allow you to work with patients only in that check to quickly and easily apply payments.
- You can view details of the remittance by clicking ‘i’ symbol under actions.
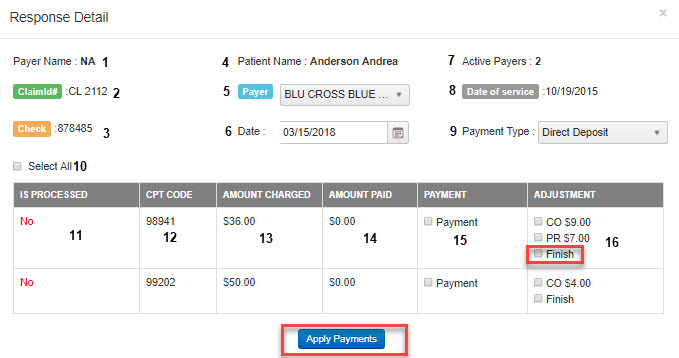
- The Response details will open.

- Payer Name: Payer name as it appears on the 835 response
- ClaimID: Chart Talk unique claim #
- Check: Insurance check # as it appears on 835 Response
- Patient Name
- Payer: payer name will always default to primary. You can select from the drop down if the payer is other than primary payer.
- Date: Select the date you want shown in manage payments and on daily reports as date payment taken. Note: defaults to today’s date
- Active Payers: Will display how many payers are active for a selected patient
- Date of Service: shown will be date of service the open response is for
- Payment Type: Select how the payment was received and how you would like the payment to be shown in manage payments and daily reports. NOTE: defaults to direct deposit
- Select All: Select all available payments adjustments. NOTE: Selects finished. Finished will mark all remaining balances as patient responsibility
- Is Processed: Yes or No if payment line item as been applied
- CPT Code
- Amount Charged: Fee charged for service listed in “CPT Code” column
- Amount paid: Amount paid by payer. Note: You may apply $0.00 payments if you would like to show in manage payments
- Payment: Check box available to select to apply amount in “amount paid” column
- Adjustment: Check box(es) available to select to apply adjustment types. NOTE:Finished will mark all remaining balances as patient responsibility. If all ALL codes marked as “finished” will put claim in finished status in the billing screen.
![]()
Apply Payments- will Apply any of the selected payments and/or adjustments.
Claim Status: 1- Processed as Primary , 2- Processed as Secondary, 19- Processed as primary, forwarded to secondary.
Secondary Claim Submission:
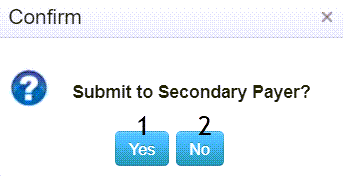
If claim status is processed as primary (1), and patient has active secondary payer, option to submit secondary will pop-up. Follow prompts.

No- Pop- up will close. Auto-Post will return to main screen.
Yes- Will launch the secondary claim tool.

Select Payer
Check/Uncheck the CPT codes to submit on claim
Select claim type- electronic,paper, download 837.
- Click Chart Talk Logo- to bring you to the main navigation menu
- Locate and click on ‘Auto Post’
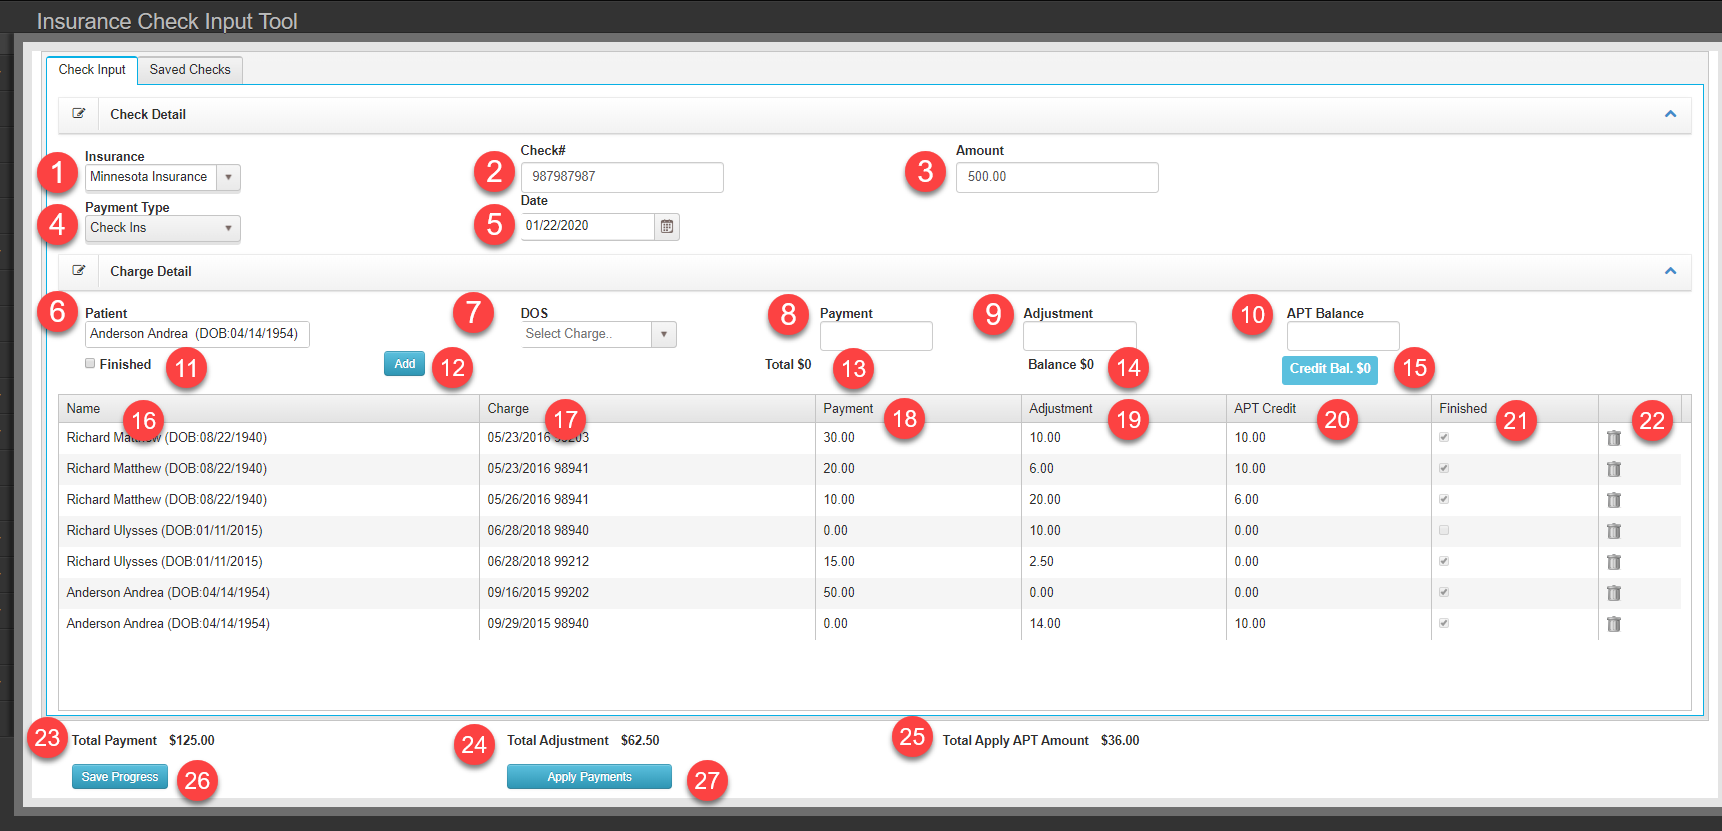
- Click ‘Check Input’. It is located on the upper right of the auto post screen.

Data Input Fields
Cloumn Details
Saved Checks Tab

-
Filters
- Check No – Filter list by check number
- Payer – Filter list by Payer
- Check Staus – By default, filter is set to Not Applied
- Filter – Apply filter value to list
- Reset – Clear filter values
- Check Date
- Check No.
- Amount
- Payment Type
- Total Patients
- Applied
- Pencil – Loads check details to Check Input tab to continue editing
Buttons
Columns – Values from saved check data